Wednesday, August 26, 2015

WebApi: Custom MediaTypeMappings in WebApi MVC 4

WebApi: Custom MediaTypeMappings in WebApi MVC 4

In this article I’ll explain about Custom MediaTypeMappings in WebApi.

Concert crowd

webApi

In this article I'll explain Custom MediaTypeMappings in the WebApi.
From the ASP.NET Web API perspective, serialization is the process of translating a .NET Common Language Runtime (CLR) type into a format that can be transmitted over HTTP. The default format is either JSON or XML
A media type formatter, which is an object of type MediaTypeFormatter, performs the serialization in the ASP.NET Web API pipeline. Consider a simple action method handling GET in an ApiController:
Employee Class Code
By default the ASP.NET Web API framework supports two media or content types: JSON and XML.If you send a request with Accept: application/json then the response message will be JSON and Content-Type will be application/json. Similarly, if you send a request with Accept: application/xml, the response message will be XML. You can also specify a quality value indicating the relative preference. The range is 0–1, with 0 being unacceptable and 1 being the most preferred. The default value is 1. For example, if you send the request header Accept: application/json; q=0.8, application/xml;q=0.9 then the response message will be XML, because application/xml has a quality value of 0.9, that is higher than the quality value of 0.8 specified for application/json.
Kindly can also visit this series of articles to learn about the WebApi:

MediaType Mapping
There is one more way by which the Conneg algorithm decides about the Response's media type and formatter. It is called MediaTypeMapping. Every MediaTypeFormatter has a collection of these mappings in it.

MediaTypeMapping provides a way for the user to add some custom logic and decide whether they would want the formatter to take part in writing the Response. This is different from the default way of just matching media type values (like “application/xml”, “application/xml”) present on the Accept and Request Content-Type headers and making decisions.

Start
Let's create a sample application and do this step-by-step.
Step 1: Let's first create a sample web application using an ASP.NET MVC 4 Web Application and name it as you choose; I used WebApiDemo as shown in the image below:
Create MVC 4 App
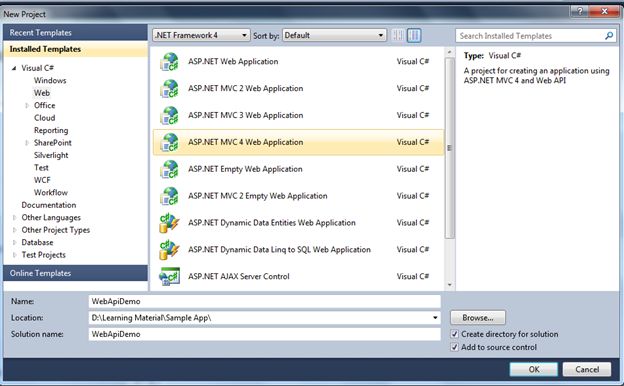
Step 2: Click OK and choose the Web API option from the templates shown in the wizard window.
Web API Project Template
Step 3: You'll find the application structure as shown below at first sight.
Application Structure
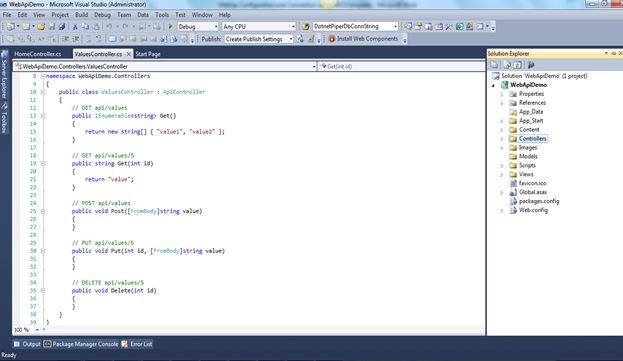
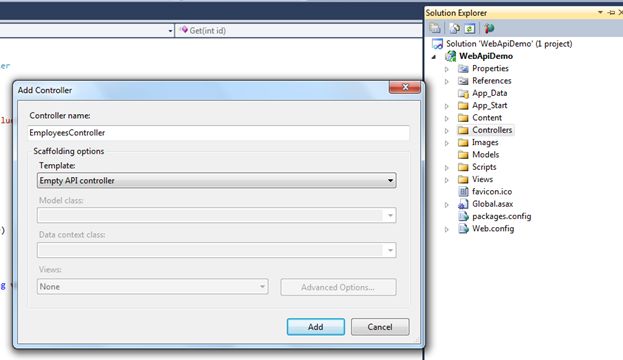
Step 4: Right-click the Controllers folder in the Solution Explorer of Visual Studio. Select "Add" ➤"Controller" and provide a name of EmployeesController for the controller. Leave the option Empty API Controller selected in the Template dropdown and click "Add", as shown in the figure below. Notice that the generated controller class inherits from ApiController, a class that is part of the ASP.NET Web API framework. Kinldy add the following code into the EmployeesController class.


  1: public static IList<Employee> listEmp = new List<Employee>()
  2:         {
  3:             new Employee()
  4:                 {
  5:                     ID =001, FirstName="Sachin", LastName="Kalia",Department="Engineering"
  6:                 },
  7:                 new Employee()
  8:                 {
  9:                     ID =002, FirstName="Dhnanjay" ,LastName="Kumar",Department="Engineering"
 10:                 },
 11:                 new Employee()
 12:                 {
 13:                     ID =003, FirstName="Ravish", LastName="Sindhwani", Department="Finance"
 14:                 },
 15:                 new Employee()
 16:                 {
 17:                     ID =004, FirstName="Amit" ,LastName="Chaudhary",Department="Architect"
 18:                 },
 19:                 new Employee()
 20:                 {
 21:                     ID =004, FirstName="Anshu" ,LastName="Aggarwal",Department="HR"
 22:                 },
 23:         };
Adding Controller

Step 5: Right-click the Models folder in the Solution Explorer of Visual Studio. Select "Add" -> "Class"
to add a new class with a name of Employee.
Adding Class
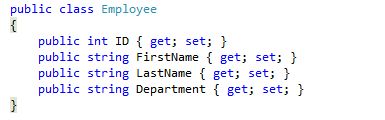
After creating the Employee class, kindly add the following code into this class.

Employee Class
Now I've added a class CustomMediaTypeMapping that checks if the Request has an “AcceptLanguage” Header called “en-FR”. If it finds the header, then it would inform the Conneg algorithm that it's a full match and that the media type formatter having this MediaTypeMapping is ready to write the response.

Class Code
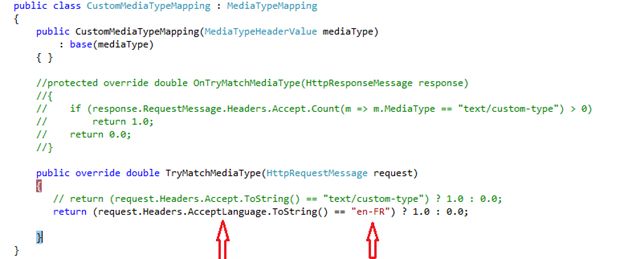
Note: If you notice, we've overridden TryMatchMediaType that takes HttpRequestMessage and returns “The quality of the match. It must be between 0.0 and 1.0. A value of 0.0 signifies no match. A value of 1.0 signifies a complete match”.

Thinking
Now the question arises, which MediaTypeFormatter will respond to such a MediaTypeMapping. The answer is, add the line given below to the WebApiConfig.cs file placed in the App_Start folder.

Config
It means that whenever a request has Accept-Language: en-FR, JsonFormatter will respond to such a request to the client.

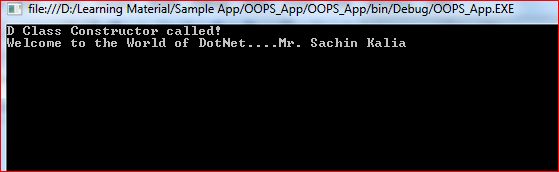
Press F5 and run your application; it will show the following image:

MVC 4 Home Page
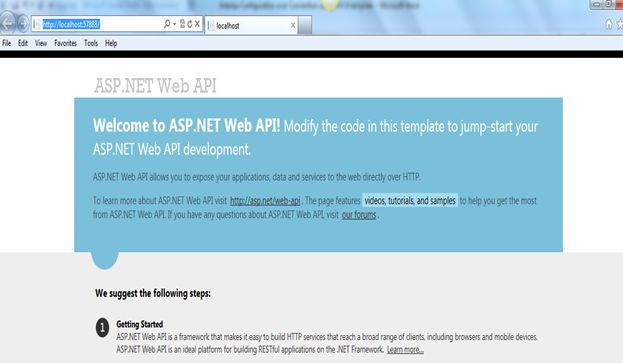
Great; the WebApi is up and running.
Now I paste the following URL http://localhost:57888/api/employees/1 into Fiddler and press execute. It responded in application/xml because it has a quality factor of 0.9 that is more than others in the Accept header field as depicted in the following image.
Inspectors

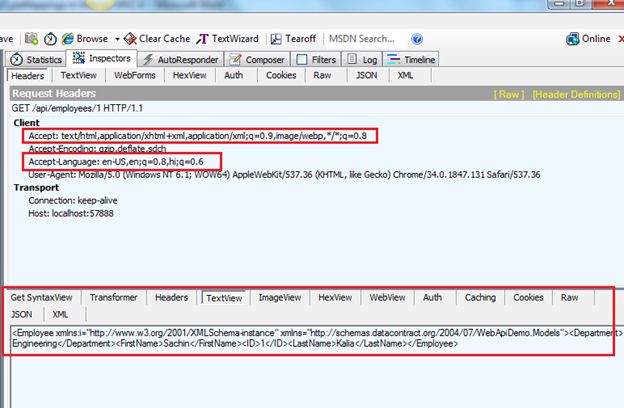
Now I make a slight change to the URL request. Paste the following URL into Fiddler with the same Accept header though this time I have changed the Accept-Language to “en-FR”. Kindly have a look at the image given below:
Parsed
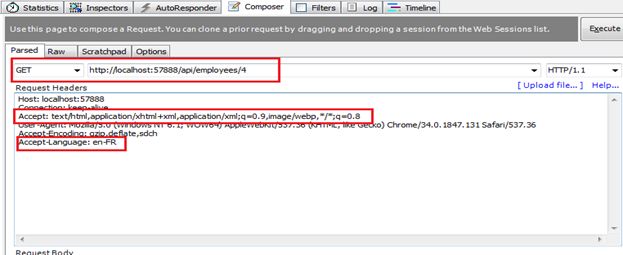
This time we expect the result in application/json format. Press the execute button.
Output
Headers

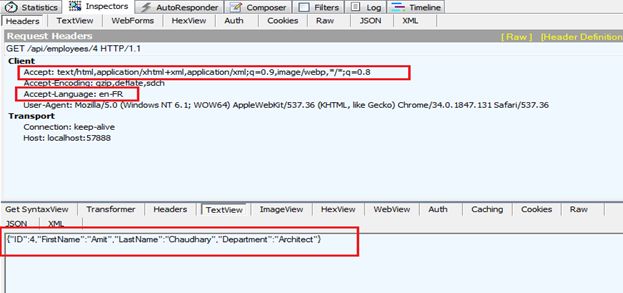
It responds with a CustomMediaTypeMapping that we've registered in JsonFormatter in WebApiConfig.

Like
Conclusion
In this article we looked into CustomMediaTypeMapping of the WebApi and a way to register with MediaTypeFormatter. I hope you enjoyed this demonstration.

I hope it will help you somewhere down the line. Keep coding and Smile.
Thanks
Sachin Kalia

Return Multiple Models in single View in MVC4

Return Multiple Models in single View in MVC4
 
Concert crowd

As Exploring MVC more, today I am going to share one the interesting fact about MVC 3 to use multiple models in single view.
I belief this is one the interesting fact about MVC, which may be in use on regular basis. Because in today’s world generally we don’t keep data into single place/model.
So Let’s Go:
To move on I’d like to share little bit about MVC (Model-View-Controller) with excerpts.
Controller
Controllers are the heart of MVC. A controller handles some of the main work of the application, such as:
  • It handles the User Input.
  • It handles the User Interaction.
  • It reads the data from the View.
  • Then it sends the data read to the Model.
In simpler manner you can say that it receives the request from the user and sends it to the Model, and then the Model retrieves the related data from the database and sends the result to the View. A controller can be associated with multiple view means we can define multiple actions in controller and according to action associated view show. It is similar to Business Layer of 3-tier architecture. It is main part of MVC architecture.
View
View is simply used to display the data; it is the Graphical Data Representation. "Model sends the output to the View then the View displays the data to the end user", so it works like a bridge between the Model and the End User. Often the views are created from the model data.
Model
A Model handles the logic for the application data; it implements the Data Domain logic. A Model is associated with Views and Controller. It produces updated output on view. Often model objects retrieve data from database and store data to database. The Database Connection is part of the model and it provides the output requested by the user.
A typical Diagram of MVC:
clip_image001
Now we move ahead and discuss the code agenda of this article.
Step 1.
I’ve created a Model class named as GuestResponse having the code snippet:
clip_image003
Step 2.
Whenever we hit any Url into browser it generally goes into any controller and controller performs its action and returns its model to view, I have HomeController for this purpose and the code shown in below depict image:
 
clip_image005
Let’s discuss the code snippet in above given image.
At the first place I created an object of ParentModel class like:
ParentModel objParent = new ParentModel();


Later created an object of GuestResponse model class, which is of List type having some values as given below in code snippet?


   1:  List<GuestResponse> objGuestResponse = new List<GuestResponse>();
   2:   
   3:  objGuestResponse.Add(new GuestResponse { Name = "Sachin Kalia", Email = "Sachin@sachin.com", WillAttend = true });
   4:   
   5:  objGuestResponse.Add(new GuestResponse { Name = "Ravish Sindhwani", Email = "Ravish@Ravish.com", WillAttend = true });
   6:   
   7:  objGuestResponse.Add(new GuestResponse { Name = "Dhananjay Kumar", Email = "Ravish@Ravish.com", WillAttend = true });
   8:   


and passed its object to ParentModel as given below:
objParent.GuestResponse = objGuestResponse;
 
The same flow for the GuestCheck model class which is also of List type having some values as given below in code snippet?


List<GuestCheck> objGuestCheck = new List<GuestCheck>();
 
objGuestCheck.Add(new GuestCheck { GuestName = "Sachin Kalia", GuestPhone = "9911635975" });
 
objGuestCheck.Add(new GuestCheck { GuestName = "Ravish Sindhwani", GuestPhone = "7666666786" });
 
objGuestCheck.Add(new GuestCheck { GuestName = "Dhananjay Kumar", GuestPhone = "7667877786" });


And passed its object to ParentModel as given below:

 
Steps to move ahead and create an object of ParentModel ,the under given image is self-descriptive:
clip_image007
 
Step 3. The another step is to create View named as RsvpForm.cshtml having the following code snippet.


   1:  @using (Html.BeginForm())
   2:  {
   3:  <h2 style="background-color:Lime" color:"red">EmpRegistration</h2>
   4:   
   5:  foreach (var item in Model)
   6:  {
   7:   
   8:  <tr>
   9:   
  10:  @for (int i = 0; i < @item.GuestResponse.Count; i++)
  11:  {
  12:  <td>
  13:  <table><tr>
  14:  <td> @item.GuestResponse[i].Name @item.GuestResponse[i].Email @item.GuestCheck[i].GuestPhone ||</td>
  15:   
  16:  @Html.Raw(HttpUtility.HtmlEncode(Environment.NewLine))
  17:   
  18:  </tr></table>
  19:  </td>
  20:  }
  21:   
  22:  @*@Html.DisplayFor(modelItem => item.GuestResponse[1].Email.ToString())*@
  23:   
  24:  </tr>
  25:   
  26:  }
  27:   
  28:  }
  29:   


@model IEnumerable<MVCSample.Models.ParentModel>: If you notice at this line you will examine this model is of IEnumerable type which we’ve returned from HomeController class.

And another most important fact is about the Model collection at time of iteration in foreach loop:
clip_image008
It gives you the collection of both model classes, which we look for:
Step 4:

Now time to run you application and Press F5 .You will see the following depict image.

clip_image010

Ignore this and paste the following URL in your browser window: http://localhost:60346/Home/Rsvpform
The output will be:
clip_image012
I tried to keep it simple to understand the fact in easier manner.
You can download the code from here Return Multiple Models in Single View in MVC3
Enjoy Coding and stay Happy Smile

Monday, August 17, 2015

Aggregation Vs Composition: A Simple Practical Approach

This article explains the real facts of Aggregation and Composition and I feel it would be a good brain teaser if I come with some actual examples.

Before proceeding I'd like to share one of the possible situations that you may encounter in your daily need or maybe in an interview. Let's dive into it in a practical way.
The question is, "What is the difference between composition and aggregation?" In this article I'll provide my understanding of composition and aggregation.
The following image is fictional and it may be one of the possible scenarios with warrior's fight.

Aggregation Vs Composition
Aggregation
Aggregation means “The act of gathering something together”.
As inheritance gives us an "is-a" and composition gives us a "part-of" whereas aggregation gives us a "has-a" relationship.
For example, a mobile “has an” operating system. Aggregation doesn't manage the lifetime of other objects. For an example, mobile uses (has-an) operating system that may be of a different service provider. like Android, iOS and Windows. Here Aggregation theory says that a mobile has an operating system of a specific service provider.
Aggregation diagram is shown as a UML diagram with unfilled diamond notation as depicted below:
Aggregation
The preceding diagram states that a Mobile class may utilize an operating system from a different service provider. A mobile is not directly dependent on an operating system class. Both are independent entities. For example a Samsung is a mobile provider whereas an Android is a Google Product.
A code snippet shown below that is an OperatingSys object is injecting into the Mobile class at the constructor level. The creation of the OperatingSys class is entirely independent from Mobile Creation. Kindly have a look at the code segment as shown below:

  1: public class Mobile
  2: {
  3:     public OperatingSys objOS;
  4:     public Mobile(OperatingSys objOperatingSys)
  5:     {
  6:         this.objOS = objOperatingSys;
  7:     }
  8:     public string MobileName { get; set; }
  9:     public string OperatingSystem { get; set; }
 10:     public string GetMobileDetails()
 11:     {
 12:         return objOS.OSName() + " Used by " + MobileName;
 13:     }
 14: }
 15: 
 16: public class OperatingSys
 17: {
 18:     public string OS { get; set; }
 19:     public string OSName()
 20:     {
 21:         return "This is Android OS being";
 22:     }
 23: }
 24: 
 25: class Program
 26: {
 27:     static void Main(string[] args)
 28:     {
 29:         OperatingSys objOperatingSys = new OperatingSys();
 30:         Mobile objMobile = new Mobile(objOperatingSys);
 31:         objMobile.MobileName = "Samsung";
 32:         Console.WriteLine(objMobile.GetMobileDetails());
 33:         Console.ReadLine();
 34:     }
 35: }
 36: 
Composition
Composition means mixture of ingredients.
Composition gives us a "part-of" relationship or a mixture of ingredients. Composition is a higher degree of association than aggregation. Composition derives the management of the objects and its lifecycle. In case of composition the lifetime of the owned object is the responsibility of the owner object. Composition is shown on a UML diagram as a filled diamond as depicted below in the screen.
Composition
As you can see in the example code snippet below, Mobile manages the lifetime of DisplayScreen, since the DisplayType object depends on the Mobile object. If Mobile is garbage collected, the DisplayType object is also garbage collected.

  1: public class Mobile
  2: {
  3:     public string MobileName { get; set; }
  4:     public string DisplayType { get; set; }
  5: 
  6:     public Mobile()
  7:     {
  8: 
  9:     }
 10: 
 11:     public string GetMobileDetails()
 12:     {
 13:         return this.DisplayType + " Used by " + this.MobileName;
 14:     }
 15: }
 16: 
 17: public class DisplayScreen
 18: {
 19:     public static string ScreenType()
 20:     {
 21:         return "This LED screen display";
 22:     }
 23: }
 24: 
 25: class Program
 26: {
 27:     static void Main(string[] args)
 28:     {
 29:         // OperatingSys objOperatingSys = new OperatingSys();
 30:         Mobile objMobile = new Mobile();
 31:         objMobile.MobileName = "Samsung Galaxy Mobile";
 32:         objMobile.DisplayType = DisplayScreen.ScreenType();
 33:         Console.WriteLine(objMobile.GetMobileDetails());
 34:         Console.ReadLine();
 35:     }
 36: }
 37: 
Output
Output

Note: It might be one of the questions in an interview.

Tuesday, August 11, 2015

Extend Sealed Class in C# Using Extension Method - A Simple Approach

image

Here we will extend sealed class in C# using extension method.
Requirement - What is sealed. Can we derive this? If yes, then how we can achieve this?
Friends this is one of the possible situation which you may confront in your daily need or may be in an interview. Let’s dive it into in practical way.
Sealed classes are used to restrict the inheritance feature of object oriented programming. Once a class is defined as a sealed class, the class cannot be inherited.
In C#, the sealed modifier is used to define a class as sealed. In Visual Basic .NET theNotInheritable keyword serves the purpose of sealed. If a class is derived from a sealed class then the compiler throws an error.
Sealed Methods and Properties

You can also use the sealed modifier on a method or a property that overrides a virtual method or property in a base class. This enables you to allow classes to derive from your class and prevent other developers that are using your classes from overriding specific virtual methods and properties.
Here we are not directly extending the functionality using the inheritance feature. We can achieve this with help of an extension method. The following is the code declaration with practical hands on.
Note: You should have knowledge of extension method in order to implement this.

  1: public sealed class DotnetPiper  
  2: {  
  3:     public DotnetPiper()  
  4:     {  
  5:         Console.WriteLine("D Class Constructor called!");  
  6:     }  
  7:    public void DotnetPiperInstanceMethod()  
  8:     {  
  9:         Console.WriteLine("DotnetPiper is Called!");  
 10:     }  
 11: }  
 12: public class DotnetPiperExtension : DotnetPiper  
 13: {  
 14:   
 15: }  

As soon as we build our solution we will get the following error:
Error 1 'OOPS_App.DotnetPiperExtension': cannot derive from sealed type,

Erro

I have created an extension class which keeps a method to extend the functionality of sealed class.

  1: public static class DotnetPiperExtension  
  2: {  
  3:     public static string DotnetPiperExtentionMethod(this DotnetPiper objDotnet, string str)  
  4:     {  
  5:         return "Welcome to the World of DotNet....Mr. " + str;  
  6:     }  
  7: } 
Please have a look at the following image:

method


Here I am calling an extension method in main class:

  1: class Program  
  2: {  
  3:     static void Main(string[] args)  
  4:     {  
  5:         DotnetPiper dp = new DotnetPiper();  
  6:         string nameStr = dp.DotnetPiperExtentionMethod("Sachin Kalia");  
  7:         Console.WriteLine(nameStr);  
  8:         Console.ReadLine();   
  9:     }  
 10: }  

Output:

CMD


Complete code for hands on:


  1: {  
  2:     public DotnetPiper()  
  3:     {  
  4:         Console.WriteLine("D Class Constructor called!");  
  5:     }  
  6:    public void DotnetPiperInstanceMethod()  
  7:     {  
  8:         Console.WriteLine("DotnetPiper is Called!");  
  9:     }  
 10: }  
 11:   
 12:   
 13: public static class DotnetPiperExtension  
 14: {  
 15:     public static string DotnetPiperExtentionMethod(this DotnetPiper objDotnet, string str)  
 16:     {  
 17:         return "Welcome to the World of DotNet....Mr. " + str;  
 18:     }  
 19: }  
 20:   
 21:   
 22: class Program  
 23: {  
 24:     static void Main(string[] args)  
 25:     {  
 26:         DotnetPiper dp = new DotnetPiper();  
 27:         string nameStr = dp.DotnetPiperExtentionMethod("Sachin Kalia");  
 28:         Console.WriteLine(nameStr);  
 29:         Console.ReadLine();  
 30:   
 31:                 }  
 32:        }  


Note: It might be one of the FAQ in an interview.

Note: Please share you opinion and advise us for better approach also.I really appreciate you initiation Smile

To know more MVC and WebApi Kindly go through with these links

MVC Articles & WCF and WebApi

Thanks.
Enjoy coding and reading

Saturday, August 8, 2015

JQuery Interview question and answer with practical: Part 1


image

Question: What is jQuery?
Ans: JQuery is fast, lightweight and feature-rich client side JavaScript Library/Framework which helps in to traverse HTML DOM, make animations, add Ajax interaction, manipulate the page content, change the style and provide cool UI effect. It is one of the most popular client side libraries.


Question: How JavaScript and jQuery are different?
Ans: JavaScript is a language while jQuery is a library built in the JavaScript language that helps to use the JavaScript language.

Question: Which is the starting point of code execution in jQuery?
Ans: The starting point of jQuery code execution is $(document).ready () function which is executed when DOM is loaded.

Question: Document Load Vs Window.Load() Jquery

Ans: Kindly have a look on detailed video demonstration as shown below:

Document Load Vs Window.Load() JQuery

$(document).ready()function is different from body window.load() function for 2 reasons.

We can have more than one document.ready () function in a page where we can have only one body onload function.

document.ready() function is called as soon as DOM is loaded where body.onload() function is called when everything gets loaded on the page that includes DOM, images and all associated resources of the page

Question: What is difference between prop and attr?

Ans:

JQuery.attr()

Get the value of an attribute for the first element in the set of matched elements.

Whereas,
JQuery. Prop ()

Get the value of a property for the first element in the set of matched elements.

What actually is Attributes?


Attributes carry additional information about an HTML element and come in name=”value” pairs. You can set an attribute for HTML element and define it while writing the source code.
E.g.

<input id="txtBox" value="Jquery" type="text" readonly="readonly" />

As shown above “id”, "type”, “value" are attributes of the input elements.
Property:

Property is a representation of an attribute in the HTML DOM tree. Once the browser parse your HTML code, corresponding DOM node will be created which is an object thus having properties.
in above case ,once browser renders the input in browser other properties like align, alt, autofocus, baseURI, checked so on will be addedas depicted in below image.


clip_image002


Since, attr() gives you the value of element as it was defines in the html on page load. It is always recommended to use prop() to get values of elements which is modified via JavaScript/JQuery in browser on rumtime.it always keeps the current state value.

Here we’ll have a look on the example which also states the difference b/w both of them.

I’ve html text box having some attributes as shown below:


clip_image003


If I run the following JQuery syntax it will produce such result.


clip_image005

Now I’ve slightly changed the code and removed the read-only attribute as shown below in image:


clip_image006


I run the application and see some attribute and property to understand the difference on fly.

Initially after running the application we have these attributes and property of input text type as depicted in image below:

Note: Kindly scroll down when you run the attached sample application to see the Value property using firebug tool of Firefox browser.


clip_image008

Now I changed the value on runtime and see the attributes and property. I’ve put Welcome JQuery in textbox. Now see that attribute value is still JQuery while value property has been changed to Welcome JQuery.

clip_image010

The property always represents the current state while the attribute (except in old versions of IE) represents the initial state or is meant for html attributes as they are strictly defined. the attribute tells you nothing about the current state.

Reference MSDN:

1. for a checkbox (jquery 1.6+)

1

2

3

4

5

<input id="check1" checked="checked" type="checkbox" />

.attr('checked') //returns  checked

.prop('checked') //returns  true

.is(':checked') //returns true

Prop() method returns Boolean value for checked, selected, disabled, readOnly..etc while attr returns defined string. So, you can directly use .prop(‘checked’) in if condition.

2. SelectedIndex, tagName, nodeName, nodeType, ownerDocument, defaultChecked, and defaultSelected..etc should be retrieved and set with the .prop() method. These do not have corresponding attributes and are only properties.

3. .attr() calls .prop() internally so .attr() method will be slightly slower than accessing them directly through .prop().

Question: What is the difference between .js and .min.js and vsdoc.js?
Ans: jQuery library comes in 2 different versions Production and Deployment. The deployment version is also known as minified version. So .min.js is basically the minified version of jQuery library file. Both the files are same as far as functionality is concerned. but .min.js is quite small in size so it loads quickly and saves bandwidth.


clip_image012


Question: How to select id which contains Meta Character.

Ans: If any element id (<li id="first-li" class="list">Sachin Kalia</li>) contains meta character in between the id then it should be resolved using the two backslashes (\\) as prefix in ID selector.


clip_image013

Question: Difference between and Usages of Html(),Text() and Val() functions in JQuery.

Ans : one of my friend interviewed in a company last day and confronted a question which I found little interesting though its very basic in nature. This is the actual content as shown below: 

  1: <div id="DivOne" class="oddNum">Div One Called !!
  2:     <span id="span">This is span value</span>
  3:     <span id="span">This is span value2
  4:         <p>I m paragraph of span 2</p></span>
  5:     <span id="span">This is span value3</span>
  6: </div>
  7: <div id="DivTwo" class="evenNum">Two</div>
  8: <div id="DivThree" class="oddNum">Three</div>
  9: <button id="btnOne">Reset odd numbers</button>
 10: <button id="btnTwo">Reset even numbers</button>
 11: <input type="text" id="txtBox" value="This is Text Box"></input>


Interviewer wanted an answer using Html(),Text() and Val().So here I’ve tried to get value using all three methods. When I initially use .Html() function it gives me all inner elements of particular div or an element you choose.This is the code base I’ve used as depicted below:

  1: $('.oddNum').css('background-color', '#DEA');
  2: $('#DivTwo').css('background-color', '#FCC');
  3: 
  4: $('#btnOne').click(function() {
  5:     // Action goes here
  6:    var result = $('#DivOne').html();
  7:     var resultText = $('#txtBox').val();
  8:     
  9:     alert(result);
 10:    // alert(resultText);
 11: });
 12: $('#btnTwo').click(function() {
 13:     // Action goes here
 14:     $('#DivTwo').css('background-color', '#FFF');
 15: });

This is the initial look of the elements in browser as given below in image:


image


Case 1 : As soon as I click on the button Reset off numbers”  and keeps var result = $('#DivOne').html();  enable in code, it gives me following result set shown below in image:

  1:  var result = $('#DivOne').html();
  2:  alert(result);

Output:


 image 


Case 2. However if we put given below code than it gives us the result as text value of each inner elements also shown in image below to code segment.

  1: var result = $('#DivOne').text();
  2: alert(result);

Output:


 image


Case 3. However if we put given below code than it gives us the result as text value of each inner elements also shown in image below to code segment.

  1:  var result = $('#DivOne').val();
  2:  alert(result);

Output will be blank dialog box :


 image


But if we execute same code with any “input” type element than div,span and paragraph elements than it gives me result as shown below in code


image


This specify  that val() function of JQuery works on input type elements than normal dom html elements.


This is the main difference between all of them .html(), .text() and .val().


ThanksSmile


Keep coding and Smile Smile