Showing posts with label MVC. Show all posts

Wednesday, October 26, 2016

Developing Book My Seat Application In AngularJS And ASP.NET - WebAPI Methods - Part Two

Here, I’ve merely thought to write my thoughts about hands-on Angular. This is my first article which tells you how to get your hands dirty with AngularJS & ASP.NET WEBAPI and SQL Server BookMySeat Application Tutorials.

This is the technology stack for this BookMySeat library application, as shown below:

In the first article, I shared the technology and other brief information about components used. In this article, will look into WebApi creation and route to configure that.
This is an initial look at the WebAPI controller defined in Solution Explorer as depicted below:

If you open this file, you will have around 6 methods which have generic names to perform the operations and easy to understand.These WebAPI methods are given below:


The complete code for all APIs is given below.

  1. public class BookMySeatAPIController : ApiController 
  2.     { 
  3. //
  4. // GET: /BookMySeatAPI/
  5.         SqlConnection objConnection = new SqlConnection(); 
  6. public void SqlConnection() 
  7.         { 
  8.             objConnection.Dispose(); 
  9.             objConnection.ConnectionString = "server=.;database=BookMySeat;uid=sa;pwd=Tpg@1234;"; 
  10.             objConnection.Open(); 
  11.         } 
  12.         [HttpGet] 
  13. public int[] GetSeatCount([FromUri] int slot) 
  14.         { 
  15. try
  16.             { 
  17.                 SqlConnection(); 
  18.                 SqlCommand SqlCommand = new SqlCommand("sp_GetMySeat", objConnection); 
  19.                 SqlCommand.CommandType = CommandType.StoredProcedure; 
  20.                 SqlCommand.Parameters.AddWithValue("@timeslotid", slot); 
  21.                 SqlDataAdapter da = new SqlDataAdapter(SqlCommand); 
  22.                 da.SelectCommand = SqlCommand; 
  23.                 DataSet ds = new DataSet(); 
  24.                 da.Fill(ds); 
  25. int[] result = new int[ds.Tables[0].Rows.Count]; 
  26. for (int i = 0; i < ds.Tables[0].Rows.Count; i++) 
  27.                 { 
  28.                     result[i] = Convert.ToInt16(ds.Tables[0].Rows[i][0].ToString()); 
  29.                 } 
  30. return result; 
  31.             } 
  32. finally
  33.             { 
  34.                 objConnection.Close(); 
  35.                 objConnection.Dispose(); 
  36.             } 
  37.         } 
  38.         [HttpPost] 
  39.         [ActionName("SeatBook")] 
  40. public int[] PostBookSeat(BookSeat objBookSeat) 
  41.         { 
  42. try
  43.             { 
  44.                 SqlConnection(); 
  45.                 SqlCommand SqlCommand = new SqlCommand("sp_BookMySeat", objConnection); 
  46.                 SqlCommand.CommandType = CommandType.StoredProcedure; 
  47.                 SqlCommand.Parameters.AddWithValue("@UserName", objBookSeat.UserName); 
  48.                 SqlCommand.Parameters.AddWithValue("@TimeSlot", objBookSeat.TimeSlot); 
  49.                 SqlCommand.Parameters.AddWithValue("@SeatNo", objBookSeat.SeatNo); 
  50.                 SqlDataAdapter da = new SqlDataAdapter(SqlCommand); 
  51.                 da.SelectCommand = SqlCommand; 
  52.                 DataSet ds = new DataSet(); 
  53.                 da.Fill(ds); 
  54. int[] result = new int[ds.Tables[0].Rows.Count]; 
  55. for (int i = 0; i < ds.Tables[0].Rows.Count; i++) 
  56.                 { 
  57.                     result[i] = Convert.ToInt16(ds.Tables[0].Rows[i][0].ToString()); 
  58.                 } 
  59. return result; 
  60.             } 
  61. finally
  62.             { 
  63.                 objConnection.Close(); 
  64.                 objConnection.Dispose(); 
  65.             } 
  66.         } 
  67.         [HttpPost] 
  68.         [ActionName("ValidateUser")] 
  69. public string ValidateUser(ValidateUser objValidateUser) 
  70.         { 
  71. try
  72.             { 
  73.                 SqlConnection(); 
  74.                 SqlCommand SqlCommand = new SqlCommand("ValidateUser", objConnection); 
  75.                 SqlCommand.CommandType = CommandType.StoredProcedure; 
  76.                 SqlCommand.Parameters.AddWithValue("@UserName", objValidateUser.UserName); 
  77.                 SqlDataAdapter da = new SqlDataAdapter(SqlCommand); 
  78.                 da.SelectCommand = SqlCommand; 
  79.                 DataSet ds = new DataSet(); 
  80.                 da.Fill(ds); 
  81. return ds.Tables[0].Rows[0][0].ToString(); 
  82.             } 
  83. finally
  84.             { 
  85.                 objConnection.Close(); 
  86.                 objConnection.Dispose(); 
  87.             } 
  88.         } 
  89.         [HttpPost] 
  90.         [ActionName("SeatDetail")] 
  91. public string GetSeatDetail(GetSeatDetail objGetSeatDetail) 
  92.         { 
  93. try
  94.             { 
  95.                 SqlConnection(); 
  96.                 SqlCommand SqlCommand = new SqlCommand("sp_GetSeatDetail", objConnection); 
  97.                 SqlCommand.CommandType = CommandType.StoredProcedure; 
  98. // SqlCommand.Parameters.AddWithValue("@UserName", objBookSeat.UserName);
  99.                 SqlCommand.Parameters.AddWithValue("@TimeSlot", objGetSeatDetail.TimeSlot); 
  100.                 SqlCommand.Parameters.AddWithValue("@SeatNo", objGetSeatDetail.SeatNo); 
  101.                 SqlDataAdapter da = new SqlDataAdapter(SqlCommand); 
  102.                 da.SelectCommand = SqlCommand; 
  103.                 DataSet ds = new DataSet(); 
  104.                 da.Fill(ds); 
  105. return ds.Tables[0].Rows[0][0].ToString(); 
  106.             } 
  107. finally
  108.             { 
  109.                 objConnection.Close(); 
  110.                 objConnection.Dispose(); 
  111.             } 
  112.         } 
  113.         [HttpPost] 
  114.         [ActionName("DeleteSeat")] 
  115. public string DeleteSeat(DeleteSeat objDeleteSeat) 
  116.         { 
  117. try
  118.             { 
  119.                 SqlConnection(); 
  120.                 SqlCommand SqlCommand = new SqlCommand("sp_DeleteSeat", objConnection); 
  121.                 SqlCommand.CommandType = CommandType.StoredProcedure; 
  122. // SqlCommand.Parameters.AddWithValue("@UserName", objBookSeat.UserName);              
  123.                 SqlCommand.Parameters.AddWithValue("@SeatNo", objDeleteSeat.SeatNo); 
  124.                 SqlCommand.Parameters.AddWithValue("@SlotNo", objDeleteSeat.TimeSlot); 
  125.                 SqlDataAdapter da = new SqlDataAdapter(SqlCommand); 
  126.                 da.SelectCommand = SqlCommand; 
  127.                 DataSet ds = new DataSet(); 
  128.                 da.Fill(ds); 
  129. return ds.Tables[0].Rows[0][0].ToString(); 
  130.             } 
  131. finally
  132.             { 
  133.                 objConnection.Close(); 
  134.                 objConnection.Dispose(); 
  135.             } 
  136.         } 
  137.         [HttpGet] 
  138. public List<ShowBookSeat> ShowBookSeat() 
  139.         { 
  140. try
  141.             { 
  142.                 SqlConnection(); 
  143.                   List<ShowBookSeat> list = new List<ShowBookSeat>();  
  144.                 SqlCommand SqlCommand = new SqlCommand("sp_ShowBookDetail", objConnection); 
  145.                 SqlCommand.CommandType = CommandType.StoredProcedure; 
  146. // SqlCommand.Parameters.AddWithValue("@UserName", objBookSeat.UserName);              
  147. //SqlCommand.Parameters.AddWithValue("@UserName", objDeleteSeat.SeatNo);
  148. //SqlCommand.Parameters.AddWithValue("@SlotNo", objDeleteSeat.TimeSlot);
  149.                 SqlDataAdapter da = new SqlDataAdapter(SqlCommand); 
  150.                 da.SelectCommand = SqlCommand; 
  151.                 DataSet ds = new DataSet(); 
  152.                 da.Fill(ds); 
  153. for (int i = 0; i < ds.Tables[0].Rows.Count; i++) 
  154.                 { 
  155.                     ShowBookSeat ShowBookSeat = new ShowBookSeat(); 
  156.                     ShowBookSeat.UserName = (ds.Tables[0].Rows[i]["username"]).ToString(); 
  157.                     ShowBookSeat.Date =Convert.ToDateTime(ds.Tables[0].Rows[i]["currentday"]); 
  158.                     ShowBookSeat.TimeSlot = Convert.ToInt32(ds.Tables[0].Rows[i]["timeslot"]); 
  159.                     ShowBookSeat.SeatNo = Convert.ToInt32(ds.Tables[0].Rows[i]["seatno"]); 
  160.                     list.Add(ShowBookSeat); 
  161.                 } 
  162. return list;  
  163.             } 
  164. finally
  165.             { 
  166.                 objConnection.Close(); 
  167.                 objConnection.Dispose(); 
  168.             } 
  169.         } 
  170.     } 

Code segment for WebApiConfig under App_start folder is given below.

  1. public static class WebApiConfig 
  2.     { 
  3. public static void Register(HttpConfiguration config) 
  4.         { 
  5.             config.Routes.MapHttpRoute( 
  6.                 name: "DefaultApi", 
  7.                 routeTemplate: "api/{controller}/{id}", 
  8.                 defaults: new { id = RouteParameter.Optional } 
  9.             ); 
  10.             config.Routes.MapHttpRoute( 
  11.                name: "seatbook", 
  12.                routeTemplate: "api/seat/{controller}/{action}/{id}", 
  13.                defaults: new { id = RouteParameter.Optional } 
  14.            ); 
  15.             config.Routes.MapHttpRoute( 
  16.                name: "seatDetail", 
  17.                routeTemplate: "api/seatdetail/{controller}/{action}/{id}", 
  18.                defaults: new { id = RouteParameter.Optional } 
  19.            ); 
  20.             config.Routes.MapHttpRoute( 
  21.                name: "ValidateUser", 
  22.                routeTemplate: "api/ValidateUser/{controller}/{action}/{id}", 
  23.                defaults: new { id = RouteParameter.Optional } 
  24.            ); 
  25.             config.Routes.MapHttpRoute( 
  26.                name: "DeleteSeat", 
  27.                routeTemplate: "api/DeleteSeat/{controller}/{action}/{id}", 
  28.                defaults: new { id = RouteParameter.Optional } 
  29.            ); 
  30.         } 
  31.     } 

The application which we are about to build consists almost all of the above defined keywords and the initial look of the application is as shown below.

Hope it’ll help you some day. Enjoy Coding.

Monday, August 1, 2016


AngularJS And ASP.NET MVC Movie Library Application - Integration Of IMDB Movie API - Part Fiv

DotnetPiper_Angular

Moving ahead, in this article, we’ll focus on the integration of live movie API within an existing application.
Kindly open the given URL and register yourself. After registering, you will get a token which we’ll be using in this article to retrieve the information/data from API.
http://api.myapifilms.com/imdb
Once you register yourself, you should receive an email like the given image, with some token value.
value
Open the website with the link, shared above, and fill in the details, as shown below in the following images.
emails
emails
As soon as you click on the submit button, you should receive a response in JSON format, as given below:
response
You may also get XML response for just making amendments either in request or in format dropdown, as shown below:
request
So far so good. We are now able to use this API URL within our application.
Open you solution and find routing.js file to add a new Controller into this, as give below:
solution

  1. routingApp.controller("ApiMovieController", ['$scope', '$http', '$timeout', function ($scope, $http, $timeout) { 
  2.     $scope.SearchMovieByTitle = function () { 
  3. var title = $scope.searchByTitle; 
  4.         alert(title); 
  5.         $http.jsonp("http://api.myapifilms.com/imdb/idIMDB?title=" + title + "&token=5bf98789787hghjg4&format=json&language=en-us&aka=0&business=0&seasons=0&seasonYear=0&technical=0&filter=2&exactFilter=0&limit=5&forceYear=0&trailers=0&movieTrivia=0&awards=0&moviePhotos=0&movieVideos=0&actors=0&biography=0&uniqueName=0&filmography=0&bornAndDead=0&starSign=0&actorActress=0&actorTrivia=0&similarMovies=0&adultSearch=0&goofs=0"es=0&fullSize=0&companyCredits=0&callback=JSON_CALLBACK").success(function (response) { 
  6.             console.log(response); 
  7.             $scope.movies = response.data.movies; 
  8.         }) 
  9.     }]); 

Kindly, put your token value in the above http request, in order to get the correct result.
Note: If you have noticed, in the above code segment, you have injected a dependency $http and $timeout. For now, only concentrate on the $http and forget about $timeout.
code
Complete code for routing.js main JavaScript file is shown below:
Code Routing.js file

  1. /// <reference path="../Scripts/angular.js" />
  2. /// <reference path="../Scripts/fusioncharts.js" />
  3. /// <reference path="../Scripts/fusioncharts.charts.js" />
  4. /// <reference path="DataService.js" />
  5. /// <reference path="../Scripts/angular-route.js" />
  6. var routingApp = angular.module('routingApp', ['ngRoute']); 
  7. routingApp.directive("login", function () { 
  8. var directive = {}; 
  9. //restrict = E, signifies that directive is Element directive
  10.     directive.restrict = 'E'; 
  11. //template replaces the complete element with its text.
  12.     directive.templateUrl = "/Application/Login.html";//"My first directive";
  13. return directive; 
  14. }); 
  15. routingApp.config(['$routeProvider', function ($routeProvider) { 
  16. //alert("Route Initiated");
  17.     $routeProvider. 
  18. // when('/Home', { templateUrl: '/Application/login.html', controller: 'DotnetPiperController' }).
  19.         when('/Movie', { templateUrl: '/Application/Movie.html', controller: 'MovieController' }). 
  20.         when('/SearchMovie', { templateUrl: '/Application/SearchMovie.html', controller: 'ApiMovieController' }). 
  21.          when('/Tolly', { templateUrl: '/Application/Tollywood.html', controller: 'tollyController' }). 
  22.         otherwise({ redirectTo: '' }); 
  23. }]); 
  24. routingApp.controller("tollyController", function ($scope) { 
  25.     $scope.tollyMessage = "Welcome to TollyWood to watch Action,Thriller and Suspence movies"; 
  26. }); 
  27. routingApp.controller("MovieController", ['$scope', function ($scope) { 
  28.     $scope.edit = false; 
  29.     $scope.message = "Welcome to DotnetPiper.com to learn Angular"; 
  30.     $scope.error = false; 
  31.     $scope.clear = false; 
  32.     $scope.success = false; 
  33. // alert("Servcie Called");
  34. var movies = [ 
  35.                 { title: "Revenent", year: "2015", rating: "5Star", plot: " A revenger Journey" }, 
  36.                  { title: "Counjouring2", year: "2016", rating: "4Star", plot: " A Complete Hourror" }, 
  37.                  { title: "DDLJ", year: "1995", rating: "SuperStar", plot: "Romantic love story" }, 
  38.                  { title: "Sultan", year: "2016", rating: "5Star", plot: "A Warrior" }, 
  39.                  { title: "BajiRao Mastani", year: "2015", rating: "4.5 Star", plot: "Film of the Year" } 
  40.     ]; 
  41.     $scope.movies = movies; 
  42.     $scope.AddMovie = function (movie) { 
  43. if ($scope.edit == true) { 
  44. var index = $scope.movies.indexOf(movie); 
  45. // alert("edit Called");
  46.             $scope.movies[index] = movie; 
  47. //alert(movie.rating);
  48.             $scope.updatedMovie = movie; 
  49.             $scope.success = true; 
  50.             $scope.movie = {}; 
  51.         } 
  52. else { 
  53. var newMovie = { 
  54.                 title: $scope.movie.title, 
  55.                 year: $scope.movie.year, 
  56.                 rating: $scope.movie.rating, 
  57.                 plot: $scope.movie.plot 
  58.             }; 
  59.             movies.push(newMovie); 
  60. // alert("Add Called");
  61.         } 
  62.     } 
  63.     $scope.DeleteMovie = function (movie, index) { 
  64.         movies.splice(index, 1); 
  65. // $scope.movie = movie;
  66.         $scope.updatedMovie = movie; 
  67.         $scope.success = false; 
  68.         $scope.clear = true; 
  69.         $scope.movie = {}; 
  70.         console.log(index); 
  71.     } 
  72.     $scope.EditMovie = function (movie, index) { 
  73.         $scope.selectedRow = null;  // initialize our variable to null
  74.         $scope.selectedRow = index; 
  75.         $scope.movie = movie; 
  76.         $scope.edit = true; 
  77.     } 
  78. }]); 
  79. routingApp.controller("ApiMovieController", ['$scope', '$http', '$timeout', function ($scope, $http, $timeout) { 
  80.     $scope.SearchMovieByTitle = function () { 
  81. var title = $scope.searchByTitle; 
  82.         alert(title); 
  83.         $http.jsonp("http://api.myapifilms.com/imdb/idIMDB?title=" + title + "&token=5bf94c9e-203f-4a6f-91d0-a63a59a77084&format=json&language=en-us&aka=0&business=0&seasons=0&seasonYear=0&technical=0&filter=2&exactFilter=0&limit=5&forceYear=0&trailers=0&movieTrivia=0&awards=0&moviePhotos=0&movieVideos=0&actors=0&biography=0&uniqueName=0&filmography=0&bornAndDead=0&starSign=0&actorActress=0&actorTrivia=0&similarMovies=0&adultSearch=0&goofs=0"es=0&fullSize=0&companyCredits=0&callback=JSON_CALLBACK").success(function (response) { 
  84.             console.log(response); 
  85.             $scope.movies = response.data.movies; 
  86.         }) 
  87.     } 
  88.     $scope.dateTime = new Date().getMinutes(); 
  89. // alert($scope.dateTime);
  90.     document.getElementById("btnSearch").addEventListener('click', function SearchMovieByTitleDigest() { 
  91. var title = $scope.searchByTitle; 
  92.         $scope.$watch("searchByTitle", function (newValue, oldValue) { 
  93.             $scope.searchByTitle = newValue; 
  94.             console.log("$scope.searchByTitle Called " + $scope.searchByTitle); 
  95.             alert($scope.searchByTitle); 
  96.         }); 
  97. //console.log(title);
  98. //alert(title);
  99.         $http.jsonp("http://api.myapifilms.com/imdb/idIMDB?title=" + $scope.searchByTitle + "&token=5bc9e-203f-4a6f-91d0-a63a59de4222&format=json&language=en-us&aka=0&business=0&seasons=0&seasonYear=0&technical=0&filter=2&exactFilter=0&limit=5&forceYear=0&trailers=0&movieTrivia=0&awards=0&moviePhotos=0&movieVideos=0&actors=0&biography=0&uniqueName=0&filmography=0&bornAndDead=0&starSign=0&actorActress=0&actorTrivia=0&similarMovies=0&adultSearch=0&goofs=0"es=0&fullSize=0&companyCredits=0&callback=JSON_CALLBACK") 
  100.             .success(function (response) { 
  101.                 $scope.movies = response.data.movies; 
  102.                 $timeout(function () { 
  103.                     $scope.$digest(); 
  104.                 }, 100); 
  105.             }) 
  106.     }); 
  107. //document.getElementById("btnSearch").addEventListener('click', function () {
  108. //                console.log("Seach Started");
  109. //                alert("Seach Started");
  110. //                $scope.dateTime = new Date().getMinutes();
  111. //                $scope.$digest();
  112. //            });
  113. }]); 

We are almost done with our Controller code part. It's now turn to create the UI to meet our purpose.
Kindly open your solution and add searchMovie.html file, as shown below in the screenshot:
searchMovie
Please copy and paste the following code in searchMovie.html partial template.
Code for searchMovie.html file,

  1. <!DOCTYPE html>
  2. <html xmlns="http://www.w3.org/1999/xhtml">
  3. <head>
  4. <h2>Seach Movie Using IMDB API</h2>
  5. <link rel="stylesheet" href="http://maxcdn.bootstrapcdn.com/bootstrap/3.3.6/css/bootstrap.min.css">
  6. <style>
  7.         .selected 
  8.         { 
  9.             background-color: lightyellow; 
  10.             color: red; 
  11.             font-weight: bold; 
  12.         } 
  13. </style>
  14. </head>
  15. <body ng-app="routingApp" class="jumbotron">
  16. <div ng-controller="ApiMovieController" class="container">
  17.         <!--<div ng-show="success" class="alert-success">Record has been upddated for movie :  {{updatedMovie.title}}</div>
  18. <div ng-show="clear" class="alert-success">Record has been deleted for movie :  {{updatedMovie.title}}</div>-->
  19. <div class="row col-md-8">
  20. <table class="table table-striped ">
  21. <tr>
  22. <td>
  23. <input type="text" ng-model="searchByTitle" class="form-control" style="width: 300px;" />
  24. </td>
  25.                     {{dateTime}} 
  26. <td>
  27. <button type="button" ng-click="SearchMovieByTitle()" class="btn btn-info">Search using Angular Scope 
  28. <span class="glyphicon glyphicon-search"></span>
  29. </button>
  30. <br />
  31. </td>
  32. </tr>
  33. <tr>
  34. <td></td>
  35. <td>
  36. <button type="button" id="btnSearch" class="btn btn-info">Seacrh Movie Using EventListener 
  37. <span class="glyphicon glyphicon-search"></span>
  38. </button>
  39. </td>
  40. </tr>
  41. <tr class="thead-inverse">
  42. <td style="background-color: Highlight">Title</td>
  43. <td style="background-color: Highlight">Year of Release</td>
  44. <td style="background-color: Highlight">Rating</td>
  45. <td style="background-color: Highlight">Plot</td>
  46. <td style="background-color: Highlight">Actions</td>
  47. </tr>
  48. <tbody>
  49. <tr ng-repeat="movie in movies" ng-class="{'selected':$index == selectedRow}">
  50. <td>{{movie.title}} 
  51. </td>
  52. <td>{{movie.year}} 
  53. </td>
  54. <td>{{movie.rating}} 
  55. </td>
  56. <td>{{movie.plot }} 
  57. </td>
  58. <td></td>
  59. </tr>
  60. </tbody>
  61. </table>
  62. </div>
  63. </div>
  64. </body>
  65. </html>

Once you paste the above code segment, run an application and click on Search Movie Globally.
Note: Ensure that you had implemented the routing, as shown in the below URL,

The output will be, as depicted below:
output
Mapping of the above textbox search, using Angular Scope. Whatever value we put into the textbox, ApiMovieController reads that value using scope and passes into http request as Title, as depicted in the screenshot below:
code
Now, search for the movie as I’ve done for The Revenant and Sultan, both.
revenent
sultan
Kindly refer tothe given screen for full fledged movie search operation.
output
Hope it’ll help you some day. Enjoy Coding.

Monday, April 4, 2016

Concert crowd
Hi Folks,
If you want to access the ModelState property in the View , you can use the ModelState in your Razor View as depicted below in image:

This is the source code as shown below:
  1. @model IEnumerable<MVCSample.Models.EmpRegistration> 
  2. @{ 
  3.     ViewBag.Title = "Verify"; 
  4. if (@ViewContext.ViewData.ModelState.IsValid) 
  5.     { 
  6.         ViewBag.Title = "Verify"; 
  7. if (TempData["EmployeeRegistration"] != null) 
  8.         { 
  9.             var tempDataEmployeeRegistration = TempData["EmployeeRegistration"]; 
  10.         } 
  11.     } 
    Thanks
To learn more about MVC please go to the following link.
MVC Articles
Thanks.
Enjoy coding and reading.
Sunday, November 22, 2015

Bind DropDownListFor at runtime in MVC : An Essential Tip

During an implementation of MVC View page ,I struggled little to bind the DropDownList with the runtime value from ViewModel . Here is the pictorial representation to Bind the DropDownList at runtime.

Image Representation As depicted below:

Hope it will help you to bind DropDownListFor at runtime.

To know more MVC and WebApi Kindly go through with these links

MVC Articles & WCF and WebAPI

Thanks.
Enjoy coding and reading.
Wednesday, August 26, 2015

Return Multiple Models in single View in MVC4

Return Multiple Models in single View in MVC4
 
Concert crowd

As Exploring MVC more, today I am going to share one the interesting fact about MVC 3 to use multiple models in single view.
I belief this is one the interesting fact about MVC, which may be in use on regular basis. Because in today’s world generally we don’t keep data into single place/model.
So Let’s Go:
To move on I’d like to share little bit about MVC (Model-View-Controller) with excerpts.
Controller
Controllers are the heart of MVC. A controller handles some of the main work of the application, such as:
  • It handles the User Input.
  • It handles the User Interaction.
  • It reads the data from the View.
  • Then it sends the data read to the Model.
In simpler manner you can say that it receives the request from the user and sends it to the Model, and then the Model retrieves the related data from the database and sends the result to the View. A controller can be associated with multiple view means we can define multiple actions in controller and according to action associated view show. It is similar to Business Layer of 3-tier architecture. It is main part of MVC architecture.
View
View is simply used to display the data; it is the Graphical Data Representation. "Model sends the output to the View then the View displays the data to the end user", so it works like a bridge between the Model and the End User. Often the views are created from the model data.
Model
A Model handles the logic for the application data; it implements the Data Domain logic. A Model is associated with Views and Controller. It produces updated output on view. Often model objects retrieve data from database and store data to database. The Database Connection is part of the model and it provides the output requested by the user.
A typical Diagram of MVC:
clip_image001
Now we move ahead and discuss the code agenda of this article.
Step 1.
I’ve created a Model class named as GuestResponse having the code snippet:
clip_image003
Step 2.
Whenever we hit any Url into browser it generally goes into any controller and controller performs its action and returns its model to view, I have HomeController for this purpose and the code shown in below depict image:
 
clip_image005
Let’s discuss the code snippet in above given image.
At the first place I created an object of ParentModel class like:
ParentModel objParent = new ParentModel();


Later created an object of GuestResponse model class, which is of List type having some values as given below in code snippet?


   1:  List<GuestResponse> objGuestResponse = new List<GuestResponse>();
   2:   
   3:  objGuestResponse.Add(new GuestResponse { Name = "Sachin Kalia", Email = "Sachin@sachin.com", WillAttend = true });
   4:   
   5:  objGuestResponse.Add(new GuestResponse { Name = "Ravish Sindhwani", Email = "Ravish@Ravish.com", WillAttend = true });
   6:   
   7:  objGuestResponse.Add(new GuestResponse { Name = "Dhananjay Kumar", Email = "Ravish@Ravish.com", WillAttend = true });
   8:   


and passed its object to ParentModel as given below:
objParent.GuestResponse = objGuestResponse;
 
The same flow for the GuestCheck model class which is also of List type having some values as given below in code snippet?


List<GuestCheck> objGuestCheck = new List<GuestCheck>();
 
objGuestCheck.Add(new GuestCheck { GuestName = "Sachin Kalia", GuestPhone = "9911635975" });
 
objGuestCheck.Add(new GuestCheck { GuestName = "Ravish Sindhwani", GuestPhone = "7666666786" });
 
objGuestCheck.Add(new GuestCheck { GuestName = "Dhananjay Kumar", GuestPhone = "7667877786" });


And passed its object to ParentModel as given below:

 
Steps to move ahead and create an object of ParentModel ,the under given image is self-descriptive:
clip_image007
 
Step 3. The another step is to create View named as RsvpForm.cshtml having the following code snippet.


   1:  @using (Html.BeginForm())
   2:  {
   3:  <h2 style="background-color:Lime" color:"red">EmpRegistration</h2>
   4:   
   5:  foreach (var item in Model)
   6:  {
   7:   
   8:  <tr>
   9:   
  10:  @for (int i = 0; i < @item.GuestResponse.Count; i++)
  11:  {
  12:  <td>
  13:  <table><tr>
  14:  <td> @item.GuestResponse[i].Name @item.GuestResponse[i].Email @item.GuestCheck[i].GuestPhone ||</td>
  15:   
  16:  @Html.Raw(HttpUtility.HtmlEncode(Environment.NewLine))
  17:   
  18:  </tr></table>
  19:  </td>
  20:  }
  21:   
  22:  @*@Html.DisplayFor(modelItem => item.GuestResponse[1].Email.ToString())*@
  23:   
  24:  </tr>
  25:   
  26:  }
  27:   
  28:  }
  29:   


@model IEnumerable<MVCSample.Models.ParentModel>: If you notice at this line you will examine this model is of IEnumerable type which we’ve returned from HomeController class.

And another most important fact is about the Model collection at time of iteration in foreach loop:
clip_image008
It gives you the collection of both model classes, which we look for:
Step 4:

Now time to run you application and Press F5 .You will see the following depict image.

clip_image010

Ignore this and paste the following URL in your browser window: http://localhost:60346/Home/Rsvpform
The output will be:
clip_image012
I tried to keep it simple to understand the fact in easier manner.
You can download the code from here Return Multiple Models in Single View in MVC3
Enjoy Coding and stay Happy Smile

Thursday, July 16, 2015

Integration of Google ReCaptcha With MVC4 Application

It is in trend these days to verify that a user is a human or not and the easiest and most used option to do this is to have Google ReCaptcha in your application. This article elaborates how to integrate Google reCaptcha in a MVC4 application. After going through with this article you may get the benefit of this rich feature.
ReCaptcha

To understand what reCaptcha is we first need to define the term “Captcha“.
Captcha is a test made of an image and distorted text that must be solved by human users when they want to subscribe to websites that want to ensure the user is a human being and not a bot or a computer (= preventing spam). Excerpt taken from link.
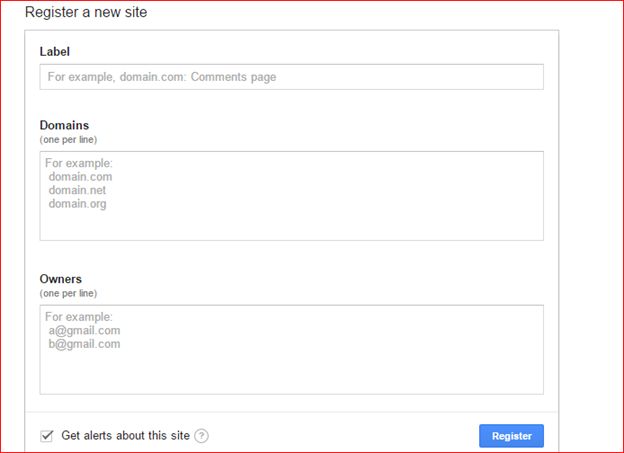
The initial step to integrate Google reCaptcha is to register your site/domain to receive public/private keys. To reach that level merely paste this URL in a browser.
As soon as you hit the preceding given URL it gives you given the following screen.


site
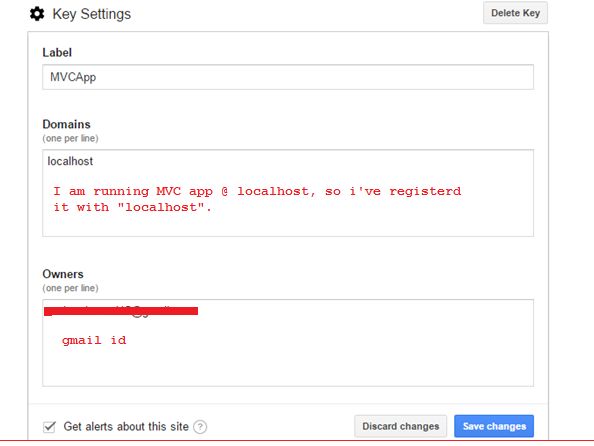
I have registered mine as shown in the following screen shot:
screen shot
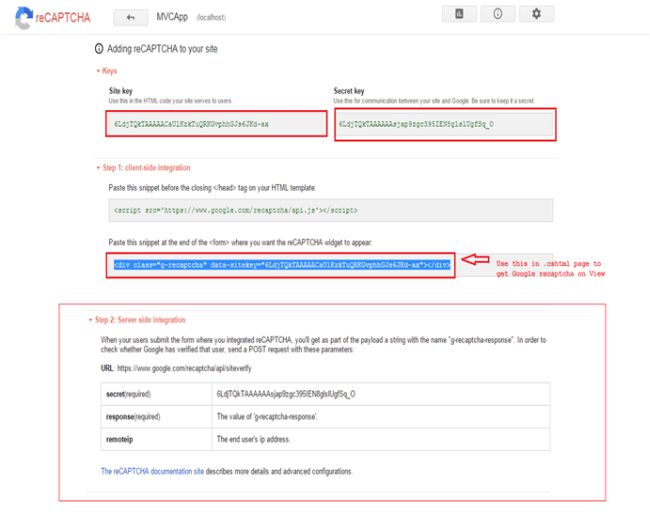
This is how it looks after registering this feature and provides public/private keys along with a reference file and API to use further.
reference file and API
You have registered and now ready to use this excellent feature.
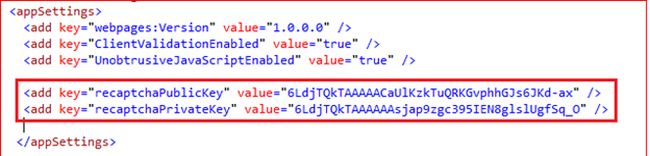
Step 1
Kindly put you public key and private key in the web.config file as shown in the following image:
shown below in image
Step 2

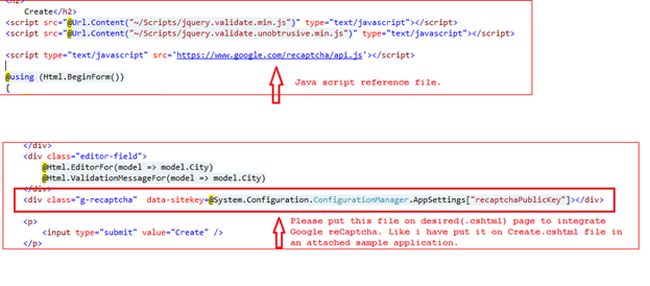
Kindly ensure a few points in order to integrate Google reCaptcha on the .cshtml page as shown in the following image:
image
Source Code Create.cshtml page is given below:

      1: @model MVCSample.Models.EmpRegistration  
      2: @{  
      3:     ViewBag.Title = "Create";  
      4: }  
      5: <h2>  
      6:     Create</h2>  
      7: <script src="@Url.Content("~/Scripts/jquery.validate.min.js")" type="text/javascript"></script>  
      8: <script src="@Url.Content("~/Scripts/jquery.validate.unobtrusive.min.js")" type="text/javascript"></script>  
      9: 
     10: <script type="text/javascript" src='https://www.google.com/recaptcha/api.js'></script>  
     11: 
     12: @using (Html.BeginForm())  
     13: {  
     14:     @Html.ValidationSummary(true)  
     15:     <fieldset>  
     16:         <legend>EmpRegistration</legend>  
     17:         <div class="editor-label">  
     18:             @Html.LabelFor(model => model.Id)  
     19:         </div>  
     20:         <div class="editor-field">  
     21:           @*  @Html.EditorFor(model => model.Id)  
     22:             @Htm*@l.ValidationMessageFor(model => model.Id)  
     23:         </div>  
     24:         <div class="editor-label">  
     25:             @Html.LabelFor(model => model.Name)  
     26:         </div>  
     27:         <div class="editor-field">  
     28:             @Html.EditorFor(model => model.Name)  
     29:             @Html.ValidationMessageFor(model => model.Name)  
     30:         </div>  
     31:         <div class="editor-label">  
     32:             @Html.LabelFor(model => model.Address)  
     33:         </div>  
     34:         <div class="editor-field">  
     35:             @Html.EditorFor(model => model.Address)  
     36:             @Html.ValidationMessageFor(model => model.Address)  
     37:         </div>  
     38:         <div class="editor-label">  
     39:             @Html.LabelFor(model => model.City)  
     40:         </div>  
     41:         <div class="editor-field">  
     42:             @Html.EditorFor(model => model.City)  
     43:             @Html.ValidationMessageFor(model => model.City)  
     44:         </div>  
     45:         <div class="g-recaptcha"  data-sitekey=@System.Configuration.ConfigurationManager.AppSettings["recaptchaPublicKey"]></div>  
     46: 
     47:         <p>  
     48:             <input type="submit" value="Create" />  
     49:         </p>  
     50:     </fieldset>  
     51: }  
     52: <div>  
     53:     @Html.ActionLink("Back to List", "Index")  
     54: </div>

Step 3

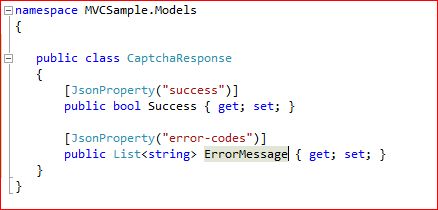
Verify that the user response as reCAPTCHA is generated and resolved by a user. The following API URL is used to verify the user response.
In the preceding API URL the secret and response parameters are required and whereas the remoteip is optional. We have a response class to verify the user response.
response parameters
I have created a POST method in the Index action in the RegisterController to verify the user response.
Here the code segment is shown below:

  1: [HttpPost]  
  2: public ActionResult Create(EmpRegistration modelEmpRegistration)  
  3: {  
  4: bool isCapthcaValid = ValidateCaptcha(Request["g-recaptcha-response"]);  
  5: 
  6: try
  7:     {  
  8: if (isCapthcaValid)  
  9:         {  
 10: if (ModelState.IsValid)  
 11:             {  
 12: //dbContext.AddToEmpRegistrations(modelEmpRegistration);
 13: //dbContext.SaveChanges();
 14: 
 15:             }  
 16: return RedirectToAction("Create");  
 17:         }  
 18: else
 19:         {  
 20: return Content("You have put wrong Captcha,Please ensure the authenticity !!!");  
 21:         }  
 22: //return RedirectToAction("Index");
 23:     }  
 24: catch
 25:     {  
 26: return View();  
 27:     }  
 28: }  
 29: 
 30: public static bool ValidateCaptcha(string response)  
 31: {  
 32: //secret that was generated in key value pair
 33: string secret = WebConfigurationManager.AppSettings["recaptchaPrivateKey"];  
 34: 
 35:     var client = new WebClient();  
 36:     var reply =  client.DownloadString(string.Format("https://www.google.com/recaptcha/api/siteverify?secret={0}&response={1}", secret, response));  
 37: 
 38:     var captchaResponse = JsonConvert.DeserializeObject<CaptchaResponse>(reply);  
 39: 
 40: return Convert.ToBoolean(captchaResponse.Success);  
 41: 
 42: }  
 43: 
Step 4

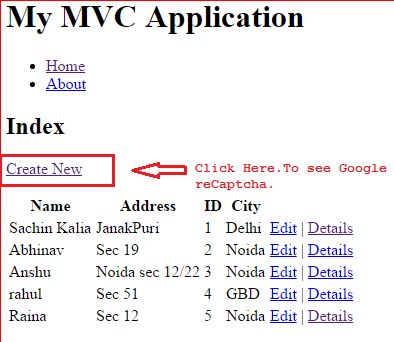
Run the application and press F5. It'll open a page as shown in the image below:
Run the application
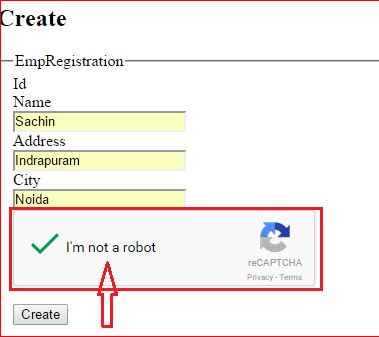
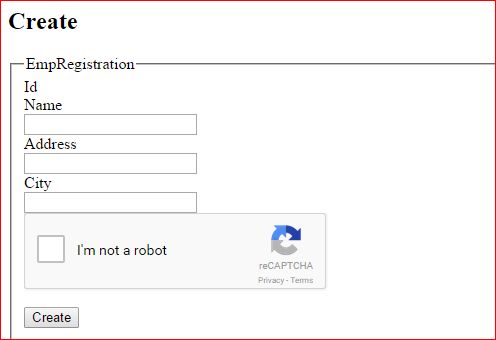
Click on “Create New” => It will open a page as depicted below:
Create New
Case 1
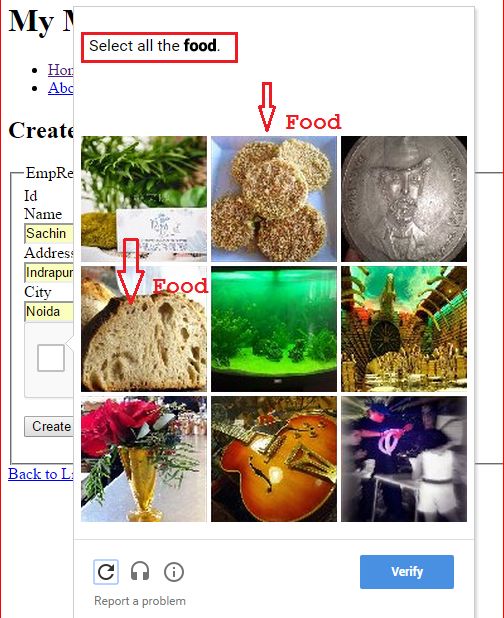
Fill in the desired details and check the checkbox. Just prefix the I'm not a robot. It will open the popup to select the choice.
select food
If you have provide the correct details it will consider you to be a human and shows the following screen as confirmation.
Create
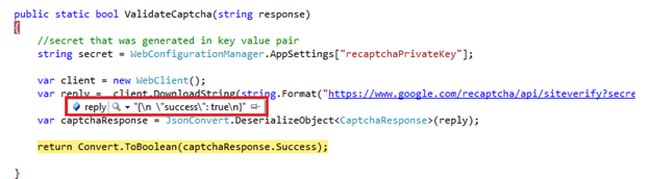
Click on the Create button and it reaches the code segment and executes the code.
Create button
As you can see from the image above it has returned “success” from the server meaning it worked perfectly.
Note: After executing successfully it returns to the create page again. I've used this page for demonstration purposes only.
Case 2
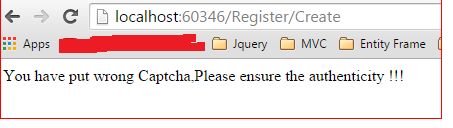
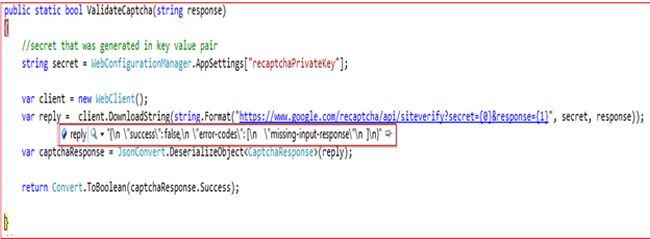
If you don't check the checkbox prefix to the message “I'm not a robot” and press Enter. It goes to the code and verifies the authenticity and it returns false. It means you are not a valid user.
authenticity
valid user
Please find the source code as an attachment.
Integration of Google ReCaptcha with MVC4 Application - Running Application.
I hope it will help to resolve your issue.


Thanks.