Short circuiting and branching in .NET Core are key concepts to make an application sequential and provide more control over the response.
The term middleware is used in a .NET Core application either to delegate a request to the next component in the pipeline or short circuit it.
Middleware has some important aspects as shown below:
- It delegates the request to the next component in the pipeline.
- Business logic can be written before and after the component is invoked in the pipeline.
There are three extension methods Run, Map, and Use which can be configured as request delegates.
Each request delegated can be written as a single line as an anonymous method (aka in-line middleware) or separately as a middleware component.
These components are responsible for invoking the next delegate in the pipeline or to short circuit it.
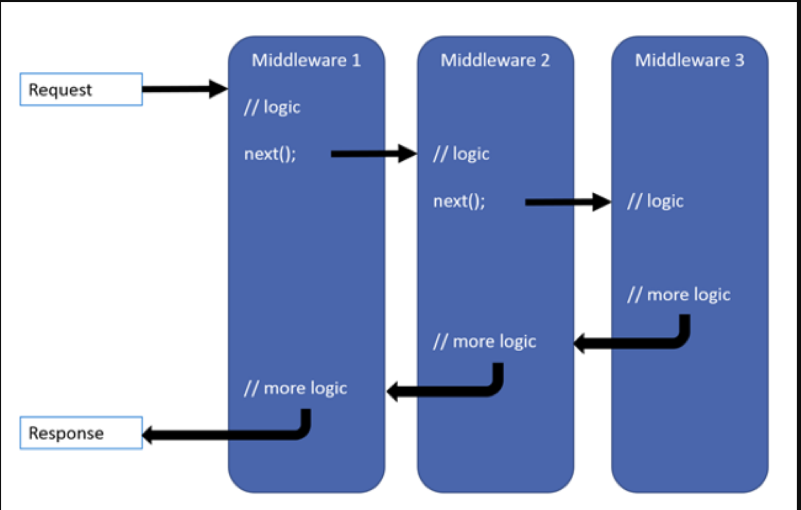
.NET Core request pipeline comprises request delegates, which call one after another as the image shown below:
Reference: MSDN

Each delegate can also decide not to pass a request to the next delegate, which is known as short circuiting. An advantage of short circuiting is, it doesn’t pass the request to the following delegate if it doesn’t meet specific criteria. For example, if a request doesn’t have a specific parameter in its URL, then it can short circuit the pipeline and returns the response directly from there.
On the other hand, branching helps to map the request based on matches and executes the specific branch (can be a method).
Map and MapWhen extensions are provided by .NET Core by default for branching the pipeline.
Kindly refer to the image below for better understanding:

Let’s practically see all this.
PREREQUISITES
- Visual Studio 2017 Enterprise/Professional
- .Net Core 1.1
IMPLEMENTATION
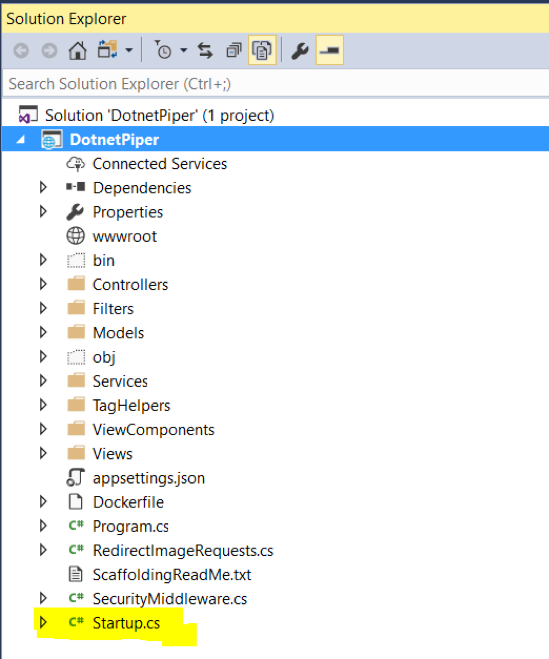
To understand the short circuiting and branching in .NET Core 1.1, refer to the figure below for a solution structure:

Open a startup.cs file and search for configure method; it comes out-of-box with .NET Core applications.
public void Configure(IApplicationBuilder app, IHostingEnvironment env, ILoggerFactory loggerFactory, IFirstService FirstService) { }
CONFIGURE:
This method gets called by the runtime. Use this method to configure the HTTP request pipeline.
Figure3.

SHORT-CIRCUITING:
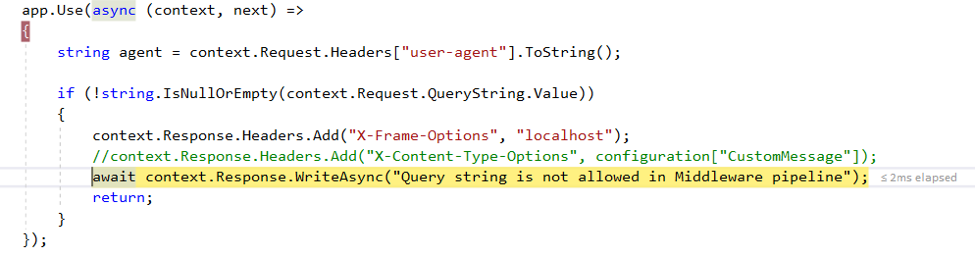
To meet purpose I’ve written code using Use extension method and set a limitation so that if a specific request contains a query string in its URL, then it should not go further in pipeline otherwise it should go till the Run method.
The code snippet for short-circuiting is shown below:
public void Configure(IApplicationBuilder app, IHostingEnvironment env, ILoggerFactory loggerFactory, IFirstService FirstService) { app.Use(async (context, next) => { string agent = context.Request.Headers["user-agent"].ToString(); if (!string.IsNullOrEmpty(context.Request.QueryString.Value)) { context.Response.Headers.Add("X-Frame-Options", "localhost"); await context.Response.WriteAsync("Query string is not allowed in Middleware pipeline"); return; } }); }
Press F5 and run an application.

Now copy and paste the following URL into your browser: http://localhost:64687/Map3?CustomString
Now as per the code (if it has a query string in URL) it should short circuit the request pipeline and return a response directly from Use method:

RESPONSE

As shown in the screen above it skips the remaining pipeline and responds from the use extension method only. Though Run method always executes if you don’t short circuit.
The snippet for the run method within an application is given below:
app.Run(async context =>         {             await context.Response.WriteAsync("Hello from sample application.");         });

The complete code snippet for short-circuiting is given below:

public class Startup

{     public void Configure(IApplicationBuilder app)     {         app.Use(async (context, next) =>         {             // You can write logic that that doesn't write to the Response.             await next.Invoke();             // write logic that doesn't write to the Response.         });         app.Run(async context =>         {             await context.Response.WriteAsync("Hello from sample application.");         });     }

}
Note: If you use the above code segment, await next.Invoke(); which is being used to call next component or further delegate in the pipeline. In this case it is the app.Run() method.
E.g., kindly copy and paste the following code snippet in your configure method and run an application.
app.Use(async (context, next) =>             {                 string agent = context.Request.Headers["user-agent"].ToString();                 if (!string.IsNullOrEmpty(context.Request.QueryString.Value))                 {                     context.Response.Headers.Add("X-Frame-Options", "localhost");                     //context.Response.Headers.Add("X-Content-Type-Options", configuration["CustomMessage"]);                     await context.Response.WriteAsync("Query string is not allowed in Middleware pipeline");                     await next.Invoke();                 }             });

app.Run(async (context) =>             {                               await context.Response.WriteAsync(" Welcome Folks in .Net Core presentation!");             });
Output:

Let’s run an application and see how it works.
Press F5 and application will open in the browser to ensure that the application is up and running.
BRANCHING:
As the name implies, branching means a resembling of the branches of a tree. It’s somewhere same in .NET Core also.
Map extension method exists in .NET Core which can be used a branching as given below:

As defined in the screenshot above, map method branches the request pipeline based on the matches of the given request path. If the request path starts with the given path, the branch will execute.
Code snippet: Keep the code segment in Configure() method of startup file.
app.Map("/map1", HandleMapMiddlewareOne);

private static void HandleMapMiddlewareOne(IApplicationBuilder app)         {             app.Run(async context =>             {                  await context.Response.WriteAsync("Map Middleware One Called...");                            });         }
app.MapWhen works the same way, as shown in the image depicted below:

Let’s see this in practice.
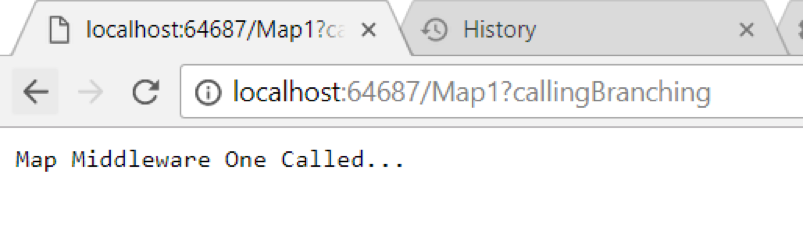
Press F5 to run your application.
Copy and paste the following URL in browser http://localhost:64687/map1?callingBranching
Note: Kindly replace localhost port with your application’s one.
As soon as you execute the URL, it verifies and matches the request and reaches to the branching delegate. In our case, its HandleMapMiddlewareOne and respond directly from there.

The same way it should work for MapWhen with the bit different condition in the below code snippet.
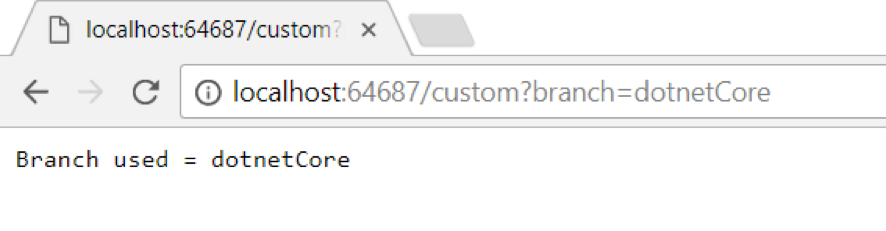
app.MapWhen(context => context.Request.Query.ContainsKey("branch"),HandleBranch);

private static void HandleBranch(IApplicationBuilder app)         {             app.Run(async context =>             {                 var branchVer = context.Request.Query["branch"];                 await context.Response.WriteAsync($"Branch used = {branchVer}");             });         }
Press F5 to run your application.
Copy and paste the following URL in browser http://localhost:64687/custom?branch=dotnetCore
OUTPUT:

Hope this helps you to understand Short Circuiting and Branching in .NET Core.
Happy Coding!