Thursday, January 4, 2018

Custom Service Dependency Injection In .Net Core 1.1

INTRODUCTION

Custom Service Dependency Injection In .Net Core 1.1

There are various ways to inject dependency in MVC. Dependency injection is a technique to pass the required Dependency so that the desired action can be performed.
Dependency Injection In .Net Core
In this article we will go through with one of the key features of .Net Core, Custom Service dependency injection in .Net core 1.1, particularly at controller’s action level .Here are some important points which will help you to understand the facts easily in the following excerpts:

Dependency Injection

Dependency Injection (DI) is a pattern that shows how we can create loosely coupled classes. It means Class A is not directly dependent on class B and an object injects the dependency of another object. A dependency is an object that can be used as service, which is a part of this article.

Earlier in .Net there were some well-known dependency resolvers like Unity, Autofac and Ninject and so on.

  1. .Net Core allows you to inject dependency out-of-the-box, there is no need to add the reference of the above mentioned dependency resolver. As soon as you create a solution you will be able to configure services easily, .Net Core manages this operation at its level that indeed helps a developer to get rid of this matter.
  2. This article explains about how to configure custom service in .Net core and inject that service object in controller’s constructor as well as in action method. In the earlier versions of .Net it used to not inject the dependency at Action level. This is recently introduced with the release of .Net core. Action level injection of service makes an application lighter than controller level. Consider a scenario when you have a number of action methods defined in a single controller and you have injected the service at controller’s constructor. Though it’s being used at one action only, it looks like it’s not worth it.
PREREQUISITES
  • Visual Studio 2017 Enterprise/Professional
  • .Net Core 1.1

IMPLEMENTATION

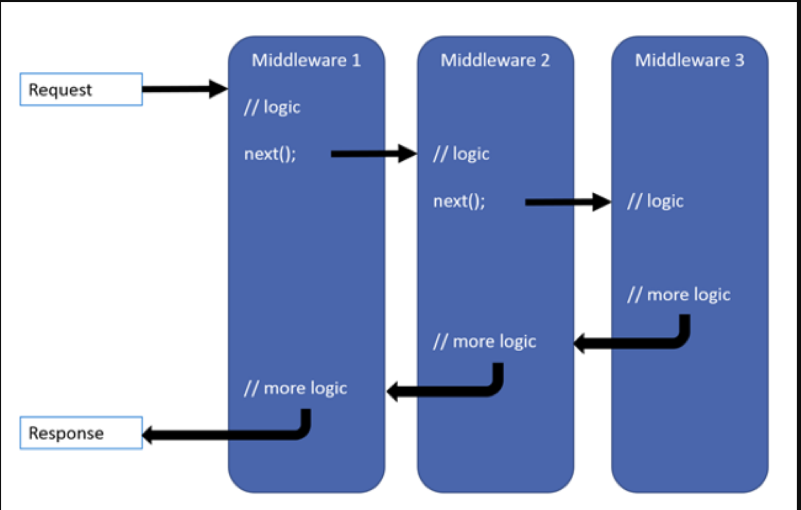
In order to understand the dependency injection in .Net core 1.1, kindly refer to the given below image which states how the client application needs an object to access the implementation of given methods.
Dependency Injection In .Net Core

Now create a custom service class file as depicted below in screen shot:

Dependency Injection In .Net Core

FirstService class file has the following code snippet.

  1. using Microsoft.Extensions.Configuration; 
  2. namespace DotnetPiper.Services 
  3. public interface IFirstService 
  4.     { 
  5.         string WelcomeEquinox(); 
  6.     } 
  7. public class FirstService : IFirstService 
  8.     { 
  9. public string welcomeEquinoxStr { get; set; } 
  10. public FirstService() 
  11.         { 
  12.             welcomeEquinoxStr = "Welcome Folks in .Net Core presentation!"; //Configuration["WelcomeEquinox"];
  13.         } 
  14. public string WelcomeEquinox() 
  15.         { 
  16. return welcomeEquinoxStr; 
  17.         } 
  18.     } 

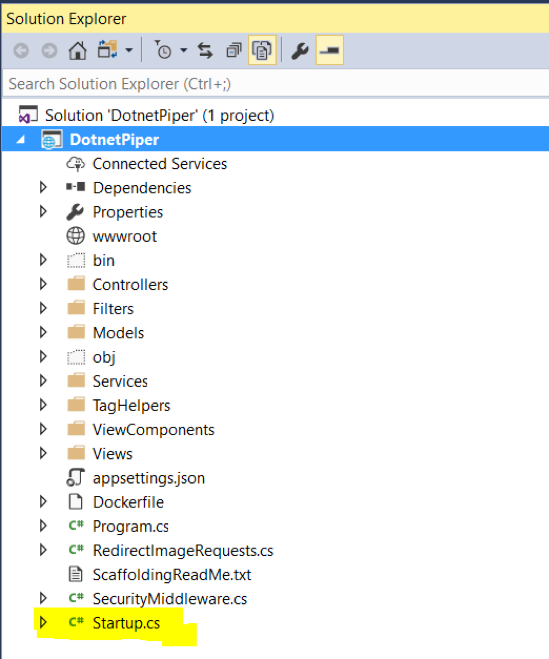
There is a startup class file which exists in solution and has two methods ConfigureServices and configure. Refer to the below image to know more about startup class file location under solution structure.

Dependency Injection In .Net Core

This method executes its functionality at runtime. Both operations have a different set of objectives as shown below,

ConfigureServices

This method gets called by the runtime. Use this method to add services to the container. And it takes one IServiceCollection object as an input. Refer to the given below screenshot.

Dependency Injection In .Net Core

Configure
This method gets called by the runtime. Use this method to configure the HTTP request pipeline.

Dependency Injection In .Net Core

Register Your Custom Services

To register your custom application services in ConfigureService method kindly put an interface definition object type that will be requested from the container. The second type represents the concrete type (class) thaFit will be instantiated by the container.

  1. services.AddSingleton<IFirstService, FirstService>(); 

If you notice in figure4, it has an IServiceCollection object which registers IFirstService object as singleton. Though there are two more ways to register your dependency in .Net core, those are AddScoped and AddTrsnsient as shown below,

  1. services.AddScoped<ArticlesService>(); 
  2. services.AddTransient<ArticlesService>(); 

Now create a product controller under controller’s folder and inject dependency in either of controller’s action, as shown below in screen shot,

Dependency Injection In .Net Core

Open Product Controller and inject IFirstService dependency in Details action method. Kindly refer to the below image for ref,

  1. public ActionResult Details([FromServices] IFirstService FirstService) 
  2.      {             
  3.          _FirstService = FirstService; 
  4. return Content(_FirstService.WelcomeEquinox()); 
  5.      } 

Note

[FromServices] attribute is newly introduced in .Net Core and brings an important role in order to inject abstract dependency at action method level.

Let’s run an application and see how it works.

Press F5 and application will open in browser just to ensure that application is up and running.

Dependency Injection In .Net Core

Kindly copy and paste the following url to ensure the IFirstService availability at action level.

http://localhost:64686/product/details
Dependency Injection In .Net Core

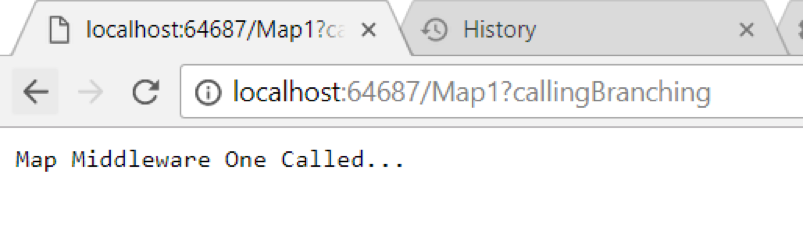
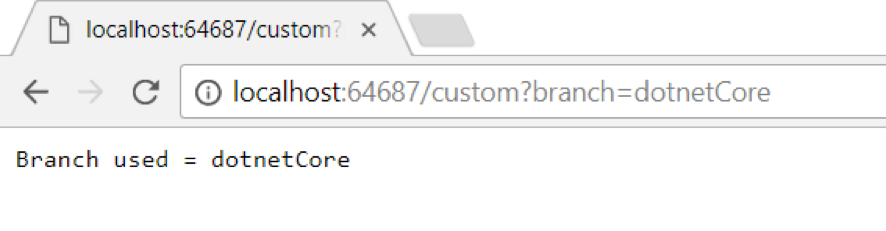
This is the final outcome which brings information through Custom service
Dependency Injection In .Net Core

    Wednesday, January 3, 2018

    Register A Chat Bot Using MS Bot Framework

    Recently, I created a Chabot for a purpose which I wanted to register within. After an implementation of Bot using MS Bot framework, it should be registered with https://dev.botframework.com/bots.

    These are a few steps which may help you to register and ready to use.

    Step 1
    Go to https://dev.botframework.com/bots. You will have the following section there as given in the below screenshot.

    Step 2
    Click on "My Bots" and further, click on "Create a bot".

    Chat Bot

    Step 3
    Click on "Create" button as shown in given image and the following window will appear.
    Chat Bot

    Step 4
    Choose the first option from the given screen and click OK.
    Chat Bot

    Step 5
    As soon as you create click ok, it generates AppId which might be essential at down the level during accessing the Bot which you have created.
    Chat Bot

    Step 6
    Click on "Generate an app password" to continue.

    Note
    Kindly save this password in Notepad for future purpose.


    Chat Bot
    Chat Bot

    Step 7:
    After performing all the above steps, it is time to set configuration as given below.
    Chat Bot

    It may prompt you to keep https instead of http,
    Chat Bot
    Step 8

    Once you are done, click on register and it will prompt to as Bot created in the given screenshot.
    Chat Bot

    Step 9
    As soon as you have created and registered your Bot, click on the recently registered Bot as depicted below in the screenshot.

    Chat Bot

    It will take you to the next level which advises you to test your Bot.
    Chat Bot
    Step 10

    Click on the Test button showing in right top corner. Click on that. It will prompt you another window and put "hi" in the chat window. As soon as you type something, it starts responding you which confirms that Bot has been register successfully.
    Chat Bot

    Short circuiting and branching in .NET Core are key concepts to make an application sequential and provide more control over the response.

    The term middleware is used in a .NET Core application either to delegate a request to the next component in the pipeline or short circuit it.

    Middleware has some important aspects as shown below:

    1. It delegates the request to the next component in the pipeline.
    2. Business logic can be written before and after the component is invoked in the pipeline.

    There are three extension methods Run, Map, and Use which can be configured as request delegates.

    Each request delegated can be written as a single line as an anonymous method (aka in-line middleware) or separately as a middleware component.

    These components are responsible for invoking the next delegate in the pipeline or to short circuit it.

    .NET Core request pipeline comprises request delegates, which call one after another as the image shown below:

    Reference: MSDN

    Each delegate can also decide not to pass a request to the next delegate, which is known as short circuiting. An advantage of short circuiting is, it doesn’t pass the request to the following delegate if it doesn’t meet specific criteria. For example, if a request doesn’t have a specific parameter in its URL, then it can short circuit the pipeline and returns the response directly from there.

    On the other hand, branching helps to map the request based on matches and executes the specific branch (can be a method).

    Map and MapWhen extensions are provided by .NET Core by default for branching the pipeline.

    Kindly refer to the image below for better understanding:

    Let’s practically see all this.

    PREREQUISITES

    • Visual Studio 2017 Enterprise/Professional
    • .Net Core 1.1

    IMPLEMENTATION

    To understand the short circuiting and branching in .NET Core 1.1, refer to the figure below for a solution structure:

    Open a startup.cs file and search for configure method; it comes out-of-box with .NET Core applications.

    public void Configure(IApplicationBuilder app, IHostingEnvironment env, ILoggerFactory loggerFactory, IFirstService FirstService)         { }


    CONFIGURE:

    This method gets called by the runtime. Use this method to configure the HTTP request pipeline.

    Figure3.

    SHORT-CIRCUITING:

    To meet purpose I’ve written code using Use extension method and set a limitation so that if a specific request contains a query string in its URL, then it should not go further in pipeline otherwise it should go till the Run method.

    The code snippet for short-circuiting is shown below:

    public void Configure(IApplicationBuilder app, IHostingEnvironment env, ILoggerFactory loggerFactory, IFirstService FirstService)         {             app.Use(async (context, next) =>             {                 string agent = context.Request.Headers["user-agent"].ToString();                 if (!string.IsNullOrEmpty(context.Request.QueryString.Value))                 {                     context.Response.Headers.Add("X-Frame-Options", "localhost");                                        await context.Response.WriteAsync("Query string is not allowed in Middleware pipeline");                     return;                 }             });         }
    

    Press F5 and run an application.

    Now copy and paste the following URL into your browser: http://localhost:64687/Map3?CustomString

    Now as per the code (if it has a query string in URL) it should short circuit the request pipeline and return a response directly from Use method:

    RESPONSE

    As shown in the screen above it skips the remaining pipeline and responds from the use extension method only. Though Run method always executes if you don’t short circuit.

    The snippet for the run method within an application is given below:

    app.Run(async context =>         {             await context.Response.WriteAsync("Hello from sample application.");         });
    
    The complete code snippet for short-circuiting is given below:
    
    public class Startup
    
    {     public void Configure(IApplicationBuilder app)     {         app.Use(async (context, next) =>         {             // You can write logic that that doesn't write to the Response.             await next.Invoke();             // write logic that doesn't write to the Response.         });         app.Run(async context =>         {             await context.Response.WriteAsync("Hello from sample application.");         });     }
    
    }
    

    Note: If you use the above code segment, await next.Invoke(); which is being used to call next component or further delegate in the pipeline. In this case it is the app.Run() method.

    E.g., kindly copy and paste the following code snippet in your configure method and run an application.

    app.Use(async (context, next) =>             {                 string agent = context.Request.Headers["user-agent"].ToString();                 if (!string.IsNullOrEmpty(context.Request.QueryString.Value))                 {                     context.Response.Headers.Add("X-Frame-Options", "localhost");                     //context.Response.Headers.Add("X-Content-Type-Options", configuration["CustomMessage"]);                     await context.Response.WriteAsync("Query string is not allowed in Middleware pipeline");                     await next.Invoke();                 }             });
    
    app.Run(async (context) =>             {                               await context.Response.WriteAsync(" Welcome Folks in .Net Core presentation!");             });
    

    Output:

    Let’s run an application and see how it works.

    Press F5 and application will open in the browser to ensure that the application is up and running.

    BRANCHING:

    As the name implies, branching means a resembling of the branches of a tree. It’s somewhere same in .NET Core also.

    Map extension method exists in .NET Core which can be used a branching as given below:

    As defined in the screenshot above, map method branches the request pipeline based on the matches of the given request path. If the request path starts with the given path, the branch will execute.

    Code snippet: Keep the code segment in Configure() method of startup file.

    app.Map("/map1", HandleMapMiddlewareOne);
    
    private static void HandleMapMiddlewareOne(IApplicationBuilder app)         {             app.Run(async context =>             {                  await context.Response.WriteAsync("Map Middleware One Called...");                            });         }
    

    app.MapWhen works the same way, as shown in the image depicted below:

    Let’s see this in practice.

    Press F5 to run your application.

    Copy and paste the following URL in browser http://localhost:64687/map1?callingBranching

    Note: Kindly replace localhost port with your application’s one.

    As soon as you execute the URL, it verifies and matches the request and reaches to the branching delegate. In our case, its HandleMapMiddlewareOne and respond directly from there.

    The same way it should work for MapWhen with the bit different condition in the below code snippet.

    app.MapWhen(context => context.Request.Query.ContainsKey("branch"),HandleBranch);
    
    private static void HandleBranch(IApplicationBuilder app)         {             app.Run(async context =>             {                 var branchVer = context.Request.Query["branch"];                 await context.Response.WriteAsync($"Branch used = {branchVer}");             });         }
    

    Press F5 to run your application.

    Copy and paste the following URL in browser http://localhost:64687/custom?branch=dotnetCore

    OUTPUT:

    Hope this helps you to understand Short Circuiting and Branching in .NET Core.

    Happy Coding!