Monday, December 29, 2014

Difference between Transactional,Snapshot and Merge Replication


    • Transactional replication – Transactional replication replicates each transaction from publisher to subscriber for the article/table which is being published. Initially transactional replication takes a snapshot of the publisher database and applies to the subscriber to synchronize the data. As we know that replication is helpful to synchronize the data among the Publisher and subscriber databases. A Log Reader Agent reads transaction from the transaction log and writes it to the distribution database and then to the subscriber database. Each database published using transactional replication keeps Log Reader agent and moves transaction from publisher to distributor. Transactional replication is helpful where real time data is required such as online trading and bank specific transactions to keep live data backup of each debit or credit transaction.

                   Note: I also noticed that transactional replication applies only on those article/tables which has primary key in it.This is the only reason it keeps track of data changed at publisher level.

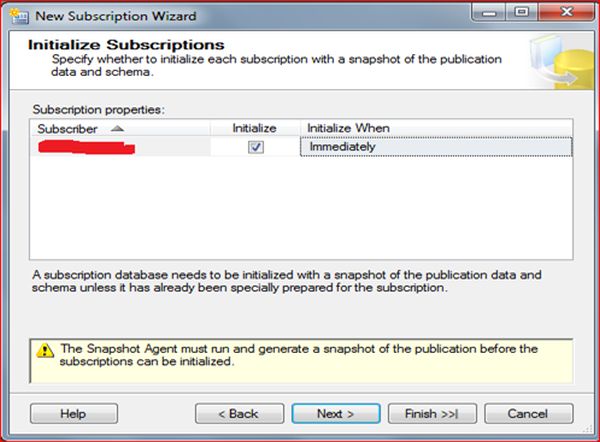
    • Snapshot replication - Snapshot replication works slightly different in manner from transactional replication. As name “snapshot” says it takes a snapshot of the published database and moves it to a subscriber database. Snapshot replication completely overwrites the transactions/data at the subscriber database every time as it drops the tables and recreates it again. Snapshot is best in use when data frequency is bit low or subscriber needs data on a certain interval rather than very frequently. E.g. Snapshot replication is to update a list of items that only changes periodically or at certain interval like end of business day. Snapshot is bit slowly than transactional because on each attempt it moves multiple records suppose millions of records from one end(Publisher) to another end(Subscriber).
    • Merge replication – As name implies “Merge” it joins publisher and subscriber databases, it is one of the complex replication and helps to keep data consistent among multiple ends. Merge replications works in an integrated manner with Publisher and subscriber, every time Merge Agent traces each change occurred at both end and send those changed transactions to distributor database for further propagation. The Merge Agent runs either at distributor end for push subscriptions or the Subscriber for pull subscriptions. What I understood about Merge replication, its best fit into Retail market like Pantaloons, BigBazar Lifestyle and many more. Where it’s helpful in synchronizing the records among multiple stores as per inventory increased or decreased.

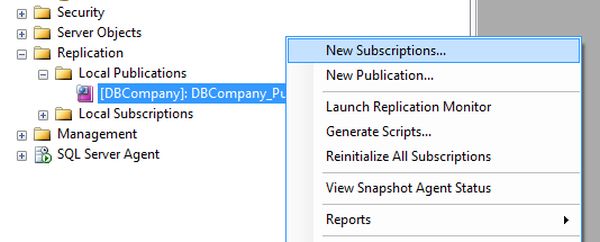
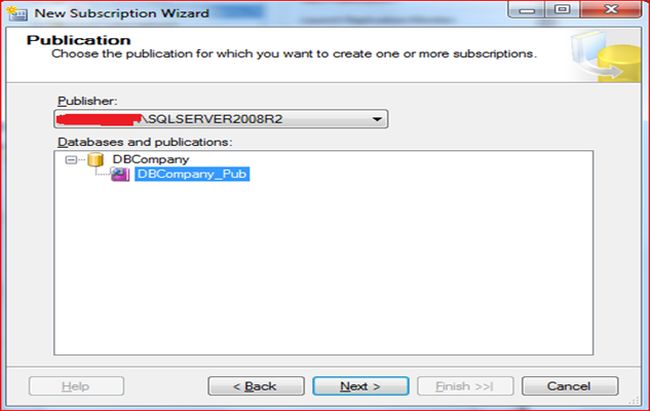
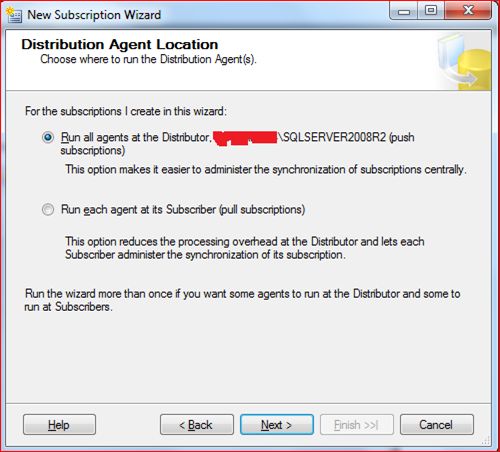
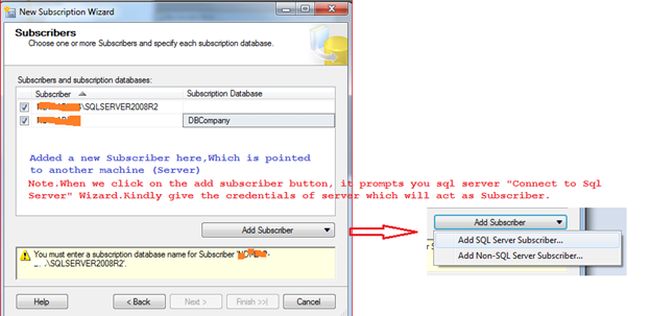
To know more about Replication please go through these links.


Thanks

Sachin Kalia

Sunday, December 28, 2014

Snapshot Replication (Setting up Subscriber) in SQL Server 2008: Part 3

This article is a continuation of the following articles:

I thought to keep the pictorial concept so that anyone can easily setup and map at their end.

image


Publisher:
The Publisher can be denoted as the origin of the database on which the schema or record amendments take place. Publisher is a point that manages data for replication and sends commands to the distributor for further process, for example S1.

Subscriber
The Subscribers is the point, where the subscriber database incurs the notification and a copy of the data from the distributor about the changes happens in the publisher database. The subscriber database generally lives on a different something, for example S2.

Setting up the Subscriber
Once the publisher (Snapshot replication (Setting up publisher) in SQL Server) has been setup, it's time to create the subscriber for it.
The following procedure is required to set up the subscriber.

Step 1:Right-click on DBCOmpany_Pub and choose the option “New Subscription” to create a subscription.


New Subscription

Step 2: A Publisher dropdown shows the publisher name that we have created recently in the last activity. Please refer to the image below for reference and click on the Next button.


Publisher dropdown

Step 3 :The following window will appear and click on the "Next" button.


run all agents


Step 4 : In this step we will add new subscribers that will be a different machine or the same machine where we have already set up the Publisher account (for example S2). Kindly refer to the screen captured below for a better understanding. Then click on the Next Button.


Publisher account

Step 5 : Please see the image given below and take the necessary action.


necessity action


Kindly refer to the image below after clicking on the button as advised above in the image. Now choose the necessary actions in a prompted dialog box and press OK.


choose the necessity actions


After fulfilling the window shown above kindly click on the Next button and proceed further.


window appeared

Step 6 : The following window will appear and click on "Next".


agent schedule

Step 7 :The following window will appear and click on "Next".


click on next

Step 8 :Another window will appear and click on "Next".


wizard action

Step 9 : The following window will appear and click on "Finish".


db company

Step 10 : A window will appear with some messages for Successful creation of the Subscription.


Successful creation of Subscription

Step 11 :Expand the publisher and you can see the subscriber as shown in the image below.


publisher

Step 12 :Expand Replication -> Local Publication the choose publication from there, right-click on the selected publisher and choose Launch Replication Monitor. Kindly refer to the image below:


Launch Replication
The Replication monitor describes to you in detail about the success or failure of the snapshot replication. You can read all the details from the three options given there.


Replication monitor describes


tips and trick


As soon as we are done with the setup of Subscriber, it's time to watch the replication. As soon as you run the Replication the monitor starts synchronizing the data from the publisher to the subscriber though there may be chances that data is not synchronizing from the publisher to the subscriber, in that case you just go to view the snapshot agent status to verify its running status as shown in the image below:
view snapshoot
start


The Magic of Data replication is over.
Thanks for reading this. I'll post another part soon.


To learn more about MVC, please go to the following link.
MVC Articles
Enjoy Coding and Reading

Tuesday, December 16, 2014


Snapshot Replication (Setting up Publisher) in SQL Server 2008: Part2


image


This is a continuation of the Snapshot Replication in SQL Server 2008: Part 1.In these articles I’ll shed light on Setting up Publisher in Snapshot Replication and recommend you to read an article as shown as link. I thought to keep the pictorial representation so that anyone can easily setup and map at their end.

Publisher:

The Publisher can be denoted as origin of database on which the schema or records amendments take place. Publisher is a point which manages data for replication and sends command to distributor for further process.e.g. S1

Subscriber:

The Subscribers is a point, where subscriber database incurs the notification and a copy of data from distributor about the changes happened at publisher database. The subscriber database generally live on a different e.g. S2

Setting up the Publisher:

Step1.Open replication node in your database and choose an option local publication.

clip_image001

Step2. Right click on local publications and click on new publication.

clip_image003

Step3. After click on new publication tab the following window will appear and click on “next” button.

clip_image005

Step4. Select the database which will act as a publisher. I’ve chosen DBCompany on my server machine and click on “next” button.

clip_image007

Step5. A following window appears and chooses a snapshot replication option out of 4 options there and clicks on “next” button..

clip_image009

Step6. Select objects that you want to publish. E.g. I’ve selected employee and Incentive table which need to replicate. Kindly refer depicted image below and click on “next” button.

clip_image011

Step7. Following window will appear and click on “next” button.

clip_image013

Step8. Kindly checked (tick) both of the checkbox .In order to change the schedule time interval than click on change button and set the time as per your need also shown in depicted image below in and then click on next.

Note: it’s not necessary to check the Schedule the snapshot agent

clip_image014

Step9. Following window will appear after click on “Change” button .Please set an interval accordingly and refer an image shown below and then Click on Ok button.

clip_image016

Step10. Click on security settings button and choose options from there as shown in image below after this image .

clip_image018

clip_image019

Step11. After putting up required value in above image a following window will appear. Kindly press next button to proceed further.

clip_image021

Step12.A following window will come in and click on Next button.

clip_image023

Step13. Kindly fill Publication name textbox with your desired name and click on Finish button.

clip_image024

Step14. A following window will appear for Successful creation of Publication.

clip_image025

Step15: In order to confirm the publication has been created, Kindly Expand Local Publication as depicted in image below:

clip_image026


clip_image027

I’ve run this under the SQL server agent account as you have seen above and also shown in image below.You can try it with Windows account also.

Also there is another point for consideration that, Kindly enter publisher SQL server account credentials of in order to connect with publisher database.

clip_image028

Thanks for reading this. I’ll post other part soon.

To learn more about MVC please go to the following link.
MVC Articles

Enjoy Coding and Readingclip_image029

Monday, December 15, 2014

Snapshot Replication in SQL Server 2008: Part1

Snapshot Replication in SQL Server 2008: Part1

Replication is one of the headstone features of SQL Server to keep data synchronize among various server. There are basically three types of replication present in SQL server Transactional,Snapshot and Merge Replication .In this article I’ll cover Snapshot Replication. As name implies “Snapshot” means it takes a snapshot of publisher database when any occurrence such as Insert, update, delete and merge (Part of DML) or Create, Alter, Drop, Truncate (part of DDL command) happens on a publisher database resides on server(e.g.S1) and needs to be reflected/replicate on the database residing on another server (e.g. S2). This change happens within fraction of seconds. In this article, I will demonstrate the step by step approach to configuring snapshot replication in SQL Server 2008 R2.

There are three musketeers of Replication and you will become familiar in the series Replication. These musketeers are shown below:

clip_image002

1.       Publisher
2.       Subscriber
3.       Distributor Database

Publisher:

The Publisher can be denoted as origin of database on which the schema or records amendments take place. Publisher is a point which manages data for replication and sends command to distributor for further process.e.g. S1

Subscriber:

The Subscribers is a point, where subscriber database incurs the notification and a copy of data from distributor about the changes happened at publisher database. The subscriber database generally live on a different e.g. S2

Distribution Database:

A database which contains all the Replication commands. Whenever any occurrence such as Insert, update, delete and merge (Part of DML) or Create, Alter, Drop, Truncate (part of DDL command) are executed on the publisher, the corresponding commands generated by SQL Server are stored in the Distribution database. Note: it’s best if we can maintain this database at shared path in such a way that the distributor is responsible for sharing data among the subscriber, I have also observed that if you keep the distribution database on the shared path than I would be convenient for another server to access that path easily otherwise it may prompt an security denied access error. Note: Distribution database can be placed on the same server as the publisher however its best practice to keep it on different server e.g. S3.

Let us now begin with the snapshot Replication and will cover Setting up the Distribution Database.

There are 3 steps involved for Configuring the Transactional Replication:

1.       Setting up the Distribution Database.

2.       Creating the publisher.

3.       Creating the subscriber

Setting up the Distribution Database:

Step1. Connect to the Microsoft SQL Server 2008 R2 Management Studio.

clip_image004

Step2. Right Click on the Replication and Select Configure Distribution as demonstrated in the screen below:

clip_image006

Step3. After Clicking on Configuration wizard following wizard will appear

clip_image008

Step4. Click Next. And choose Ditributor is a point to in respect to Replication which is responsible for sharing data among the subscribers or server on which the Replication will be configured will be Hosting the distribution database and second option is states that another server can be used as another host for distribution database as depicted in image below:

clip_image010

Step5: A new window appears as shown in the screen capture below:

clip_image012

Step6: Create a folder on any other drive/server to hold the Snapshot folder and Click on the Next button as shown in the screen depicted below. Note: Snapshot folder should not be in C drive or in that drive which has OS.

clip_image014

E.g. SnapShot Folder- -> \\servername\path to respective folder.

Step7: A new window appears as shown in the screen capture below and display information to store data and log file.

clip_image015

Step8:   A new window appears as shown in the screen below and Click on the Next button.

clip_image017

Step9: Click on the Next button as shown in the screen capture below:

clip_image019

Step10. Click on Finish button.

clip_image020

As soon as I click on Finish button it takes few seconds to completes its process and give you success wizard .After completing this step you will see an entry in master database for distribution DB as depicted below.

Step11: A following window represent that distribution point has been created in master.

clip_image021

Thanks for reading this. I’ll post other part soon.

To learn more about MVC please go to the following link.
MVC Articles

Enjoy Coding and Readingclip_image022