Monday, August 17, 2015

Aggregation Vs Composition: A Simple Practical Approach

This article explains the real facts of Aggregation and Composition and I feel it would be a good brain teaser if I come with some actual examples.

Before proceeding I'd like to share one of the possible situations that you may encounter in your daily need or maybe in an interview. Let's dive into it in a practical way.
The question is, "What is the difference between composition and aggregation?" In this article I'll provide my understanding of composition and aggregation.
The following image is fictional and it may be one of the possible scenarios with warrior's fight.
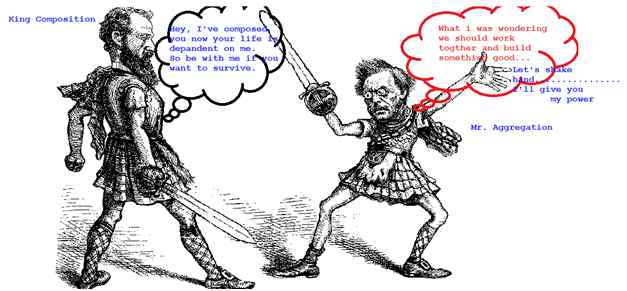
Aggregation Vs Composition
Aggregation
Aggregation means “The act of gathering something together”.
As inheritance gives us an "is-a" and composition gives us a "part-of" whereas aggregation gives us a "has-a" relationship.
For example, a mobile “has an” operating system. Aggregation doesn't manage the lifetime of other objects. For an example, mobile uses (has-an) operating system that may be of a different service provider. like Android, iOS and Windows. Here Aggregation theory says that a mobile has an operating system of a specific service provider.
Aggregation diagram is shown as a UML diagram with unfilled diamond notation as depicted below:
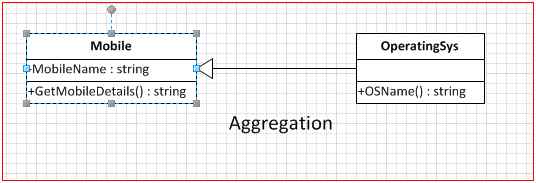
Aggregation
The preceding diagram states that a Mobile class may utilize an operating system from a different service provider. A mobile is not directly dependent on an operating system class. Both are independent entities. For example a Samsung is a mobile provider whereas an Android is a Google Product.
A code snippet shown below that is an OperatingSys object is injecting into the Mobile class at the constructor level. The creation of the OperatingSys class is entirely independent from Mobile Creation. Kindly have a look at the code segment as shown below:

  1: public class Mobile
  2: {
  3:     public OperatingSys objOS;
  4:     public Mobile(OperatingSys objOperatingSys)
  5:     {
  6:         this.objOS = objOperatingSys;
  7:     }
  8:     public string MobileName { get; set; }
  9:     public string OperatingSystem { get; set; }
 10:     public string GetMobileDetails()
 11:     {
 12:         return objOS.OSName() + " Used by " + MobileName;
 13:     }
 14: }
 15: 
 16: public class OperatingSys
 17: {
 18:     public string OS { get; set; }
 19:     public string OSName()
 20:     {
 21:         return "This is Android OS being";
 22:     }
 23: }
 24: 
 25: class Program
 26: {
 27:     static void Main(string[] args)
 28:     {
 29:         OperatingSys objOperatingSys = new OperatingSys();
 30:         Mobile objMobile = new Mobile(objOperatingSys);
 31:         objMobile.MobileName = "Samsung";
 32:         Console.WriteLine(objMobile.GetMobileDetails());
 33:         Console.ReadLine();
 34:     }
 35: }
 36: 
Composition
Composition means mixture of ingredients.
Composition gives us a "part-of" relationship or a mixture of ingredients. Composition is a higher degree of association than aggregation. Composition derives the management of the objects and its lifecycle. In case of composition the lifetime of the owned object is the responsibility of the owner object. Composition is shown on a UML diagram as a filled diamond as depicted below in the screen.
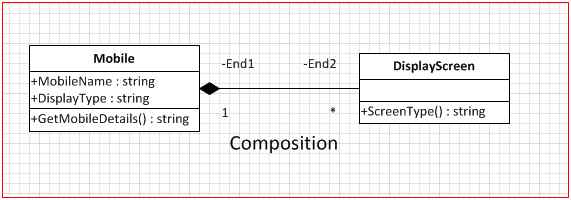
Composition
As you can see in the example code snippet below, Mobile manages the lifetime of DisplayScreen, since the DisplayType object depends on the Mobile object. If Mobile is garbage collected, the DisplayType object is also garbage collected.

  1: public class Mobile
  2: {
  3:     public string MobileName { get; set; }
  4:     public string DisplayType { get; set; }
  5: 
  6:     public Mobile()
  7:     {
  8: 
  9:     }
 10: 
 11:     public string GetMobileDetails()
 12:     {
 13:         return this.DisplayType + " Used by " + this.MobileName;
 14:     }
 15: }
 16: 
 17: public class DisplayScreen
 18: {
 19:     public static string ScreenType()
 20:     {
 21:         return "This LED screen display";
 22:     }
 23: }
 24: 
 25: class Program
 26: {
 27:     static void Main(string[] args)
 28:     {
 29:         // OperatingSys objOperatingSys = new OperatingSys();
 30:         Mobile objMobile = new Mobile();
 31:         objMobile.MobileName = "Samsung Galaxy Mobile";
 32:         objMobile.DisplayType = DisplayScreen.ScreenType();
 33:         Console.WriteLine(objMobile.GetMobileDetails());
 34:         Console.ReadLine();
 35:     }
 36: }
 37: 

Output
Output

Note: It might be one of the questions in an interview.

Tuesday, August 11, 2015

Extend Sealed Class in C# Using Extension Method - A Simple Approach

image

Here we will extend sealed class in C# using extension method.
Requirement - What is sealed. Can we derive this? If yes, then how we can achieve this?
Friends this is one of the possible situation which you may confront in your daily need or may be in an interview. Let’s dive it into in practical way.
Sealed classes are used to restrict the inheritance feature of object oriented programming. Once a class is defined as a sealed class, the class cannot be inherited.
In C#, the sealed modifier is used to define a class as sealed. In Visual Basic .NET theNotInheritable keyword serves the purpose of sealed. If a class is derived from a sealed class then the compiler throws an error.
Sealed Methods and Properties

You can also use the sealed modifier on a method or a property that overrides a virtual method or property in a base class. This enables you to allow classes to derive from your class and prevent other developers that are using your classes from overriding specific virtual methods and properties.
Here we are not directly extending the functionality using the inheritance feature. We can achieve this with help of an extension method. The following is the code declaration with practical hands on.
Note: You should have knowledge of extension method in order to implement this.

  1: public sealed class DotnetPiper  
  2: {  
  3:     public DotnetPiper()  
  4:     {  
  5:         Console.WriteLine("D Class Constructor called!");  
  6:     }  
  7:    public void DotnetPiperInstanceMethod()  
  8:     {  
  9:         Console.WriteLine("DotnetPiper is Called!");  
 10:     }  
 11: }  
 12: public class DotnetPiperExtension : DotnetPiper  
 13: {  
 14:   
 15: }  

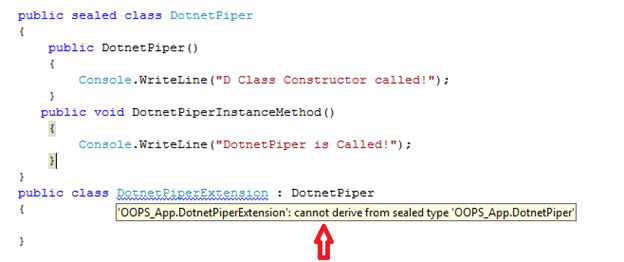
As soon as we build our solution we will get the following error:
Error 1 'OOPS_App.DotnetPiperExtension': cannot derive from sealed type,

Erro

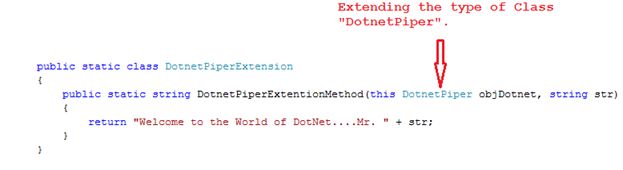
I have created an extension class which keeps a method to extend the functionality of sealed class.

  1: public static class DotnetPiperExtension  
  2: {  
  3:     public static string DotnetPiperExtentionMethod(this DotnetPiper objDotnet, string str)  
  4:     {  
  5:         return "Welcome to the World of DotNet....Mr. " + str;  
  6:     }  
  7: } 
Please have a look at the following image:

method


Here I am calling an extension method in main class:

  1: class Program  
  2: {  
  3:     static void Main(string[] args)  
  4:     {  
  5:         DotnetPiper dp = new DotnetPiper();  
  6:         string nameStr = dp.DotnetPiperExtentionMethod("Sachin Kalia");  
  7:         Console.WriteLine(nameStr);  
  8:         Console.ReadLine();   
  9:     }  
 10: }  

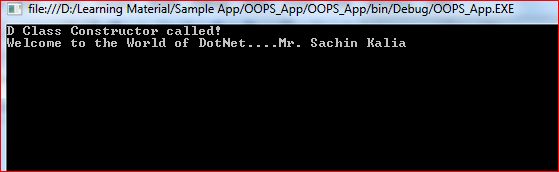
Output:

CMD


Complete code for hands on:


  1: {  
  2:     public DotnetPiper()  
  3:     {  
  4:         Console.WriteLine("D Class Constructor called!");  
  5:     }  
  6:    public void DotnetPiperInstanceMethod()  
  7:     {  
  8:         Console.WriteLine("DotnetPiper is Called!");  
  9:     }  
 10: }  
 11:   
 12:   
 13: public static class DotnetPiperExtension  
 14: {  
 15:     public static string DotnetPiperExtentionMethod(this DotnetPiper objDotnet, string str)  
 16:     {  
 17:         return "Welcome to the World of DotNet....Mr. " + str;  
 18:     }  
 19: }  
 20:   
 21:   
 22: class Program  
 23: {  
 24:     static void Main(string[] args)  
 25:     {  
 26:         DotnetPiper dp = new DotnetPiper();  
 27:         string nameStr = dp.DotnetPiperExtentionMethod("Sachin Kalia");  
 28:         Console.WriteLine(nameStr);  
 29:         Console.ReadLine();  
 30:   
 31:                 }  
 32:        }  


Note: It might be one of the FAQ in an interview.

Note: Please share you opinion and advise us for better approach also.I really appreciate you initiation Smile

To know more MVC and WebApi Kindly go through with these links

MVC Articles & WCF and WebApi

Thanks.
Enjoy coding and reading

Saturday, August 8, 2015

JQuery Interview question and answer with practical: Part 1


image

Question: What is jQuery?
Ans: JQuery is fast, lightweight and feature-rich client side JavaScript Library/Framework which helps in to traverse HTML DOM, make animations, add Ajax interaction, manipulate the page content, change the style and provide cool UI effect. It is one of the most popular client side libraries.


Question: How JavaScript and jQuery are different?
Ans: JavaScript is a language while jQuery is a library built in the JavaScript language that helps to use the JavaScript language.

Question: Which is the starting point of code execution in jQuery?
Ans: The starting point of jQuery code execution is $(document).ready () function which is executed when DOM is loaded.

Question: Document Load Vs Window.Load() Jquery

Ans: Kindly have a look on detailed video demonstration as shown below:

Document Load Vs Window.Load() JQuery

$(document).ready()function is different from body window.load() function for 2 reasons.

We can have more than one document.ready () function in a page where we can have only one body onload function.

document.ready() function is called as soon as DOM is loaded where body.onload() function is called when everything gets loaded on the page that includes DOM, images and all associated resources of the page

Question: What is difference between prop and attr?

Ans:

JQuery.attr()

Get the value of an attribute for the first element in the set of matched elements.

Whereas,
JQuery. Prop ()

Get the value of a property for the first element in the set of matched elements.

What actually is Attributes?


Attributes carry additional information about an HTML element and come in name=”value” pairs. You can set an attribute for HTML element and define it while writing the source code.
E.g.

<input id="txtBox" value="Jquery" type="text" readonly="readonly" />

As shown above “id”, "type”, “value" are attributes of the input elements.
Property:

Property is a representation of an attribute in the HTML DOM tree. Once the browser parse your HTML code, corresponding DOM node will be created which is an object thus having properties.
in above case ,once browser renders the input in browser other properties like align, alt, autofocus, baseURI, checked so on will be addedas depicted in below image.


clip_image002


Since, attr() gives you the value of element as it was defines in the html on page load. It is always recommended to use prop() to get values of elements which is modified via JavaScript/JQuery in browser on rumtime.it always keeps the current state value.

Here we’ll have a look on the example which also states the difference b/w both of them.

I’ve html text box having some attributes as shown below:


clip_image003


If I run the following JQuery syntax it will produce such result.


clip_image005

Now I’ve slightly changed the code and removed the read-only attribute as shown below in image:


clip_image006


I run the application and see some attribute and property to understand the difference on fly.

Initially after running the application we have these attributes and property of input text type as depicted in image below:

Note: Kindly scroll down when you run the attached sample application to see the Value property using firebug tool of Firefox browser.


clip_image008

Now I changed the value on runtime and see the attributes and property. I’ve put Welcome JQuery in textbox. Now see that attribute value is still JQuery while value property has been changed to Welcome JQuery.

clip_image010

The property always represents the current state while the attribute (except in old versions of IE) represents the initial state or is meant for html attributes as they are strictly defined. the attribute tells you nothing about the current state.

Reference MSDN:

1. for a checkbox (jquery 1.6+)

1

2

3

4

5

<input id="check1" checked="checked" type="checkbox" />

.attr('checked') //returns  checked

.prop('checked') //returns  true

.is(':checked') //returns true

Prop() method returns Boolean value for checked, selected, disabled, readOnly..etc while attr returns defined string. So, you can directly use .prop(‘checked’) in if condition.

2. SelectedIndex, tagName, nodeName, nodeType, ownerDocument, defaultChecked, and defaultSelected..etc should be retrieved and set with the .prop() method. These do not have corresponding attributes and are only properties.

3. .attr() calls .prop() internally so .attr() method will be slightly slower than accessing them directly through .prop().

Question: What is the difference between .js and .min.js and vsdoc.js?
Ans: jQuery library comes in 2 different versions Production and Deployment. The deployment version is also known as minified version. So .min.js is basically the minified version of jQuery library file. Both the files are same as far as functionality is concerned. but .min.js is quite small in size so it loads quickly and saves bandwidth.


clip_image012


Question: How to select id which contains Meta Character.

Ans: If any element id (<li id="first-li" class="list">Sachin Kalia</li>) contains meta character in between the id then it should be resolved using the two backslashes (\\) as prefix in ID selector.


clip_image013

Question: Difference between and Usages of Html(),Text() and Val() functions in JQuery.

Ans : one of my friend interviewed in a company last day and confronted a question which I found little interesting though its very basic in nature. This is the actual content as shown below: 

  1: <div id="DivOne" class="oddNum">Div One Called !!
  2:     <span id="span">This is span value</span>
  3:     <span id="span">This is span value2
  4:         <p>I m paragraph of span 2</p></span>
  5:     <span id="span">This is span value3</span>
  6: </div>
  7: <div id="DivTwo" class="evenNum">Two</div>
  8: <div id="DivThree" class="oddNum">Three</div>
  9: <button id="btnOne">Reset odd numbers</button>
 10: <button id="btnTwo">Reset even numbers</button>
 11: <input type="text" id="txtBox" value="This is Text Box"></input>


Interviewer wanted an answer using Html(),Text() and Val().So here I’ve tried to get value using all three methods. When I initially use .Html() function it gives me all inner elements of particular div or an element you choose.This is the code base I’ve used as depicted below:

  1: $('.oddNum').css('background-color', '#DEA');
  2: $('#DivTwo').css('background-color', '#FCC');
  3: 
  4: $('#btnOne').click(function() {
  5:     // Action goes here
  6:    var result = $('#DivOne').html();
  7:     var resultText = $('#txtBox').val();
  8:     
  9:     alert(result);
 10:    // alert(resultText);
 11: });
 12: $('#btnTwo').click(function() {
 13:     // Action goes here
 14:     $('#DivTwo').css('background-color', '#FFF');
 15: });

This is the initial look of the elements in browser as given below in image:


image


Case 1 : As soon as I click on the button Reset off numbers”  and keeps var result = $('#DivOne').html();  enable in code, it gives me following result set shown below in image:

  1:  var result = $('#DivOne').html();
  2:  alert(result);

Output:


 image 


Case 2. However if we put given below code than it gives us the result as text value of each inner elements also shown in image below to code segment.

  1: var result = $('#DivOne').text();
  2: alert(result);

Output:


 image


Case 3. However if we put given below code than it gives us the result as text value of each inner elements also shown in image below to code segment.

  1:  var result = $('#DivOne').val();
  2:  alert(result);

Output will be blank dialog box :


 image


But if we execute same code with any “input” type element than div,span and paragraph elements than it gives me result as shown below in code


image


This specify  that val() function of JQuery works on input type elements than normal dom html elements.


This is the main difference between all of them .html(), .text() and .val().


ThanksSmile


Keep coding and Smile Smile

Sunday, August 2, 2015

Swap column value of table using Cursor in SQL Server 2008

image

As idea to write an article came from last day when one of my friends encountered a question in an interview. I feel it would be a good brain teaser.

Question - > Please swap a value of specific column value with other. For an example if we have a table t1 having column Gender than Male should be replaced with Female and vice versa.

Note: You should have little knowledge of Cursor and Switch Statement in SQLServer2005,2008 so on.

I’ve taken an idea and created a table keeps the structure as depicted below:

select * from customers

clip_image001

Here we will swap name column values like “Sachin” will be replaced by “dotnetpiper.com” and vice versa.

Output will be like this.

clip_image002

I’ve used cursor to do the desired task .Reason to choose cursor because of it will fetch each row individually and will perform the desired action. Here is the actual SQL query implementation as

  1: DECLARE @name VARCHAR(50) -- database name  
  2: DECLARE DotnetPiper_Cursor CURSOR FOR  
  3: SELECT name 
  4: FROM customers
  5: 
  6: OPEN DotnetPiper_Cursor   
  7: FETCH NEXT FROM DotnetPiper_Cursor INTO @name   
  8: 
  9: WHILE @@FETCH_STATUS = 0   
 10: BEGIN         
 11:       Update customers SET name=( Case when @name='sachin' then 'dotnetpiper.com'
 12:                                        when @name= 'dotnetpiper.com' then 'sachin'
 13:                                         else @name 
 14:                                         End) WHERE CURRENT OF DotnetPiper_Cursor
 15: 
 16:        FETCH NEXT FROM DotnetPiper_Cursor INTO @name   
 17: END   
 18: 
 19: CLOSE DotnetPiper_Cursor   
 20: DEALLOCATE DotnetPiper_Cursor
clip_image004

SQL Snippet to create table Customer table:

  1: USE [Employee]
  2: GO
  3: 
  4: /****** Object:  Table [dbo].[Customers]    Script Date: 08/03/2015 07:18:12 ******/
  5: SET ANSI_NULLS ON
  6: GO
  7: 
  8: SET QUOTED_IDENTIFIER ON
  9: GO
 10: 
 11: SET ANSI_PADDING ON
 12: GO
 13: 
 14: CREATE TABLE [dbo].[Customers](
 15: [ID] [int] NULL,
 16: [Name] [varchar](50) NULL,
 17: [Salary] [varchar](50) NULL
 18: ) ON [PRIMARY]
 19: 
 20: GO
 21: 
 22: SET ANSI_PADDING OFF
 23: GO
 24: 
 25: 
 26: 


I wish it will help you in order to crack such question or scenario.


Note: Please share you opinion and advise us for better approach also.I really appreciate you initiation Smile


To know more MVC and WebApi Kindly go through with these links

MVC Articles & WCF and WebApi

Thanks.
Enjoy coding and reading.

Wednesday, July 29, 2015

The Open Closed Principle of SOLID

The Open Closed Principle of SOLID Principle


image

SOLID principles are like the backbone of OOP, I've gone through with this and obtained a good understanding of this and I thought to share it so that anyone can understand this principle at MAX.
Here is the list of SOLID principles.

SRP

The Single Responsibility Principle

A class should have one, and only one, reason to change.

OCP

The Open Closed Principle

You should be able to extend a classes behavior, without modifying it.

LSP

The Liskov Substitution Principle

Derived classes must be substitutable for their base classes.

ISP

The Interface Segregation Principle

Make fine grained interfaces that are client specific.

DIP

The Dependency Inversion Principle

Depend on abstractions, not on concretions.

Today I am hilighting the Open Closed Principle of SOLID.
Software entities should be open for extension, but closed for modification: Robert Martin
The preceding statement may be a bit confusiing to understand for those who are not very familiar with these principles.


Open for Extension: A class should be open for extension only (for example a derived class or subclasses).
Closed for modification: A class shouldn't be open of modification (for example we should not add code on demand whenever required).


One thing is sure in all software development, most software changes during its life cycle. So, it requires assurance that developers design software that is stable.
For example, let's say you are creating a class to represent an Export. The Export class will export the information/dataset to the desired format like a list of employees and related information to a CSV and text format on behalf of the specified provider. The following sample example is for illustrative purposes only:

  1: public enum ProviderName
  2: {
  3:     SQlServer
  4: }
  5: class Export
  6: {
  7:     public bool ExportFileToDesiredFormat(Provider objProvider)
  8:     {
  9:         if (objProvider == ProviderName.SQlServer)
 10:         {
 11:             //Export to CSV,text,.pdf format code segment which depands     on provider
 12:             return true;
 13:         }
 14:         return true;
 15:     }
 16: }
Now everything looks great. Suppose we come up with one more desired export format. Then at development time it will look like this that is connected with an OLEDB connection:
  1: public enum ProviderName
  2: {
  3:     SQlServer,
  4:     OLEDB,
  5:     Oracle
  6: }
  7: 
  8: class Export
  9: {
 10:     public bool ExportFileToDesiredFormat(string objProvider)
 11:     {
 12:         if (objProvider == ProviderName.SQlServer.ToString())
 13:         {
 14:             //Export to CSV,text,.pdf format code segment which depands on provider
 15:             return true;
 16:         }
 17:         else if (objProvider == ProviderName.OLEDB.ToString())
 18:         {
 19:             //Export to CSV,text,.pdf format code segment which depands on provider
 20:             return true;
 21:         }
 22:         else if (objProvider == ProviderName.Oracle.ToString())
 23:         {
 24:             //Export to CSV,text,.pdf format code segment which depands on provider
 25:             return true;
 26:         }
 27:         else 
 28:         { }
 29:         return true;
 30:     }
 31: }
Here if you can see from the code above, we are modifying the class Export rather than extending, in other words whenever we add a new export format then we are modifying the existing class that violates the OCP.
It's time to remember OCP: entities should be open for extension and closed for modification.
Here is the code segment after considering OCP in mind. The sample example is for illustrative purposes only.

  1: interface IProvider
  2: {
  3:     bool connect(string objProviderName);
  4: }
  5: 
  6: class ExportFileFromSQLProvider : IProvider
  7: {
  8:     public bool connect(string objProviderName)
  9:     {
 10:         //write code on behalf of provider to get connect with SQLProvider and export dataset to desired format such as .csv,.pdf,.text
 11:         return true;
 12:     }
 13: }
 14: 
 15: class ExportFileFromOLEDBProvider : IProvider
 16: {
 17:     public bool connect(string objProviderName)
 18:     {
 19:         //write code on behalf of provide to get connect with OLEDBProvider and export dataset to desired format such as .csv,.pdf,.text
 20:         return true;
 21:     }
 22: }
 23: 
 24: class ExportFileFromOracleProvider : IProvider
 25: {
 26:     public bool connect(string objProviderName)
 27:     {
 28:         //write code on behalf of provide to get connect with OracleProvider and export dataset to desired format such as .csv,.pdf,.text
 29:         return true;
 30:     }
 31: }
 32: 
 33: 
The main method will look like:
  1: class Program
  2: {
  3:     static void Main(string[] args)
  4:     {
  5:         IProvider objSQLIProvider = new ExportFileFromSQLProvider();
  6:         bool sucess = objSQLIProvider.connect("sqlprovider");
  7:         IProvider objOLEDBIProvider = new ExportFileFromOLEDBProvider();
  8:         bool result = objOLEDBIProvider.connect("OLEDBProvider");
  9:     }
 10: }

Using this approach we can add as many ProviderName to export a file as needed. Thus the IProvider interface implements the idea of open for extension but closed for modifications.
It's very easy to understand, especially for those who are not familiar with this principle. Hope you enjoyed this demonstration.


Enjoy Coding and Have wonderful day ahead Smile


To know more MVC and WebApi Kindly go through with these links

MVC Articles & WCF and WebApi

Thanks.
Enjoy coding and reading.