Tuesday, July 28, 2015

Difference between ROW_NUMBER () OVER () & PARTITION BY clause


This is one of the main basic and needed terms which you may have used in your daily uses in SQL Server and off course one of the main interview question.

image


Before jumping into code indeed lets understand what it means by ROW_NUMBER() & PARTITION BY clause.

Order by is required clause for using ROW_NUMBER(), as row number is generated on the basis of the column used along with ROW_NUMBER()

Example: Suppose there are 7 employees in your table 3 are from city Roorkee and others 4 are from city Rohtak and Noida respectively.

Now, if you would use "Order By empid" only, it would assign ROW_NUMBER() on the basis of empid in ascending order from 1, 2, 3, 4,5,6,7

But, if you want to generate row numbers differently for cities then use PARTITION BY in that case.

Please have a look on the example depicted below:

  1: declare @table table(
  2: 
  3: empid varchar(10),Name varchar(20), city char(10)
  4: 
  5: )
  6: 
  7: insert into @table 
  8: 
  9: select 'EMP001','Sachin Kalia', 'RoorKee'
 10: 
 11: union all select 'EMP002', 'Rohit Kalia', 'RoorKee'
 12: 
 13: union all select 'EMP003', 'Yogendra', 'RoorKee'
 14: 
 15: union all select 'EMP004', 'Ravish Sindhwani', 'Rohtak'
 16: 
 17: union all select 'EMP005', 'Parvinder', 'Rohtak'
 18: 
 19: union all select 'EMP006', 'Abhinav Singh', 'Noida'
 20: 
 21: union all select 'EMP006', 'Anshu Agarwal', 'Noida'
 22: 
 23: Select * from @table
 24: 
 25: 
After running the above sql statements here is the result.Now we will apply Order By and Partition By clause seperatly in order to understand the facts.

clip_image002

Now execute the given below lines one by one and see the actual facts.

  1: declare @table table(
  2: 
  3: empid varchar(10),Name varchar(20), city char(10)
  4: 
  5: )
  6: 
  7: insert into @table 
  8: 
  9: select 'EMP001','Sachin Kalia', 'RoorKee'
 10: 
 11: union all select 'EMP002', 'Rohit Kalia', 'RoorKee'
 12: 
 13: union all select 'EMP003', 'Yogendra', 'RoorKee'
 14: 
 15: union all select 'EMP004', 'Ravish Sindhwani', 'Rohtak'
 16: 
 17: union all select 'EMP005', 'Parvinder', 'Rohtak'
 18: 
 19: union all select 'EMP006', 'Abhinav Singh', 'Noida'
 20: 
 21: union all select 'EMP006', 'Anshu Agarwal', 'Noida'
 22: 
 23: --Select * from @table
 24: 
 25: SELECT *, ROW_NUMBER() OVER (ORDER BY empid ) As Counter
 26: 
 27: FROM @table
 28: 

The above given query will give the the following output :

clip_image003

One more clause that can be used with Over is PARTITION BY in case when you want to set one more level of filtration while generating Row_Number.Here is an example given below:

  1: declare @table table(
  2: 
  3: empid varchar(10),Name varchar(20), city char(10)
  4: 
  5: )
  6: 
  7: insert into @table 
  8: 
  9: select 'EMP001','Sachin Kalia', 'RoorKee'
 10: 
 11: union all select 'EMP002', 'Rohit Kalia', 'RoorKee'
 12: 
 13: union all select 'EMP003', 'Yogendra', 'RoorKee'
 14: 
 15: union all select 'EMP004', 'Ravish Sindhwani', 'Rohtak'
 16: 
 17: union all select 'EMP005', 'Parvinder', 'Rohtak'
 18: 
 19: union all select 'EMP006', 'Abhinav Singh', 'Noida'
 20: 
 21: union all select 'EMP006', 'Anshu Agarwal', 'Noida'
 22: 
 23: SELECT *, ROW_NUMBER() OVER (PARTITION BY city ORDER BY empid) As CounterByCityName FROM @table
 24: 
 25: 
clip_image004

This is the beauty of these keywords and may utilize to make the rows sequential in manner.

Kindly find an attached SQL file.

Thanks


Monday, July 27, 2015

Select data of a table from another database in SQL Server 2008R2

In this short snippet blog I’ve demonstrate a condition to use two databases / schemas on the same database server, you can query across databases with the given below syntax :

  1: select * from database1.dbo.table1 t1 join database2.dbo.table2 t2 on t1.column_Name= t2.column_Name
e.g. select * from DBEncrypt.[dbo].TestTable
 
image
 
Sachin Kalia

Wednesday, July 22, 2015

Controller to Controller Communication Using $RouteScope in AngularJS

Here I've merely thought to write my thoughts and hands-on experience with Angular. This is another article that tells you how to get your hands dirty with Controller to Controller communication using $RouteScope in AngularJs AngularJs.
I've designed a program to help you become familiar with just a few keywords that you may be confronting in the future. Those keywords are shown below in the article.
As a newbie to Angular you must be familiar with a few main keywords that you will be using in an application:

  • ng-app: This directive ng-app tells that this element is the "owner" of an AngularJs application.
  • ng-model: This directive ng-model binds the value of the input field to the application variablefirstName.
  • ng-bind: This directive ng-bind binds the innerHTML of the specific element to the application variable firstName.

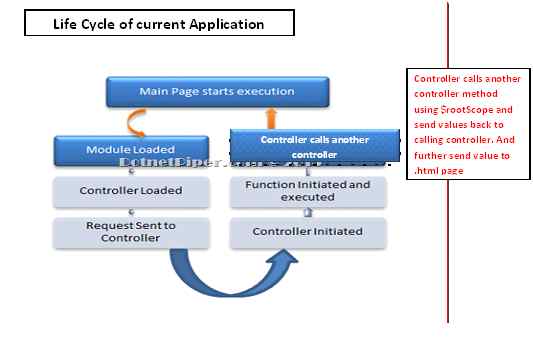
The Application Life Cycle of this program is shown below:

Life cycle of Basic application

I've created an HTML page as the View and named it FirstAngularApp.html that keeps a reference of an Angular.min.js file. You can download and add it to the solution as well.

  1: Here I have a HTML page that keeps the following code segment.
  2: 
  3: <!DOCTYPE html>  
  4: <html>  
  5:     <head>  
  6:         <title>DotNetPiper.com</title>  
  7:         <script src="http://ajax.googleapis.com/ajax/libs/angularjs/1.3.14/angular.min.js"></script>  
  8:         <script type="text/javascript" src="Scripts/Main1.js"></script>  
  9:         <!--<script src="Scripts/Main1.js"></script>-->  
 10:         <script></script>  
 11:     </head>  
 12:     <body ng-app="myApp" ng-controller="Myctrl">  
 13:         <div ng-controller="Myctrl1">  
 14:             <strong>Custom information :</strong> {{message}}  
 15:             <br />  
 16:             <strong>Custom information provide by Controller 2 is :</strong> {{ CompName(message) }}  
 17:             <br />  
 18:         </div>  
 19:         <!--   
 20:     <div ng-controller="Myctrl3"></div> -->  
 21:     </body>  
 22: </html> 
 

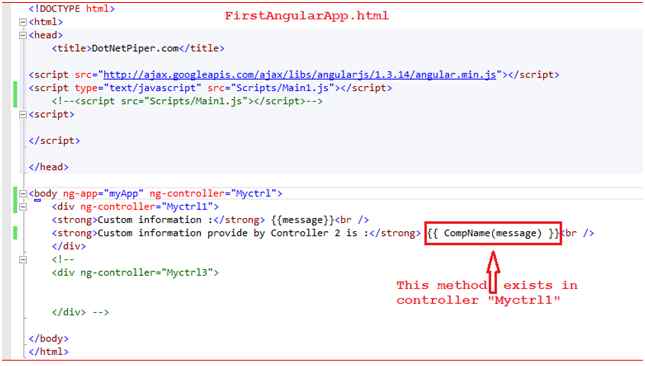
Please have a look at the image shown below:
image
In the code segment shown above it has <strong>{{ CompName(message) }} <br /><br />. This code calls the function CompName defined in the Controller Myctrl1. As soon as this line executes it goes to the controller and performs the required actions.
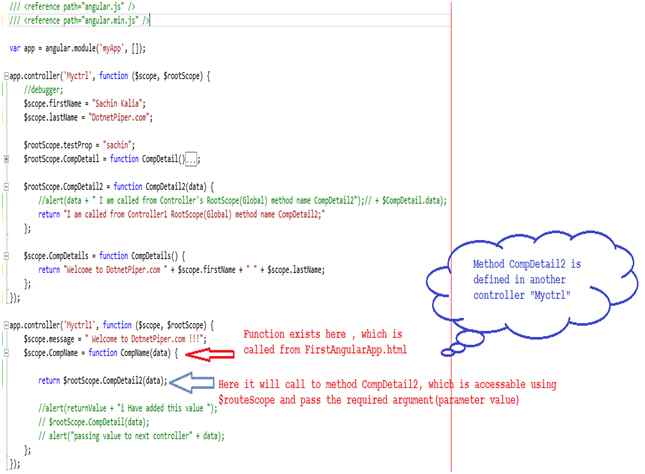
Please refer to the image shown below that keeps the code segment for the Main1.js file.


code
$rootScope

The $rootScope is the top-most scope and acts like a global variable. An app can have only one $rootScope that will be shared among all the components. All other $scopes are children of the $rootScope.
Code segment for main1.js


  1: /// <reference path="angular.intellisense.js" />
  2: /// <reference path="angular.js" />
  3: /// <reference path="angular.min.js" />
  4: 
  5: 
  6: var app = angular.module('myApp', []);  
  7: 
  8: app.controller('Myctrl', function ($scope, $rootScope) {  
  9: //debugger;
 10:     $scope.firstName = "Sachin Kalia";  
 11:     $scope.lastName = "DotnetPiper.com";  
 12: 
 13: 
 14:     $rootScope.testProp = "sachin";  
 15: 
 16:     $rootScope.CompDetail2 = function CompDetail2(data) {  
 17: return "I am called from Controller1 RootScope(Global) method name CompDetail2  =>=> " + data;  
 18: 
 19:     };  
 20: 
 21:     $scope.CompDetails = function CompDetails() {  
 22: return "Welcome to DotnetPiper.com " + $scope.firstName + " " + $scope.lastName;  
 23: 
 24:     };  
 25: });  
 26: 
 27: 
 28: app.controller('Myctrl1', function ($scope, $rootScope) {  
 29:     alert("Welcome");  
 30:     $scope.message = " Welcome to DotnetPiper.com!!!";  
 31:     $scope.CompName = function CompName(data) {  
 32: 
 33: return $rootScope.CompDetail2(data);  
 34: 
 35: //alert(returnValue + "i Have added this value ");
 36: // $rootScope.CompDetail(data);
 37: // alert("passing value to next controller" + data);
 38:     };  
 39: });  
 40: 


As soon as you run BasicAngularApp.html it shows you the result as shown below in the image.
custom information
If you noticed from the image, it has main1.js shown above that calls the method compName() that accepts data as the parameter sent by the view page. Further it again tries to access the method CompDetail2() that is already defined in another controller named Myctrl and accessible using the $routeScope global variable.
$routeScope methods and property should be defined/written prior to the calling method otherwise it will provide an “undefined” error since JavaScript finds the reference line by line.
Kindly have a look at the Life cycle of the basic application as depicted below:
Life cycle of Basic application
I hope it'll help you some day.
You can download a sample application from here : Controller to Controller Communication Using $RouteScope in AngularJS


Kindly inform me if having any query.


Cheers, .Net
Sachin Kalia

Thursday, July 16, 2015

Integration of Google ReCaptcha With MVC4 Application

It is in trend these days to verify that a user is a human or not and the easiest and most used option to do this is to have Google ReCaptcha in your application. This article elaborates how to integrate Google reCaptcha in a MVC4 application. After going through with this article you may get the benefit of this rich feature.
ReCaptcha

To understand what reCaptcha is we first need to define the term “Captcha“.
Captcha is a test made of an image and distorted text that must be solved by human users when they want to subscribe to websites that want to ensure the user is a human being and not a bot or a computer (= preventing spam). Excerpt taken from link.
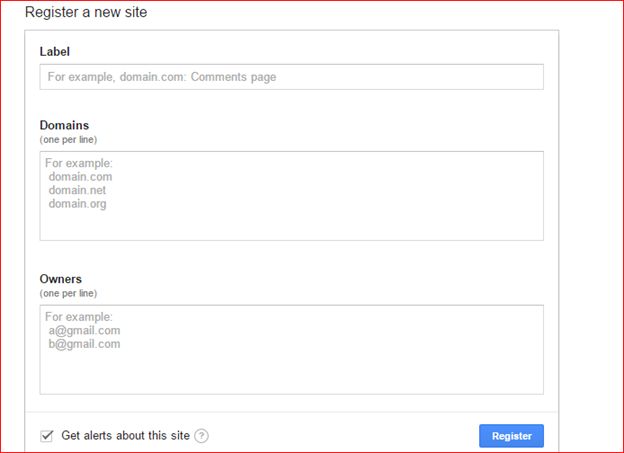
The initial step to integrate Google reCaptcha is to register your site/domain to receive public/private keys. To reach that level merely paste this URL in a browser.
As soon as you hit the preceding given URL it gives you given the following screen.


site
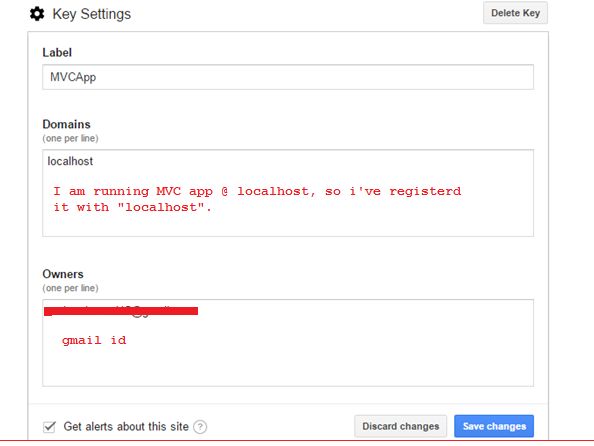
I have registered mine as shown in the following screen shot:
screen shot
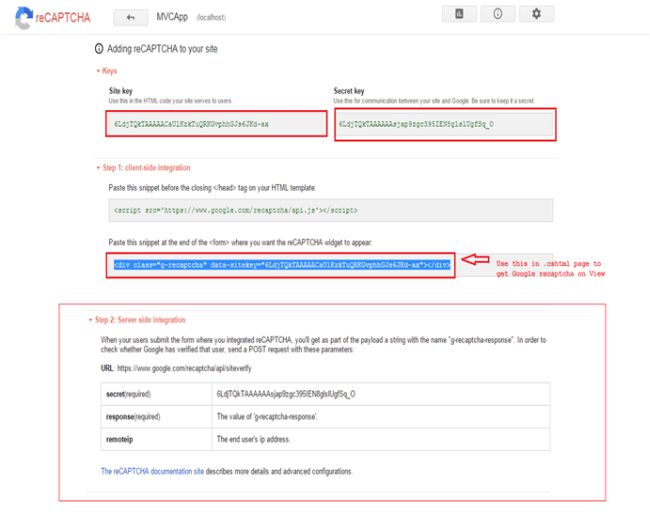
This is how it looks after registering this feature and provides public/private keys along with a reference file and API to use further.
reference file and API
You have registered and now ready to use this excellent feature.
Step 1
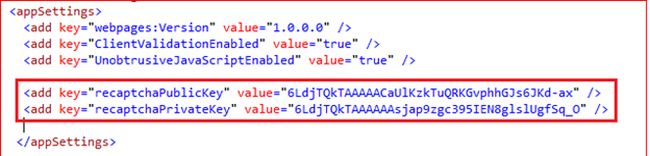
Kindly put you public key and private key in the web.config file as shown in the following image:
shown below in image
Step 2

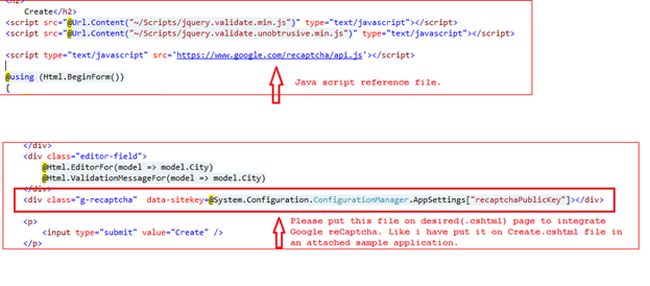
Kindly ensure a few points in order to integrate Google reCaptcha on the .cshtml page as shown in the following image:
image
Source Code Create.cshtml page is given below:

      1: @model MVCSample.Models.EmpRegistration  
      2: @{  
      3:     ViewBag.Title = "Create";  
      4: }  
      5: <h2>  
      6:     Create</h2>  
      7: <script src="@Url.Content("~/Scripts/jquery.validate.min.js")" type="text/javascript"></script>  
      8: <script src="@Url.Content("~/Scripts/jquery.validate.unobtrusive.min.js")" type="text/javascript"></script>  
      9: 
     10: <script type="text/javascript" src='https://www.google.com/recaptcha/api.js'></script>  
     11: 
     12: @using (Html.BeginForm())  
     13: {  
     14:     @Html.ValidationSummary(true)  
     15:     <fieldset>  
     16:         <legend>EmpRegistration</legend>  
     17:         <div class="editor-label">  
     18:             @Html.LabelFor(model => model.Id)  
     19:         </div>  
     20:         <div class="editor-field">  
     21:           @*  @Html.EditorFor(model => model.Id)  
     22:             @Htm*@l.ValidationMessageFor(model => model.Id)  
     23:         </div>  
     24:         <div class="editor-label">  
     25:             @Html.LabelFor(model => model.Name)  
     26:         </div>  
     27:         <div class="editor-field">  
     28:             @Html.EditorFor(model => model.Name)  
     29:             @Html.ValidationMessageFor(model => model.Name)  
     30:         </div>  
     31:         <div class="editor-label">  
     32:             @Html.LabelFor(model => model.Address)  
     33:         </div>  
     34:         <div class="editor-field">  
     35:             @Html.EditorFor(model => model.Address)  
     36:             @Html.ValidationMessageFor(model => model.Address)  
     37:         </div>  
     38:         <div class="editor-label">  
     39:             @Html.LabelFor(model => model.City)  
     40:         </div>  
     41:         <div class="editor-field">  
     42:             @Html.EditorFor(model => model.City)  
     43:             @Html.ValidationMessageFor(model => model.City)  
     44:         </div>  
     45:         <div class="g-recaptcha"  data-sitekey=@System.Configuration.ConfigurationManager.AppSettings["recaptchaPublicKey"]></div>  
     46: 
     47:         <p>  
     48:             <input type="submit" value="Create" />  
     49:         </p>  
     50:     </fieldset>  
     51: }  
     52: <div>  
     53:     @Html.ActionLink("Back to List", "Index")  
     54: </div>

Step 3

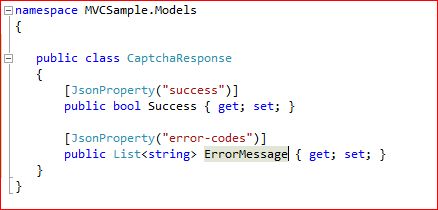
Verify that the user response as reCAPTCHA is generated and resolved by a user. The following API URL is used to verify the user response.
In the preceding API URL the secret and response parameters are required and whereas the remoteip is optional. We have a response class to verify the user response.
response parameters
I have created a POST method in the Index action in the RegisterController to verify the user response.
Here the code segment is shown below:

  1: [HttpPost]  
  2: public ActionResult Create(EmpRegistration modelEmpRegistration)  
  3: {  
  4: bool isCapthcaValid = ValidateCaptcha(Request["g-recaptcha-response"]);  
  5: 
  6: try
  7:     {  
  8: if (isCapthcaValid)  
  9:         {  
 10: if (ModelState.IsValid)  
 11:             {  
 12: //dbContext.AddToEmpRegistrations(modelEmpRegistration);
 13: //dbContext.SaveChanges();
 14: 
 15:             }  
 16: return RedirectToAction("Create");  
 17:         }  
 18: else
 19:         {  
 20: return Content("You have put wrong Captcha,Please ensure the authenticity !!!");  
 21:         }  
 22: //return RedirectToAction("Index");
 23:     }  
 24: catch
 25:     {  
 26: return View();  
 27:     }  
 28: }  
 29: 
 30: public static bool ValidateCaptcha(string response)  
 31: {  
 32: //secret that was generated in key value pair
 33: string secret = WebConfigurationManager.AppSettings["recaptchaPrivateKey"];  
 34: 
 35:     var client = new WebClient();  
 36:     var reply =  client.DownloadString(string.Format("https://www.google.com/recaptcha/api/siteverify?secret={0}&response={1}", secret, response));  
 37: 
 38:     var captchaResponse = JsonConvert.DeserializeObject<CaptchaResponse>(reply);  
 39: 
 40: return Convert.ToBoolean(captchaResponse.Success);  
 41: 
 42: }  
 43: 
Step 4

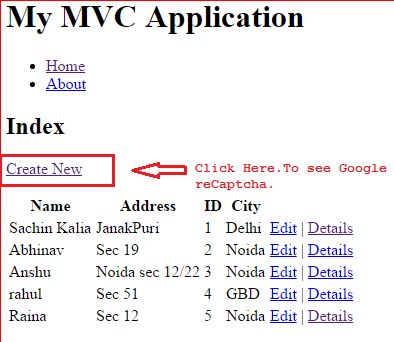
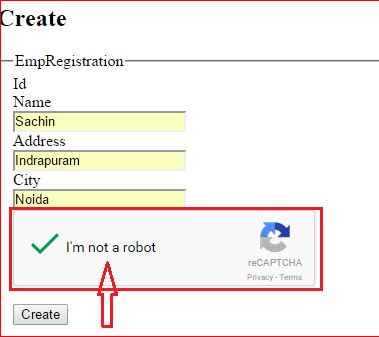
Run the application and press F5. It'll open a page as shown in the image below:
Run the application
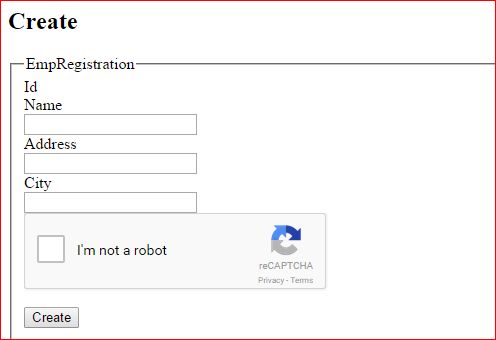
Click on “Create New” => It will open a page as depicted below:
Create New
Case 1
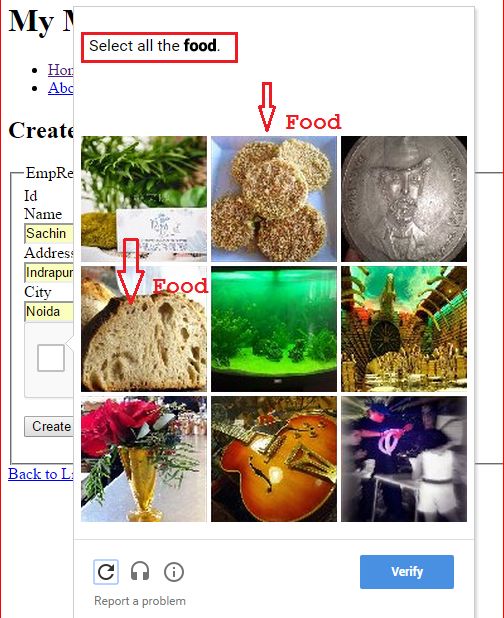
Fill in the desired details and check the checkbox. Just prefix the I'm not a robot. It will open the popup to select the choice.
select food
If you have provide the correct details it will consider you to be a human and shows the following screen as confirmation.
Create
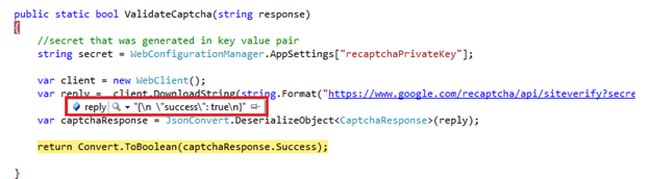
Click on the Create button and it reaches the code segment and executes the code.
Create button
As you can see from the image above it has returned “success” from the server meaning it worked perfectly.
Note: After executing successfully it returns to the create page again. I've used this page for demonstration purposes only.
Case 2
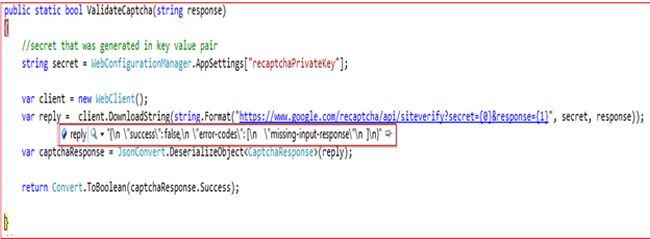
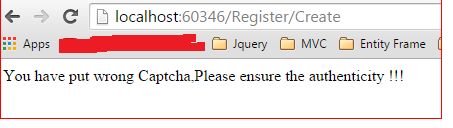
If you don't check the checkbox prefix to the message “I'm not a robot” and press Enter. It goes to the code and verifies the authenticity and it returns false. It means you are not a valid user.
authenticity
valid user
Please find the source code as an attachment.
Integration of Google ReCaptcha with MVC4 Application - Running Application.
I hope it will help to resolve your issue.


Thanks.

Wednesday, July 8, 2015

Fetching the html content of an iframe using JQuery

Fetching the html / Text content of an tinymce editor in iframe using JQuery

Today I confronted a situation when I needed to get the value of a specific control like “tinyMCE”. Initially I struggled to fetch value however later succeeded to get value.

and this is how I get the value and made it easy for further execution.


This is how TinyMCE looks like in MVC as depicted below on a MVC page.

image

The declaration of tinyMce on .cshtml page is defined as :


@Html.EditorFor(“textTiny”, “tinymce_full_compressed”);

image

There are two ways to get the desired information:

$('#txtTest_ifr').contents().find('#tinymce').html();

$('#txtTest_ifr').contents().find('#tinymce').Text();


image


However this is very concise in manner but will be fruitful in use.


Thanks
Saturday, July 4, 2015

NuGet Package Manager Error : Could not connect to the feed specified at ‘https://nuget.org/api/v2

Today I encountered an error while I was trying to add a reference for newtonSoft.JSON from the NuGet Package Manager of Visual Studio 2010. Initially, I struggled and attempted various ways to resolve this and finally succeeded in resolving this. Please use this approach to resolve such NuGet errors.


I encountered an error as given below:
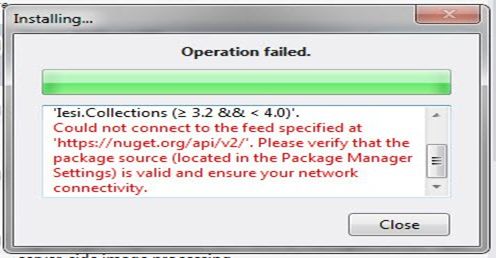
Could not connect to the feed specified at "https://nuget.org/api/v2/"'. Please verify that the package source (located in the Package Manager Settings) is valid and ensure your network connectivity.
your network connectivity


There are a few steps recommended to resolve an error as shown below:

Could not connect to the feed specified at ‘https://nuget.org/api/v2/&#8217;. Please verify that the package source (located in the Package Manager Settings) is valid and ensure your network connectivity.

In order to resolve an error I made certain changes as shown below;

Step1 . Open file devnev.exe.config placed at C:\Program Files (x86)\Microsoft Visual Studio 10.0\Common7\IDE

Step2. Take a backup of this file.

Step3 . Open this file and find system <System.Net> </System.Net> ,which you may see at bottom of this file.

Step4 . Add the following segment into <System.net> as depicted below:

  1: <system.net>
  2:     <settings>
  3:       <servicePointManager expect100Continue="false" />
  4:       <ipv6 enabled="true"/>
  5:     </settings>
  6:     <defaultProxy useDefaultCredentials="true" enabled="true">
  7:       <proxy usesystemdefault="True"/>
  8:     </defaultProxy>
  9: </system.net>

Step5. Save and Close this file.

Step6: Reopen Visual Studio 2010.
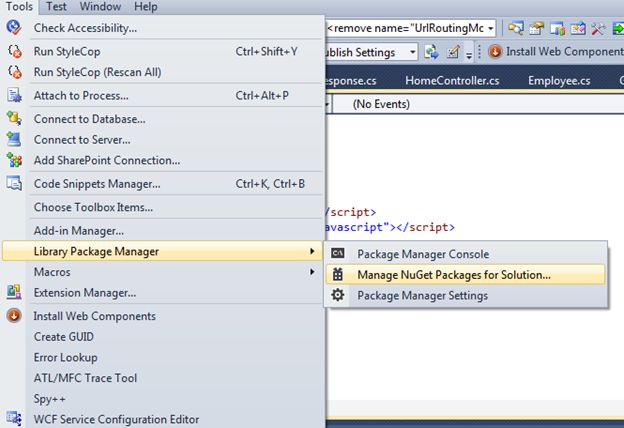
Step7: For finding the package, first we need to open the Package Manager Console. We can open it as in the following:


  • From the Tools menu.
  • Select "Library Package Manager".
  • Then select "Manage NuGet Packages for Solution".
    Manage NuGet Packages for Solution 
  • Open the NuGet Package Manager and type your desire file name, for examle I specified NewtonSoft.Json.
    NuGet package manager

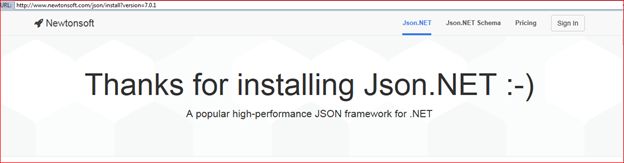
As soon as you have succeeded in downloading, a welcome message page is shown as in the following:


succeeded to download


Hope it will help to resolve your issue.

Thanks

To know more MVC and WebApi Kindly go through with these links

MVC Articles & WCF and WebAPI

Friday, July 3, 2015

AngularJS - Basic Application Life Cycle

AngularJS - Basic Application Life Cycle

In the article I will tell you how to work on AngularJS.
I’ve designed a program in which you will get familiar with few words which you may be confronting in coming days. Those keywords are shown  in the following article::
Component of Angular Description
image

I’ve created an html page as View and named it BasicAngularApp.html, which keeps r ference of an Angular.min.js file. You can download and add to you solution as well.
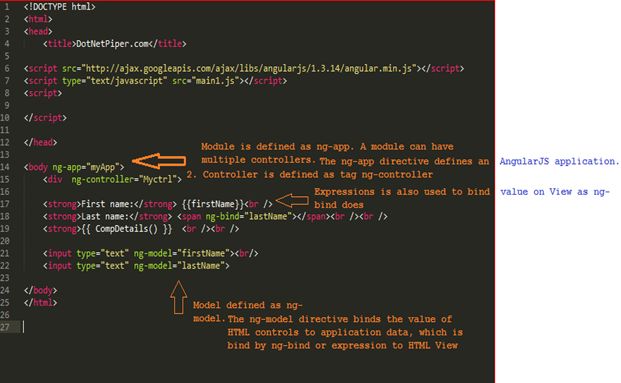
As a newbie to AngularJS, you must be familiar with few main keywords which you will be using in an application:
  • ng-app: This directive ng-app tells that this element is the "owner" of an AngularJS application.
  • ng-model: This directive ng-model binds the value of the input field to the application variable firstName.
  • ng-bind: This directive ng-bind binds the innerHTML of the specific element to the application variable firstName.

  • element to the application
      1: <!DOCTYPE html>  
      2: <html>  
      3:     <head>  
      4:         <title>DotNetPiper.com</title>  
      5:         <script src="http://ajax.googleapis.com/ajax/libs/angularjs/1.3.14/angular.min.js"></script>  
      6:         <script type="text/javascript" src="main1.js"></script>  
      7:         <script></script>  
      8:     </head>  
      9:     <body ng-app="myApp">  
     10:         <div ng-controller="Myctrl">  
     11:             <strong>First name:</strong> {{firstName}}  
     12: 
     13:             <strong>Last name:</strong>  
     14:             <span ng-bind="lastName"></span>  
     15:             <strong>{{ CompDetails() }} </strong>  
     16:             <input type="text" ng-model="firstName"></input>  
     17:             <input type="text" ng-model="lastName"></input>  
     18:         </div>  
     19:     </body>  
     20: </html>  
     21: 
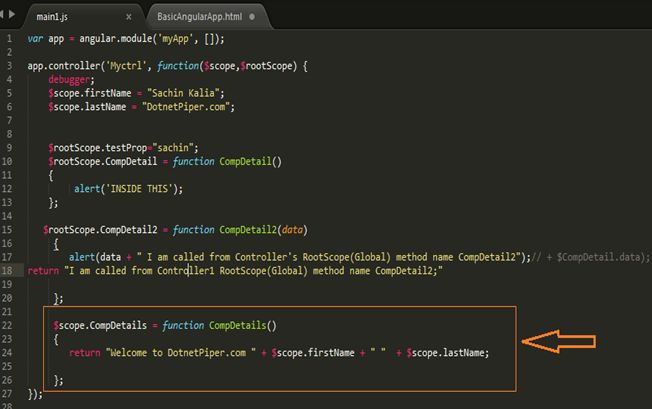
In the code segment shown above, there is <strong>{{ CompDetails() }} <br /><br />. This code calls function CompDetails defined in controller Myctrl. As soon as this line executes it goes to the controller and performs the required actions.
Please refer the following image:
code
Code segment for main1.js

  1: var app = angular.module('myApp', []);  
  2: 
  3: app.controller('Myctrl', function($scope,$rootScope) {  
  4:     debugger;  
  5:     $scope.firstName = "Sachin Kalia";  
  6:     $scope.lastName = "DotnetPiper.com";  
  7: 
  8: 
  9:     $rootScope.testProp="sachin";  
 10:     $rootScope.CompDetail = function CompDetail()  
 11:     {  
 12:          alert('INSIDE THIS');  
 13:     };  
 14: 
 15:    $rootScope.CompDetail2 = function CompDetail2(data)  
 16:      {        
 17:         alert(data + " I am called from Controller's RootScope(Global) method name CompDetail2");// + $CompDetail.data);
 18: return "I am called from Controller1 RootScope(Global) method name CompDetail2;"
 19: 
 20:      };  
 21: 
 22:      $scope.CompDetails = function CompDetails()  
 23:      {  
 24: return "Welcome to DotnetPiper.com " + $scope.firstName + " "  + $scope.lastName;  
 25: 
 26:      };  
 27: });  
 28: 


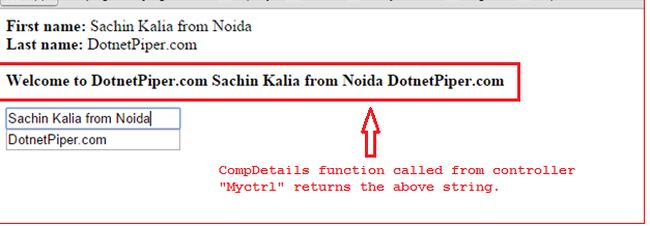
As soon as you run BasicAngularApp.html it shows you result as shown in the following pic:
result
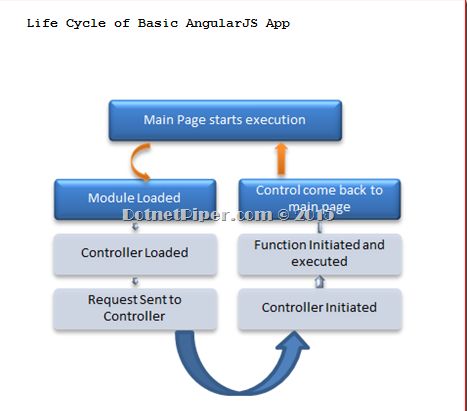
If you notice the image, it has main1.js shown above, we’ve set some value to $scope.firstName and $scope.lastName which is returned by the function at the bottom of main.js file. Scope is the glue between application controller and the view, and somewhere it shows two ways binding (my understanding). As soon as you change the value of input type it updates the application data and for the same reason CompDetails function returns updated value. Kindly have a look on the Life cycle of Basic application as depicted in the following image:
Basic Angular App

You can download sample application from here AngularJS - Basic Application Life Cycle
Hope it’ll help you some day.
Enjoy MVC and Routing.
Kindly inform me if you faced any query