Saturday, April 16, 2016

Ensure that HttpConfiguration.EnsureInitialized() is called in the application's startup

This error prompts you when you forget to initialize the apllication startup to fix this problem kindly use the given below line and add it under global.asax file of solution.

   GlobalConfiguration.Configuration.EnsureInitialized();

image

This is the complete stack trace which comes when you run an application.

<Error>
<Message>An error has occurred.</Message>
<ExceptionMessage>
The object has not yet been initialized. Ensure that HttpConfiguration.EnsureInitialized() is called in the application's startup code after all other initialization code.
</ExceptionMessage>
<ExceptionType>System.InvalidOperationException</ExceptionType>

<StackTrace>
at System.Web.Http.Routing.RouteCollectionRoute.get_SubRoutes() at System.Web.Http.Routing.RouteCollectionRoute.GetRouteData(String virtualPathRoot, HttpRequestMessage request) at System.Web.Http.WebHost.Routing.HttpWebRoute.GetRouteData(HttpContextBase httpContext)
</StackTrace>

</Error>

Hope it will sort out your issue.

Learn more about MVC and WebApi :

http://www.dotnetpiper.com/search/label/MVC

http://www.dotnetpiper.com/search/label/WCF%20and%20WebAPI

Tuesday, April 12, 2016

Explore Persistence Caching In Web API Using CacheCow.Server.EntityTagStore.SqlServer

Concert crowd

In the previous post Apply Caching in Web API Using CacheCow, I have shared about apply caching in-memory using CacheCow and its benefits. In the continuation of that post I’ll sharethoughts about persistence caching and its implementation. Caching always plays vital role when we have very frequent request model to server to fetch the data. Caching helps to reduce frequent hits to server and brings potential information in a minimal duration. Caching also helps to enhance Web API performance and reduce the load on server where Web API is hosted? EntityTag is an HttpHeader used for cache conditional request for resource.EntityTag is also pronounced as ETag.

Let’s take a simple example which uses ETag like “Client sends a request to Http server with Etag value that holds an updated value for cached resource, server identifies this with ETag value whether client has an already updated value for resource or it should revert with a latest copy back to client.

ETag working behavior and implementation

This section elaborates about ETag and its working behavior. Actually ETag is a string representation which is created by server against each request for a resource and also varies as value is updated for resource. For example,

Initially client sends a request http://localhost:57888/api2/employees/getdetails/5 to server and ask for employeeId 5, as per initial request it won’t be cached and server will return the fresh copy of the requested resource with some ETag value. We’ll see this in illustration down the level of this article. Later client send the same request to server with header If-None-Matchalong with ETag value which client has received in body response of earlier (e.g. TR6truy7) request If server finds equal ETag value for the requested resource than server responds Http not modified otherwise server will respond with new ETag value. Header “If-None-Match” works only with HttpGet and HttpDelete.

Installation of SqlServerEntityTagStore

HttpGet and HttpDelete works in similar manner. ThoughHttpPut works slightly in different nature. For this purpose we’ve to install “CacheCow.Server.EntityTagStore.SqlServer” from NuGet manager. Right click on solution and choose manage NuGet Manager.

Manager

Type CacheCow.Server.EntityTagStore.SqlServer in search, the following window will appears shown below. Click on install button.

install

Install of CacheCow library: Click on install button as show on above screen. As soon as you install the CacheCowlibrary you will findCacheCow.Server.EntityTagStore.SqlServer.dllin solution explorer under reference folder as depicted in screen below:

reference

Once the installation has done, we need to register CacheCowSQlServerEntitytagStore handler in WebApiConfig.cs file like shown below in depicted image.

installation

  1. //Configure HTTP Caching SqlServerEntityTagStore using Entity Tags
  2. varconnString = System.Configuration.ConfigurationManager.ConnectionStrings["CacheCowConnectionString"].ConnectionString; 
  3. vareTagStore = new CacheCow.Server.EntityTagStore.SqlServer.SqlServerEntityTagStore(connString); 
  4. varcacheCowCacheHandler = newCacheCow.Server.CachingHandler(config,eTagStore,""); 
  5. cacheCowCacheHandler.AddLastModifiedHeader = false; 
  6. config.MessageHandlers.Add(cacheCowCacheHandler); 

You can read more about how does handler works in ASP.NET Web API from here: Global and Per-Route Handler in Asp.Net WebApi

Once we are have done with installation and code segment placing, next step is to execute the following database script placed under {ProjectPath}\packages\CacheCow.Server.EntityTagStore.SqlServer.1.0.0\scripts.Onceexecute the database script there will be a table dbo.CacheState and 6 procedures as shown in depicted image below:

procedures

Each procedure works in different manner. Now I’ll perform PUT HTTP PUT request to understand how persistence caching works does.

We will see this complete step by step process to understand this here. I’m using fiddler for this purpose.

Step 1: Send the Initial request using Postman as shown below and press send button:

send

Response from server as given below in screen shot:

server

As soon as you receive a response for the latest request sent by client, there will be an entry relevant to resource in CacheState table exist in database as shown below in screen shot, and which is self-explanatory.

explantory

Step 2:
We will utilize this recently received ETag value for further communication in order to update the record using HTTP PUT verb.

Note
:
Kindly send If-Match parameterin header of request to update the resource. Kindly refer the image shown below: If- Match has the value "07aa73fe997d4c199f9b4774007778ac" which is sent by the server in last request.

CacheState
The status 200 means resource has updated .

Step 3:
In these steps the main objective is to identify that, does client has the latest copy of resource or not, which client is willing to update. So send the new request using the ETag value (not latest one) received in some old response. In short If the ETag value doesn’t match with the ETag value persist in database than will revert precompiled condition issue in response .Which means that client doesn’t have the latest copy to update the resource. So please get the latest copy of resource(Using HTTP GET) before sending the update request. Kindly refer the image shown below:

request

If I use the latest Etag value than it works fine and update the value.
done

Caching plays a vital role where client sends very frequent request for a resource. CacheCow one of the good providers to maintain caching in solution though there are lots of other variants exist. It is simple in use easy to install and works very effectively. The one fall point which I realized is that you have to keep the updated value of specific ETag sent by server response for each request

You can download the source code from link given below: 

Explore Persistence Caching In Web API Using CacheCow.Server.EntityTagStore.SqlServer

Learn more about MVC and WebApi :

http://www.dotnetpiper.com/search/label/MVC

 http://www.dotnetpiper.com/search/label/WCF%20and%20WebAPI

Saturday, April 9, 2016

The request contains an entity body but no Content-Type header
The Simple solution for such issue is please put “ Content-Type: application/json; charset=utf-8” in request.
Kinldy find a screen shot given below for reference:
image
Please refer www.dotnetpiper.com

Friday, April 8, 2016

Attribute Routing in ASP.NET Web API 2

Attribute Routing in ASP.NET Web API 2

Concert crowd

In the last article we’ve seen how can we inject multiple parameters to Web API method the same can be achieve using route attribute in Web API. Though there were little challenges which I will also describe in this article which may reduce your development time for sure. Excerpt from asp.net about routing,
"Routing is how Web API matches a URI to an action. Web API 2 supports a new type of routing, called attribute routing. As the name implies, attribute routing uses attributes to define routes. Attribute routing gives you more control over the URIs in your web API. For example, you can easily create URIs that describe hierarchies of resources.The earlier style of routing, called convention-based routing, is still fully supported. In fact, you can combine both techniques in the same project".

The website also stated why Attribute Routing is required,
"The first release of Web API used convention-based routing. In that type of routing, you define one or more route templates, which are basically parameterized strings. When the framework receives a request, it matches the URI against the route template. One advantage of convention-based routing is that templates are defined in a single place, and the routing rules are applied consistently across all controllers".

Enabling Attribute Routing
To enable attribute routing, call MapHttpAttributeRoutes during configuration. This extension method is defined in the System.Web.Http.HttpConfigurationExtensions class. Kindy have a look at the code shown below as well as an image depicted below:

  1. namespace WebApiDemo 
  2.     public static class WebApiConfig 
  3.     { 
  4.         public static void Register(System.Web.Http.HttpConfiguration config) 
  5.         { 
  6.             config.MapHttpAttributeRoutes(); 
  7.             config.Routes.MapHttpRoute( 
  8.                 name: "DefaultApi", 
  9.                 routeTemplate: "api/{controller}/{action}/{id}", 
  10.                 defaults: new
  11.                 { 
  12.                     id = RouteParameter.Optional 
  13.                 } 
  14.             ); 
  15.         } 
  16.     } 

Here, I’ve a simple controller Employees which has the following Action Methods defined below and performs a set of statement like fetch a record from collection.GetDetails() action method takes one parameter and has its own specific routes while GetEmployeeByID() action method takes two parameters as arguments and has its own defined route.
GetDetails

  1. [Route("api/{employees}/{id}")] 
  2. public Employee GetDetails(int id) 
  3. return listEmp.First(e => e.ID == id); 

GetEmployeeByID

  1. [HttpGet] 
  2. [Route("api/{employees}/{id}/{userName}")] 
  3. [ActionName("GetEmployeeByID")] 
  4. public Employee Get(int id, string userName) 
  5. return listEmp.First(e => e.ID == id); 
  6.     SqlDataReader reader = null; 
  7.     SqlConnection myConnection = newSqlConnection(); 
  8.     myConnection.ConnectionString = @ "Server=.;Database=DBCompany;User ID=sa;Password=db@1234;"; 
  9.     SqlCommand sqlCmd = newSqlCommand(); 
  10.     sqlCmd.CommandType = CommandType.Text; 
  11.     sqlCmd.CommandText = "Select * from tblEmployee where EmployeeId=" + id + ""; 
  12.     sqlCmd.Connection = myConnection; 
  13.     myConnection.Open(); 
  14.     reader = sqlCmd.ExecuteReader(); 
  15.     Employee emp = null; 
  16. while (reader.Read()) 
  17.     { 
  18.         emp = new Employee(); 
  19.         emp.EmployeeId = Convert.ToInt32(reader.GetValue(0)); 
  20.         emp.Name = reader.GetValue(1).ToString(); 
  21.         emp.ManagerId = Convert.ToInt32(reader.GetValue(2)); 
  22.     } 
  23. return emp; 
  24.     myConnection.Close(); 
  25. } 

I run my application and verify that whether API is up or not. Kindly find given below image to identify this.
api
It shows API is running and ready to perform some action. Along with this I’ve Postman running aside where I paste the specific url. which meets the requirement as shown below:
normal
As soon as I click on the Send button it will go to the respective controller’s action to execute set of statements. This is the best benefits of Attribute routing is you can set any route as per you convenient. Like in the above URl there is no action method defined still it finds the right action method.This type of URI is difficult to create using convention-based routing(traditional routing model). Although it can be done, the results don’t scale well if you have many controllers or resource types
The output will be like given image shown below:
output
The same way you would have action which takes multi arguments than you can set the Attribute routing in such a way in below code segment.it makes it simple to understand and easily to execute.

  1. [HttpGet] 
  2. [Route("api/{employees}/{id}/{userName}")] 
  3. [ActionName("GetEmployeeByID")] 
  4. public Employee Get(int id, string userName) 
  5. }

I run an application again and verify that whether API is up or not. Kindly find given below image to identify this.
api
It shows API is running and ready to perform some action. Along with this I’ve Postman running aside where I paste the specific url (http://localhost:57888/api/employees/4/SachinKalia) which meets the requirement as shown below:
api
As soon as user click on send button it should reach to anticipated action method.
code
And the output will be like given below:
body
Attribute routing makes things easy and can create complex route in simpler way.
way
However there islittle issue which I confronted and would like to share with you. If you create route in such a way, that keeps parameter {controller} like in following route[Route("api/{controller}/{id}")]it prompts an error like “A direct route cannot use the parameter 'controller'. Specify a literal path in place of this parameter to create a route to a controller”. In simple words it should be a literal value.it throws same issue if you keep parameter {action} in route.
code
code
Which may consume your potential time during development?
way
Kindly add the following line in Global.asax file to initialize object as give below:

  1. GlobalConfiguration.Configuration.EnsureInitialized();  

If you don’t put this line in Global.asax file it throws an error as given below in screen shot.
code

Reference

You may downlaod the code from the given link here : Attribute Routing in ASP.NET Web API 2

Wednesday, April 6, 2016

Inject Multiple Arguments To A Web API Method

Inject Multiple Arguments To A Web API Method

Concert crowd

There can be various scenarios when you may have to pass multiple arguments in a Web API get method. Though there might be a few more ways, I have used the default configuration mapping which I am sharing here in this article.
We should pass arguments as additional parameters. It is especially easy with GET requests. This will work in Web API 1 & 2:
Here, I have a simple controller Employee which has the following Action Method defined below and performs a set of statements such as fetch a record from collection. GetEmployeeByID method takes two parameters as arguments.

  1. [ActionName("GetEmployeeByID")]   
  2. public class EmployeesController: ApiController   
  3. {   
  4.     public Employee Get(int ? id = null, string userName = null)   
  5.     {   
  6.         return listEmp.First(e => e.ID == id);   
  7.     }   

For this purpose, I have the following routing which is placed in WebApiConfig.cs as shown below in depicted image,
code

  1. public static void Register(System.Web.Http.HttpConfigurationconfig)    
  2. {   
  3.     config.Routes.MapHttpRoute(name: "DefaultApi", routeTemplate: "api/{controller}/{action}/{id}", defaults: new
  4.      {   
  5.         id = RouteParameter.Optional   
  6.     });   

I run my application and verify whether API is up or not. Kindly find the given below image to identify this.
asp.net
It shows the API is running and ready to perform some action. Along with this I have Postman running on the side where I paste the specific url which meets the requirement as shown below,
postman
As soon as I click on the Send button it will go to the respective controller’s action to executea  set of statements. The image depicted below shows that username argument has the value “Sachin Kalia”. In the same way, you can utilize such value at action level.
code
The output will be like given image shown below,
output
Note: Suppose you would like to get output in XML form instead of JSON, You just need to add header value in a request.
A simple example to receive output in a different form: Click on Headers button on the right side of Postman client screen. The following window will appear as shown below and fill the required details likeAccept: Application/xml in headers part.
postman
As soon as the user clicks on send button it should respond to the request in XML form as shown in below image.
postman
This is the sample code segment which fetches records from database and responds in WebAPi response form as shown below,

  1. [HttpGet]   
  2. // [Route("api/{employees}/{id}/{userName}")] 
  3. [ActionName("GetEmployeeByID")]   
  4. publicEmployee Get(int id, stringuserName)   
  5. {   
  6.     returnlistEmp.First(e => e.ID == id);   
  7.     SqlDataReader reader = null;   
  8.     SqlConnectionmyConnection = newSqlConnection();   
  9.     myConnection.ConnectionString = @ "Server=.;Database=DBCompany;User ID=sa;Password=Tpg@1234;";   
  10.     SqlCommandsqlCmd = newSqlCommand();   
  11.     sqlCmd.CommandType = CommandType.Text;   
  12.     sqlCmd.CommandText = "Select * from tblEmployee where EmployeeId=" + id + "";   
  13.     sqlCmd.Connection = myConnection;   
  14.     myConnection.Open();   
  15.     reader = sqlCmd.ExecuteReader();   
  16.     Employeeemp = null;   
  17. while (reader.Read())   
  18.     {   
  19.         emp = newEmployee();   
  20.         emp.EmployeeId = Convert.ToInt32(reader.GetValue(0));   
  21.         emp.Name = reader.GetValue(1).ToString();   
  22.         emp.ManagerId = Convert.ToInt32(reader.GetValue(2));   
  23.     }   
  24.     returnemp;   
  25.     myConnection.Close();   
  26. } 

This is one of the possible ways of doing this. In the next article we can achieve the same thing in a more linear fashion using Route Attribute.

Monday, April 4, 2016

Concert crowd
Hi Folks,
If you want to access the ModelState property in the View , you can use the ModelState in your Razor View as depicted below in image:

This is the source code as shown below:
  1. @model IEnumerable<MVCSample.Models.EmpRegistration> 
  2. @{ 
  3.     ViewBag.Title = "Verify"; 
  4. if (@ViewContext.ViewData.ModelState.IsValid) 
  5.     { 
  6.         ViewBag.Title = "Verify"; 
  7. if (TempData["EmployeeRegistration"] != null) 
  8.         { 
  9.             var tempDataEmployeeRegistration = TempData["EmployeeRegistration"]; 
  10.         } 
  11.     } 
    Thanks
To learn more about MVC please go to the following link.
MVC Articles
Thanks.
Enjoy coding and reading.

Thursday, January 7, 2016

Function Hoisting in JavaScript

Function Hoisting in JavaScript

clip_image001

Function hoisting is one of the fundamental point to understand in Java Script.I found it key point to understand shared my understanding on this :

Here I have a function defined below :

1: var x = 1234;

2: (function verify() {

3: document.write(x);

4: })();

When I run this code snippet it displays value as 1234 as an output.

However when I make any amendments to this function and create a variable x with some different value it still displays an output “undefined” value:

1: var x = 1234;

2: (function verify() {

3: document.write(x);

4: var x =4444;

5: })();

clip_image002l

This is because of JavaScript interpreter treats it in little different manner cause to function hoisting.so what is function hoisting ?

Hoisting ==> Initialization is not hoisted only declaration is hoisted on the top of function means variable are defined at the top of the function but not initialize value.Hoisting actually mean “Move from one place to another by lifting”.

Declaration

var x; // the declaration

Initialization

x= 4444; // the initialization

The above given code would be treated like this at runtime as shown below:

1: var x = 1234;

2: (function verify() {

3: var x;

4: document.write(x);

5: x = 4444;

6: })();

if you notice in above code, only variable x declaration (var x; ) is at the top of function Verify() though an assignment or initialization of value is just below to document.write(x); This is the only reason it displays undefined as x doesn’t have any value.

Hope it will help you to understand hoisting.

Thanks

Monday, November 30, 2015

Demystify Web API Versioning

Demystify Web API Versioning

Concert crowd
Since technology is evolving every day, you may have the opportunity to upgrade your existing business needs and this tutorial is about WebApi Versioning using Routing. Once you have published a successful API, the client/consumers will start depending on it, but change is required as business grows. Requirements are being changed every day and here the idea occurred to me to create a new API without tampering with an existing one. There are various ways to do this, like URL, Custom header, Query String and Accept Header.
Web API Versioning using URI:
First, I will cover WebApi versioning using an URL in this section before proceeding. I’d like to share one of the possible situations when you may need this. So let’s dive into it in a practical way.
You might have a situation in which you already have a running WebApi hosted on a server and plenty of end users are getting its benefits. For an example, here the current API is returning a response in JSON format as shown below:
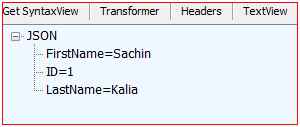
JSON format
Down the line, the customer may desire to have a few more things without messing with the existing one. After considering a new requirement, the client needs a few more fields from the same API to maintain their policies at the business level, so now we can consider a new version of the API with a few more fields like City and Gender in employee in response as depicted below:
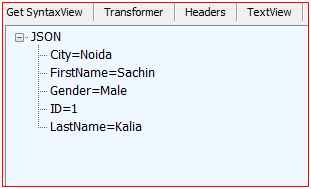
response as depicted
To do this we’ll set a new route for the new version of the WebApi Version number in the URI, considering the most common way of versioning so we can consume a resource by callinghttp://localhost:57888/api/v1/Employees/FetchEmployeeById/1 (the client wants to use version 1 of the API) or http://localhost:57888/api/v2/employeesv2/FetchEmployeeById/1 (the client wants to use version 2 of the API).
To implement this we need to add two new routes inside the Register method in the “WebApiConfig” class as in the code below:
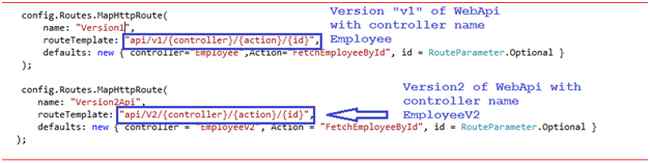
code
Notice in the code shown previously there are two new routes and mapped each route with its corresponding controller. In other words, the Route named “Version1? is by default mapped to the controller “Employees? and the Route named “Version2Api” is mapped to the Controller EmployeesV2.
Assume we want to add a new version, V3, of the existing WebApi. Then we need to add a new route to WebApiConfig.cs and so on.
Before proceeding I’d like to share how WebApi selects an appropriate controller from the current request. There is a class DefaultHttpControllerSelector that has the method SelectController, that method has the parameter HttpRequestMessage to maintain the information of route data including controller name defined in the class WebApiConfig. Based on this information it fetches the controller/classes collection using reflection derived from the ApiController base class.
The following is a code snippet for CustomControllerSelector:

  1: public class CustomControllerSelector : DefaultHttpControllerSelector
  2: {
  3:     private HttpConfiguration _config;
  4:     public CustomControllerSelector(HttpConfiguration config)
  5:         : base(config)
  6:     {
  7:         _config = config;
  8:     }
  9: 
 10:     public override HttpControllerDescriptor SelectController(HttpRequestMessage request)
 11:     {
 12:         try
 13:         {
 14:             var controllers = GetControllerMapping();
 15:             var routeData = request.GetRouteData();
 16: 
 17:             var controllerName = routeData.Values["controller"].ToString();
 18: 
 19:             HttpControllerDescriptor controllerDescriptor;
 20: 
 21:             if (controllers.TryGetValue(controllerName, out controllerDescriptor))
 22:             {
 23:                 return controllerDescriptor;
 24:             }
 25:             return null;
 26:         }
 27:         catch (Exception ex)
 28:         {
 29:             throw ex;
 30:         }
 31: 
 32:     }
 33: }
 34: 
Add “CustomControllerSelector” to WebApiConfig.cs to get its benefit as shown below:

  1. config.Services.Replace(typeof(IHttpControllerSelector), new CustomControllerSelector((config))); 

Code snippet for Version v1
Kindly find the code below for the EmployeesController class and Employee Model class that represent version v1 of the WebApi as shown below:

  1: public class EmployeesController : ApiController
  2: {
  3:     public static IList<Employee> listEmp = new List<Employee>()  
  4:     {  
  5:         new Employee()  
  6:                 {  
  7:                     ID =001, FirstName="Sachin", LastName="Kalia"
  8:                 },  
  9:         new Employee()  
 10:                 {  
 11:                     ID =002, FirstName="Dhnanjay" ,LastName="Kumar"
 12:                 },  
 13:         new Employee()  
 14:                 {  
 15:                     ID =003, FirstName="Ravish", LastName="Sindhwani"
 16:                 },  
 17:         new Employee()  
 18:                 {  
 19:                     ID =004, FirstName="Rahul" ,LastName="Saxena"
 20:                 },  
 21:     };
 22: 
 23:     [AcceptVerbs("GET")]
 24:     public Employee FetchEmployeeById(int id)
 25:     {
 26:         return listEmp.First(e => e.ID == id);
 27:     }
 28: }
 29: 
 30: public class Employee
 31: {
 32:     public int ID { get; set; }
 33:     public string FirstName { get; set; }
 34:     public string LastName { get; set; }
 35: 
 36: }
 37: 
To test this please press F5 and run you WebApi.
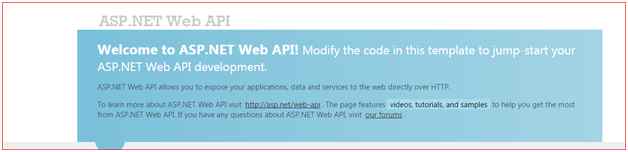
WebApi
To test this we need to issue a GET request using the Web Proxy tool Fiddler as in the image below. Kindly copy and paste the following URL that specifies version v1:
http://localhost:57888/api/v1/Employees/FetchEmployeeById/1
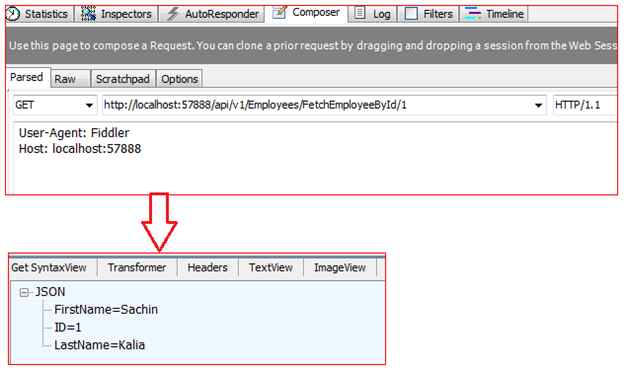
GET request using Web Proxy tool
Code snippet for Version v2
Kindly find the code below for the EmployeesV2Controller class and EmployeeV2 Model class that specifies version v2 of the WebApi:
      1: public class EmployeesV2Controller : ApiController
      2: {
      3:     public static IList<EmployeeV2> listEmp = new List<EmployeeV2>()  
      4:     {  
      5:         new EmployeeV2()  
      6:                 {  
      7:                     ID =001, FirstName="Sachin", LastName="Kalia",City="Noida",Gender="Male"
      8:                 },  
      9:         new EmployeeV2()  
     10:                 {  
     11:                     ID =002, FirstName="Dhnanjay" ,LastName="Kumar", City="Gurgaon",Gender="Male"
     12:                 },  
     13:         new EmployeeV2()  
     14:                 {  
     15:                     ID =003, FirstName="Ravish", LastName="Sindhwani", City="indianapolis",Gender="Male"
     16:                 },  
     17:         new EmployeeV2()  
     18:                 {  
     19:                     ID =004, FirstName="Neeraj", LastName="Arora", City="San Francisco",Gender="Male"
     20:                 },  
     21:         new EmployeeV2()  
     22:                 {  
     23:                     ID =005, FirstName="Rahul" ,LastName="Saxena", City="Hydrabad",Gender="Male"
     24:                 },  
     25:         new EmployeeV2()  
     26:                 {  
     27:                     ID =006, FirstName="Anshu" ,LastName="Agarwal", City="Noida",Gender="Female"
     28:                 },  
     29: 
     30:     };
     31: 
     32:     [AcceptVerbs("GET")]
     33:     public EmployeeV2 FetchEmployeeById(int id)
     34:     {
     35:         var coll = listEmp.FirstOrDefault(e => e.ID == id);
     36:         return coll;
     37:     }
     38: }
     39: 
     40: public class EmployeeV2
     41: {
     42:     public int ID { get; set; }
     43:     public string FirstName { get; set; }
     44:     public string LastName { get; set; }
     45:     public string City { get; set; }
     46:     public string Gender { get; set; }
     47: }

Press F5 and run you WebApi.
To test this we need to issue a GET request using the Web Proxy tool Fiddler as in the image below. Kindly copy and paste the following URL that specifies version v2 into the Web Proxy tool Fiddler:
http://localhost:57888/api/v2/employeesv2/FetchEmployeeById/1.
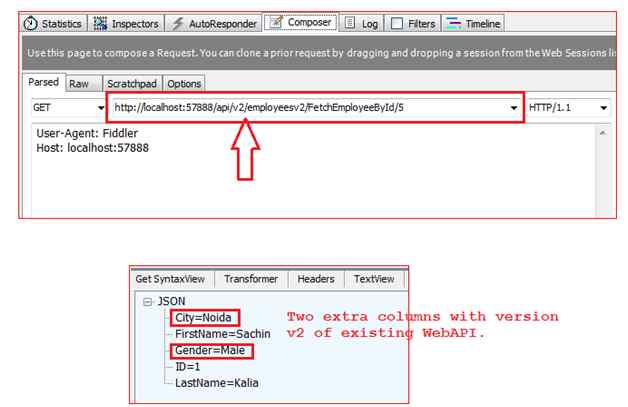
Web Proxy tool
Web API Versioning using QueryString parameter
WebApi versioning with query string parameter is a simple way to this, because everything is dependent on the query string parameter only.
We’ll specify the defined version of the WebApi in the request parameter. Using that parameter the SelectController class will identify which controller I need to call in order to respond to the client.
Added a new method into the existing CustomControllerSelector and made small amendments in the SelectController class as shown below in a code snippet.
      1: public override HttpControllerDescriptor SelectController(HttpRequestMessage request)  
      2: {  
      3:     try  
      4:     {  
      5:         var controllers = GetControllerMapping();  
      6:         var routeData = request.GetRouteData();  
      7:   
      8:         var controllerName = routeData.Values["controller"].ToString();  
      9:         HttpControllerDescriptor controllerDescriptor;  
     10:   
     11:         string versionNum= GetVersionFromQueryString(request);  
     12:   
     13:         if (versionNum == "v1")  
     14:         {  
     15:             if (controllers.TryGetValue(controllerName, out controllerDescriptor))  
     16:             {  
     17:                 return controllerDescriptor;  
     18:             }  
     19:         }  
     20:         else   
     21:         {  
     22:             controllerName= string.Concat(controllerName,"V2");  
     23:             if (controllers.TryGetValue(controllerName, out controllerDescriptor))  
     24:             {  
     25:                 return controllerDescriptor;  
     26:             }  
     27:         }  
     28:   
     29:         return null;  
     30:     }  
     31:     catch (Exception ex)  
     32:     {  
     33:         throw ex;  
     34:     }  
     35: }  
     36:   
     37: /// <summary>  
     38: /// Method to Get Query String Values from URL to get the version number  
     39: /// </summary>  
     40: /// <param name="request">HttpRequestMessage: Current Request made through Browser or Fiddler</param>  
     41: /// <returns>Version Number</returns>  
     42:   
     43: private string GetVersionFromQueryString(HttpRequestMessage request)  
     44: {  
     45:     var versionStr = HttpUtility.ParseQueryString(request.RequestUri.Query);  
     46:   
     47:     if (versionStr[0] != null)  
     48:     {  
     49:         return versionStr[0];  
     50:     }  
     51:     return "V1";  
     52: }  

Press F5 and run you WebApi.
Kindly paste the following URL into Fiddler to verify the working behavior.
http://localhost:57888/api/employees/FetchEmployeeById/2?V2
Kindly have a look at the image shown below:
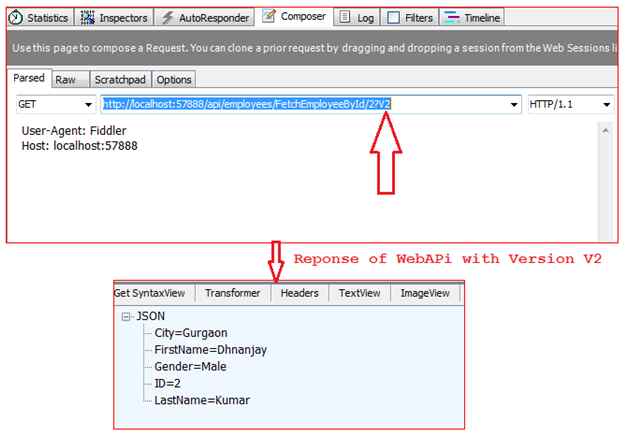
response from WebApi with version
In the same way you can try with:
http://localhost:57888/api/employees/FetchEmployeeById/1?V1
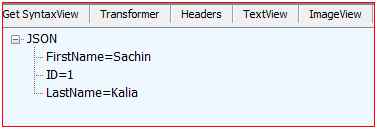
json
Web API Versioning using Custom Header parameter
So far we’ve seen WebApi with the two techniques URL and Query String. The next WebApi versioning techniques with CustomHeader parameter is an easy way to do versioning. For this example we’ve used customHeader Name “Version-Num” that we must send into the current request.
We’ll specify the desired version of the WebApi in the CustomHeader request. Using that parameter the SelectController class will identify the controller I need to call in order to respond to the client.
Added a new method into the existing CustomControllerSelector and made small amendments in the SelectController class as shown below in a code snippet.

  1: /// <summary>  
  2: /// Method to Get Header Values.  
  3: /// </summary>  
  4: /// <param name="request">HttpRequestMessage: Current Request made through        Browser or Fiddler  
  5: </param>  
  6: /// <returns>Version Number</returns>  
  7: private string GetVersionFromHeader(HttpRequestMessage request)  
  8: {  
  9:     const string HEADER_NAME = "Version-Num";  
 10:   
 11:     if (request.Headers.Contains(HEADER_NAME))  
 12:     {  
 13:         var versionHeader = request.Headers.GetValues(HEADER_NAME).FirstOrDefault();  
 14:         if (versionHeader != null)  
 15:         {  
 16:             return versionHeader;  
 17:         }  
 18:     }  
 19:   
 20:     return "V1";  
 21: } 
To test this we need to issue a GET request using Fiddler as in the image below, note how we added the new header “Version-Num” to the request header collection.
Web API Versioning using Accept Header parameterSo far we’ve seen WebApi with the three techniques URL, Query String and CustomHeader.
The next WebApi versioning technique uses an AcceptHeader parameter that is an easy way to do WebApi versioning. For this example we’ve used an Accept Header value Accept: application/json or "Accept: application/xml, that we need to send into the current request.
For this approach we’ve added a new method in the existing CustomControllerSelector and made small amendments in the SelectController class as shown below in a code snippet.

  1: /// <summary>  
  2: /// Method to Get Accept Header Values.  
  3: /// </summary>  
  4: /// <param name="request">HttpRequestMessage: Current Request made through Browser or Fiddler</param>  
  5: /// <returns>Version Number</returns>  
  6: private string GetVersionFromAcceptHeader(HttpRequestMessage request)  
  7: {  
  8:     var acceptHeader = request.Headers.Accept;  
  9:   
 10:     foreach (var mime in acceptHeader)  
 11:     {  
 12:         if (mime.MediaType == "application/json")  
 13:         {                      
 14:             return "V2";  
 15:         }  
 16:         else if (mime.MediaType == "application/xml")  
 17:         {  
 18:             return "V1";  
 19:         }  
 20:         else { return "V1"; }  
 21:   
 22:     }  
 23:     return "V1";  
 24: }  
Note: We are assuming that if the end-user/client doesn’t provide a value then we will consider it to be Version V1. Kindly have a look at the image shown below:
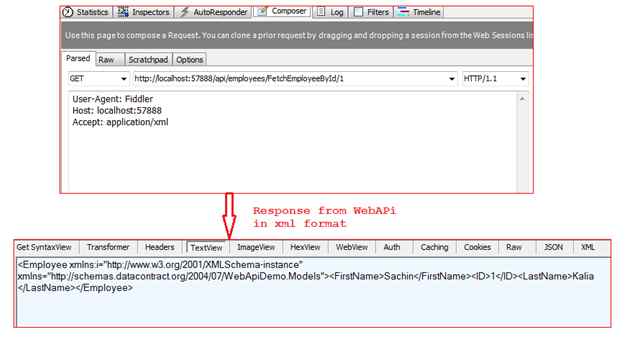
consider the Version V1
Now if we replace Accept: application/xml with application/json then it should respond from WebApi version V2. Kindly have a look at the image shown below:
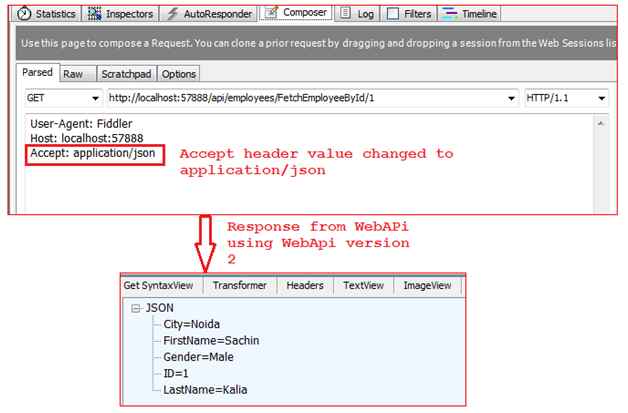
response from WebApi
You can also get more details about the Media Types formatter using the link shown below: 
Note: It might be one of the questions in an interview.

Download source code from here : Demystify Web API Versioning- Source Code